
GraphQL is a Query Language for APIs. It provides a fresh and modern approach to fetching (and manipulating) data from APIs when compared to traditional methods such as REST. Its power comes from the ability to let clients talk to a single endpoint and specify precisely what data they need. That’s very powerful indeed.
This blog post is a hands-on introduction to GraphQL and its important features. When I first encountered GraphQL (we’re switching public REST APIs to GraphQL,) coming from REST background, I was baffled. ‘Where’s the list of API end-points?’, ‘Is the list of fields documented somewhere?’ So I decided to write this article not as a comprehensive overview that deep-dives into internals, but rather to give an understanding of what GraphQL is and how to use it using real examples. It assumes no previous knowledge of GraphQL. Let’s get started.
GraphQL - An Overview
GraphQL - or more specifically - the data query language specification and the runtime for it - was developed by Facebook. It was opened sourced it in 2015, after a few years of internal use at Facebook. What inspired the need for GraphQL? Here’s an excerpt from the Facebook engineering blog:
As we transitioned to natively implemented models and views, we found ourselves for the first time needing an API data version of News Feed — which up until that point had only been delivered as HTML. We evaluated our options for delivering News Feed data to our mobile apps, including RESTful server resources … We were frustrated with the differences between the data we wanted to use in our apps and the server queries they required.
Once you build and expose a REST API, it’s pretty rigid. For example, suppose we have built a News Feed RESTful API which is returning 10 attributes for each item in the news feed. Down the road, you are building a mobile app for low-tier devices that don’t have the screen real-estate to show the news feed in all its glory. So instead of showing all 10 attributes for each news feed item, you resort to showing just 5. This is wasteful because you’re still fetching all 10 attributes. The typical solution would be to go to the RESTful API development (backend) team and ask them to make the fields you are not using optional. But this is not straight-forward because there are other clients out there and you might introduce a breaking change. They could introduce a new version or do something else. But the point I’m trying to illustrate is that the process is not free of friction and is inefficient.
GraphQL solves this exact problem by putting a lot of power in the hands of client developers. The basic premise is that the clients can always describe what data they need. Continuing the Facebook engineering blog post:
There was also a considerable amount of code to write on both the server to prepare the data and on the client to parse it. This frustration inspired a few of us to start the project that ultimately became GraphQL. GraphQL was our opportunity to rethink mobile app data-fetching from the perspective of product designers and developers. It moved the focus of development to the client apps, where designers and developers spend their time and attention.
GraphQL has a strong community behind it that supports many languages including Java, Javascript, C#, Python, etc. It’s used by many companies and teams of all sizes including Facebook, Pinterest, GitHub, Yelp, and many others.
Playing with GraphQL in Browser: GraphiQL
Let’s get hands-on and learn GraphQL by trying it out, thanks to the nice folks at GitHub who have made public their GraphQL APIs. What’s even better is that we don’t need to install any command line tools or do anything special. All you need is a web-browser and a free GitHub account. To run queries on GitHub’s GraphQL, we’ll be using a tool called GraphiQL (pronounciation). Think of it like Swagger for RESTful APIs.
A graphical interactive in-browser GraphQL IDE.
GraphiQL is easy to integrate and is used a lot by teams when working with GraphQL in development and pre-production environments. I use it a lot to explore queries, find issues, etc. before moving on to implementation. Goes without saying, but you shouldn’t enable it on your public servers unless you’re exposing a public API like GitHub.
Alright, without further ado, let’s head over GitHub’s GraphiQL endpoint and open it in a new tab so you can try out the examples. Here’s the link to GitHub GraphQL Explorer. (They have customized the UI a bit but it’s GraphiQL under the hood.)
First GraphQL Query
Type the following query and hit the play button in the top right corner or press Ctrl-Enter to execute the query.
{
  viewer {
    name
    isEmployee
    location
  }
}
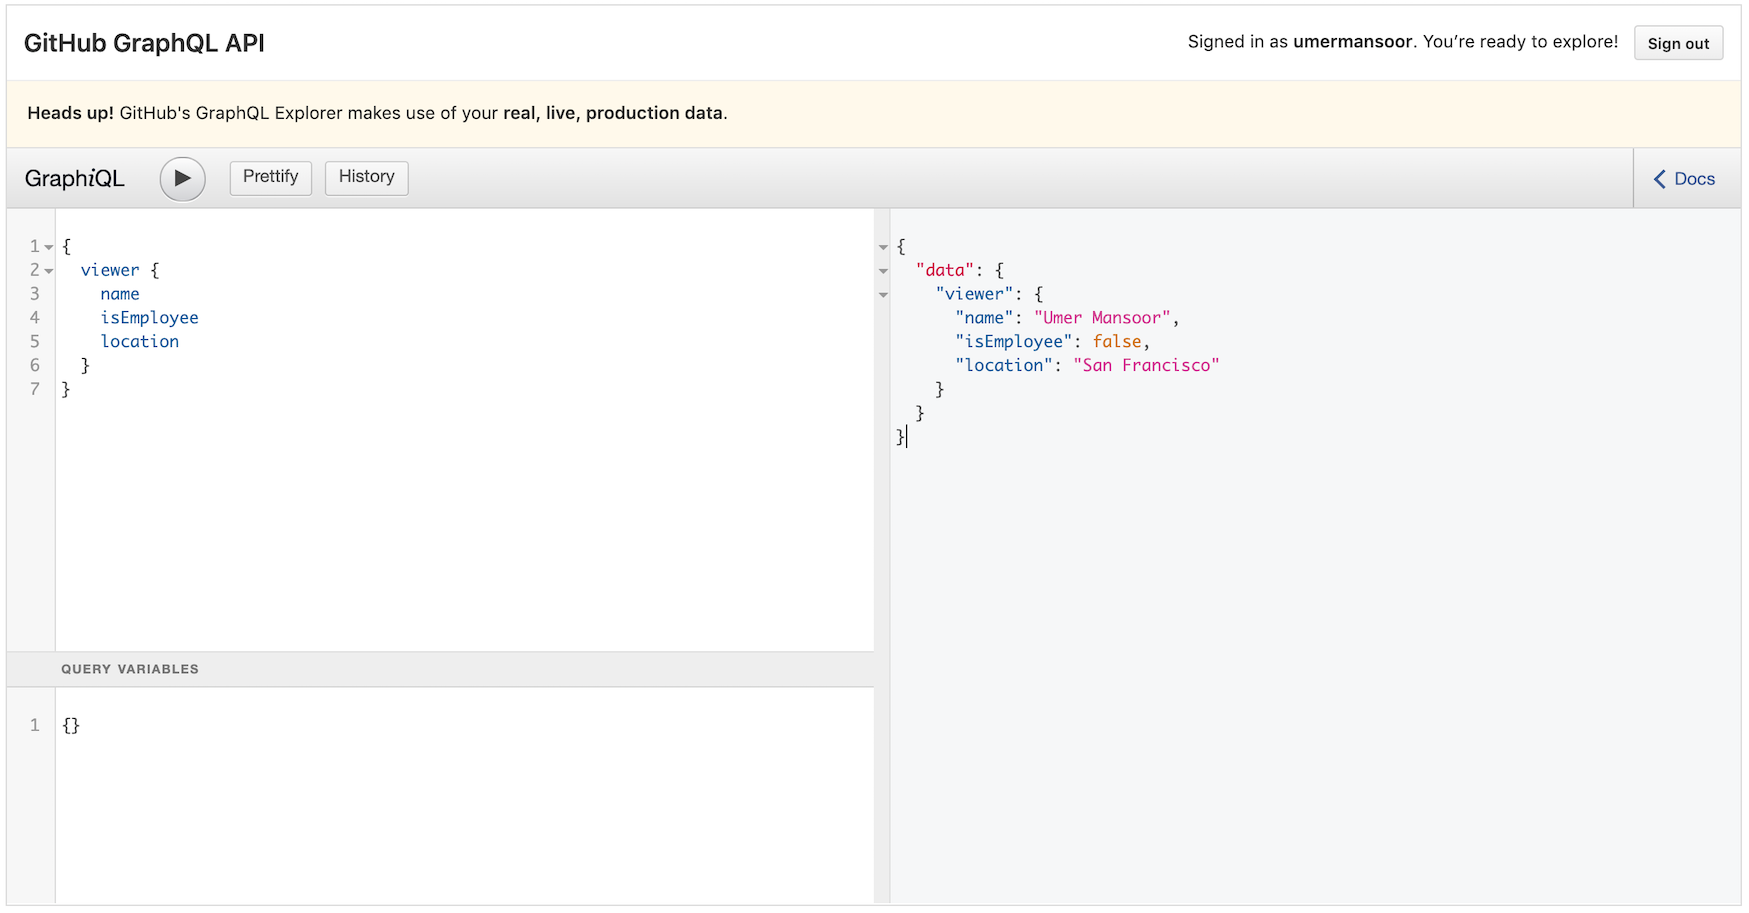
Congratulations! You just ran our first GraphQL query. The data GraphQL returned is in JSON format and has the same shape as the query. This is an important concept in GraphQL: the shape of the response (query result) closely matches the result. The syntax of the query is custom to GraphQL and corresponds to its schema which we’ll explore in the next section.
In the query we just ran, we asked the GraphQL server to return three fields (name etc.) for an object called viewer which represents your GitHub account. We could easily ask for more fields as shown in the example below where I added three new fields to the same query:
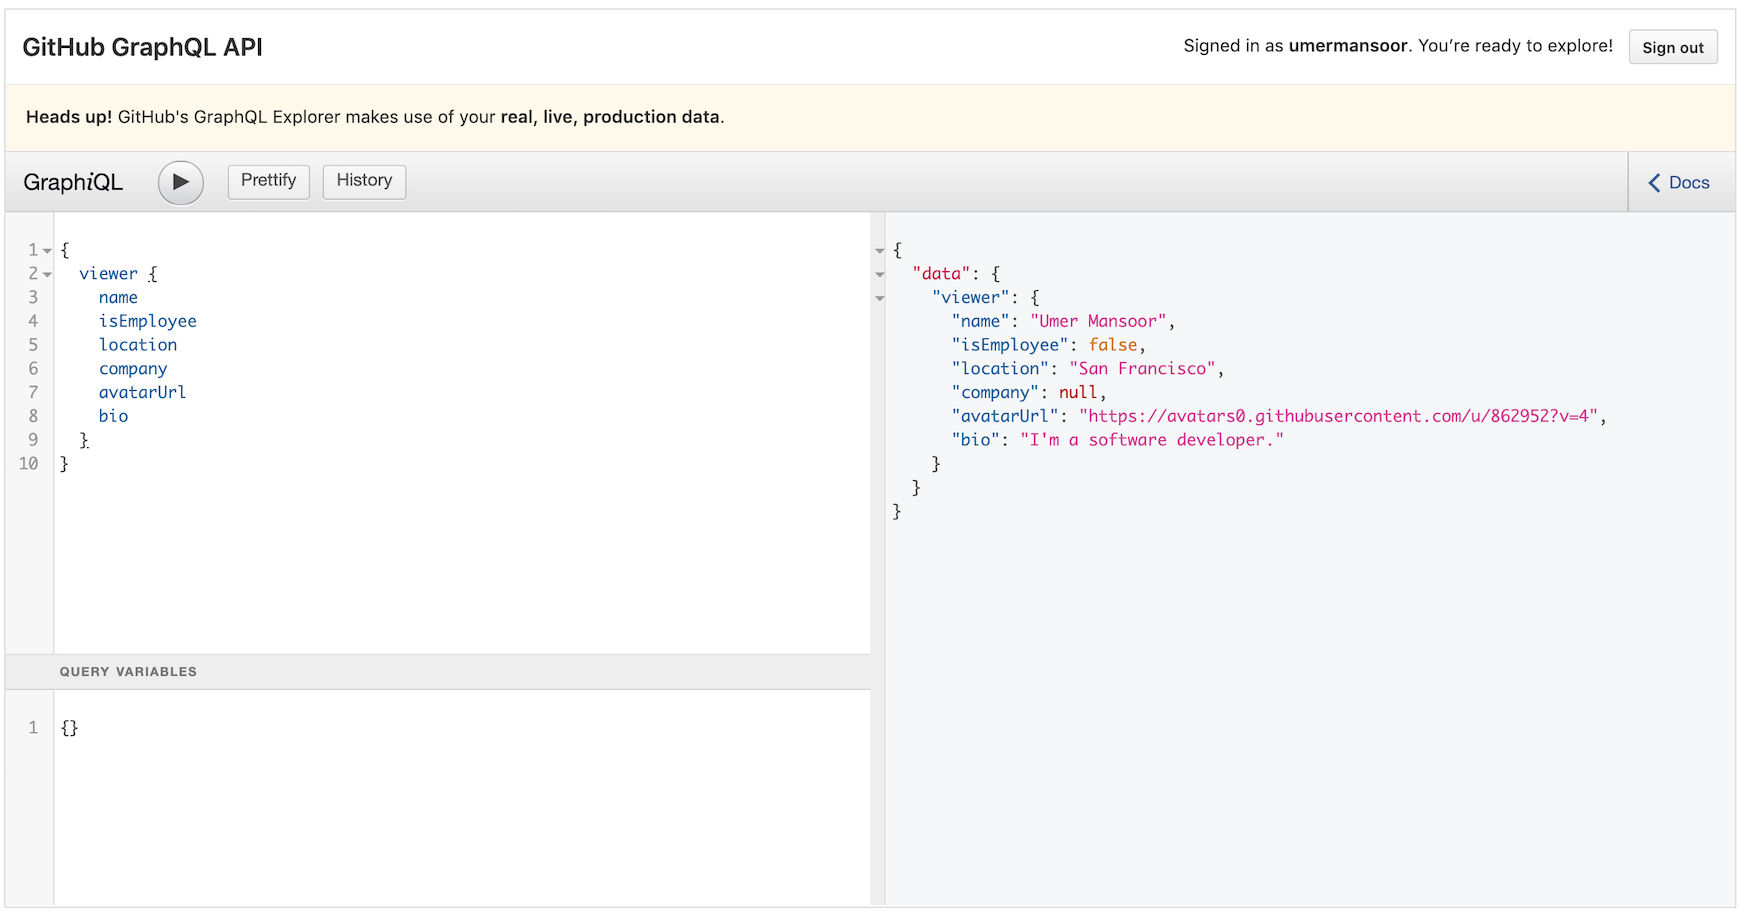
Hint: GraphiQL will autocomplete fields as you start typing. Try out other parameters that are available.
GraphQL Schema
The schema is the main part of any GraphQL implementation. Schemas are written using what’s known as the Schema Definition Language or SDL for short. SDL is human readable and while it might look like Javascript, it’s not. The syntax doesn’t correspond to any one programming language which makes it language-agnostic for good reasons. SDL describes all the fields, arguments, and functionality that is available to clients.
Fields
Fields are the basic unit of data in GraphQL and the center of its universe. According to the official documentation:
the GraphQL query language is basically about selecting fields on objects.
Reviewig the query we just wrote:
{
  viewer {
    name
    isEmployee
    location
  }
}
- We start with the special “root” object.
- We select an object
vieweron the query which represents your Github account. - For the object returned by
viewer, we select thename,isEmployeeandlocationfields to be returned.
Fields have types. The following types are currently supported:
- Integer
- Float
- Boolean
- String
- Enum
- List
- Object (custom types)
GitHub GraphQL implementation makes available the following objects that are commonly associated with GitHub. We can query these objects and ask GitHub to return fields that we need, as we did for the viewer object in the last example.
- Viewer
- Repositories
- Users
- Organizations
- Issues
- etc.
For more information on schema and the Schema Definition Language (SDL,) you can go to this tutorial.
Viewing API Documentation
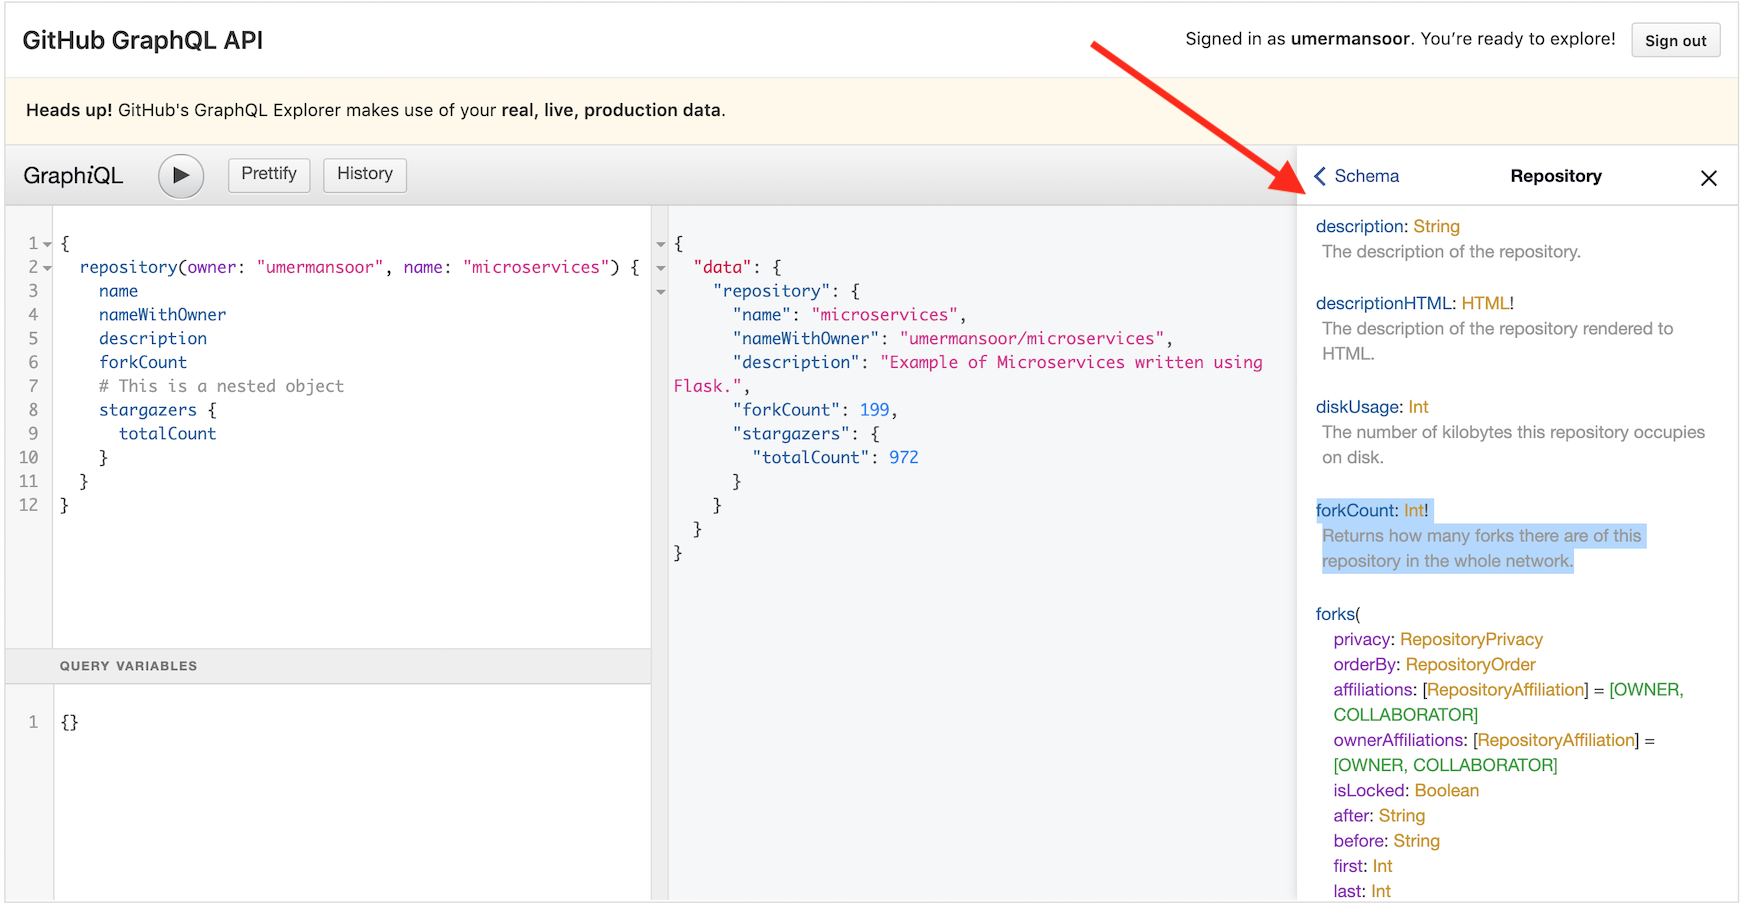
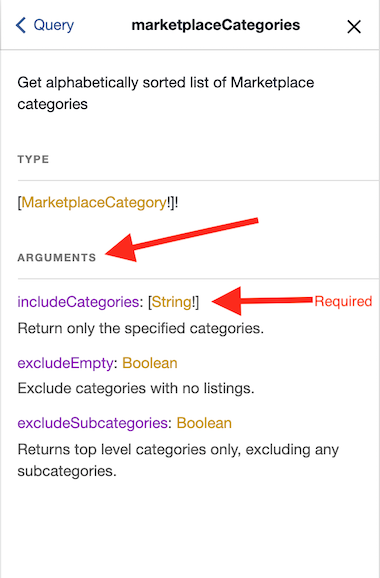
GraphiQL makes it very easy to explore the schema to get information on what queries it support. It comes with a built-in documentation tool called Documentation Explorer which shows you all the available types, fields, arguments, available fields and more. It’s a pretty kick-ass feature and I like it a lot. To open the Document Explorer, click the < Docs icon typically on the top left side. This will open a new pane. Type repository in the search field to explore what arguments it takes and which fields it returns.
In addition to using Document Explorer to explore the schema, you could also query it schema directly. This is useful if you are not using the GraphiQL interface and need an alternate way to look at the schema. __schema and __type fields are used for this purpose. This is called introspection and you can read more about it here if you are interested.
GraphQL Query Arguments
In the last couple of queries we ran, we just asked GraphQL to return as some fields e.g. name or location without passing any arguments. It’s possible to pass arguments to a query. Let’s take a look at another query, one that requires arguments.
{
  repository(owner: "umermansoor", name: "microservices") {
    name
    nameWithOwner
    description
    # Nested field
    stargazers {
      totalCount
    }
  }
}
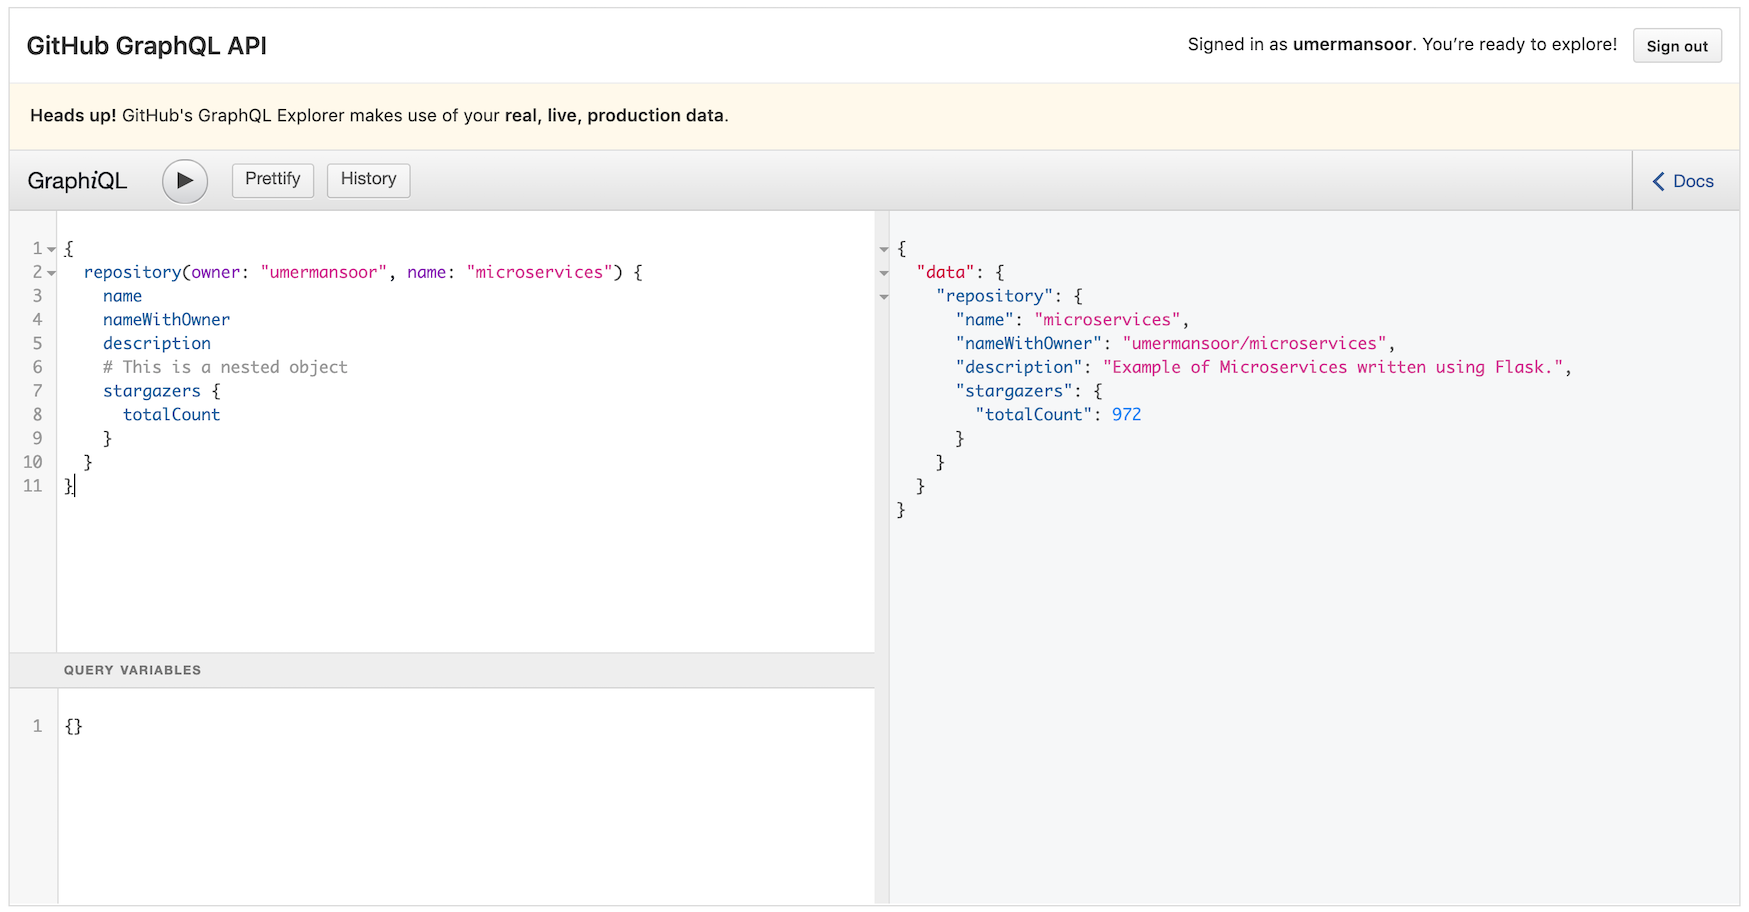
In the above query, we passed two arguments: owner and name to the repository object of type Repository. This object returns information about a GitHub repository. In this example, I passed my Github username umansoor as the owner and microservices as the name of a repository which I own. (Fun fact: This repository is an example project I created when I was experimenting with Flask. You can read more about it here)
GraphQL arguments can be either required or optional. This is controlled in the schema. You can easily see which arguments are required vs optional. An argument ending with an exclamation point (!) means that is required. One’s that do not end with an ! are optional.
Multiple Queries and Aliases
Let’s revisit our repository example and suppose we want to fetch information about two separate repositories at the same time. A naive approach will be to repeat the query twice. Let’s see what happens when we do that:
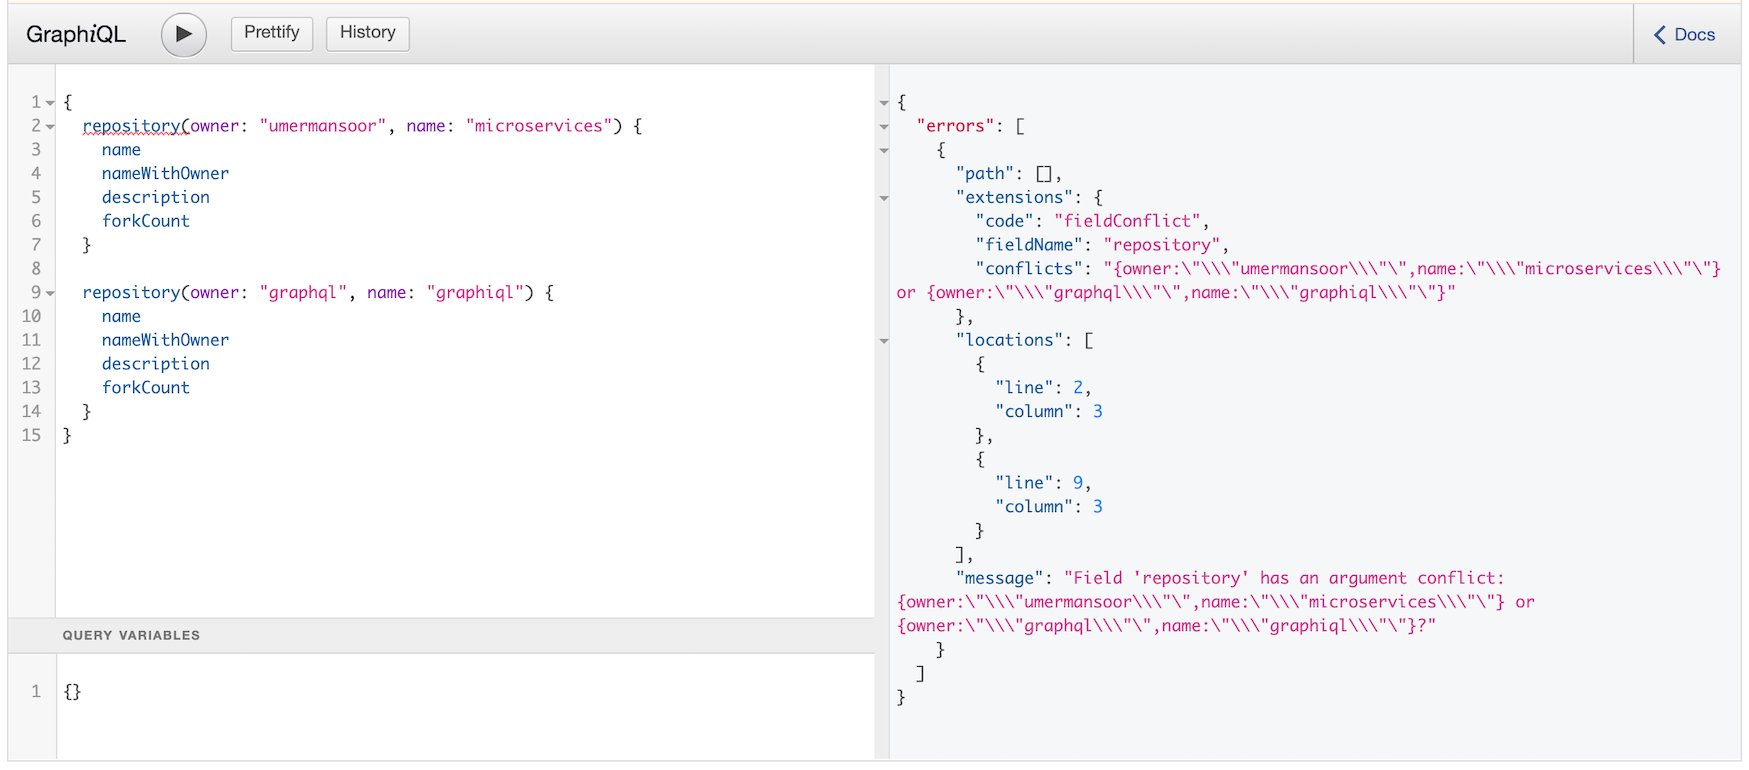
It threw an error basically saying that there’s an argument conflict. In GraphQL, we can’t query the same field with different arguments, which is what we did the in the last example: we called the repository object (of type Repository) with two different sets of arguments:
repository(owner: "umermansoor", name: "microservices")...repository(owner: "graphql", name: "graphiql") ...
This REST like approach didn’t work. Good news is that there’s a really easy way to fetch both fields in one call. This is where aliases come in. They allow us to attach a custom name to each query. Here’s the last query that failed with aliases which nows works:
{
  pythonMicroservicesRepository: repository(owner: "umermansoor", name: "microservices") {
    name
    nameWithOwner
    description
    forkCount
  }

  graphqlRepository:repository(owner: "graphql", name: "graphiql") {
    name
    nameWithOwner
    description
    forkCount
  }
}
This is the result that I get. Notice that even with aliases, the shape of the response closely resembles the query. The name repository in the response is replaced by the alias that we provided in the query:
{
  "data": {
    "pythonMicroservicesRepository": {
      "name": "microservices",
      "nameWithOwner": "umermansoor/microservices",
      "description": "Example of Microservices written using Flask.",
      "forkCount": 199
    },
    "graphqlRepository": {
      "name": "graphiql",
      "nameWithOwner": "graphql/graphiql",
      "description": "An in-browser IDE for exploring GraphQL.",
      "forkCount": 890
    }
  }
}
Fetching Related Objects using Connections, Edges and Nodes
Suppose you want to fetch repositories that belong to a user and the commits that the user has done. Think about it for a moment about how you’d normally do it using REST API.
In REST, it will typically take multiple calls. In GraphQL, you can fetch related objects easily in the same query. The first concept we’ll look at is called Connection. A connection allows fetching related objects in the same query. Objects are connected to other objects using edges. In other words, when you query for a connection, you’re traversing connection’s edges to get its nodes. A node is a generic term for an object that is accessible via an edge. You can read more about Connections here. I’m borrowing a diagram and an example below to complete the definition.
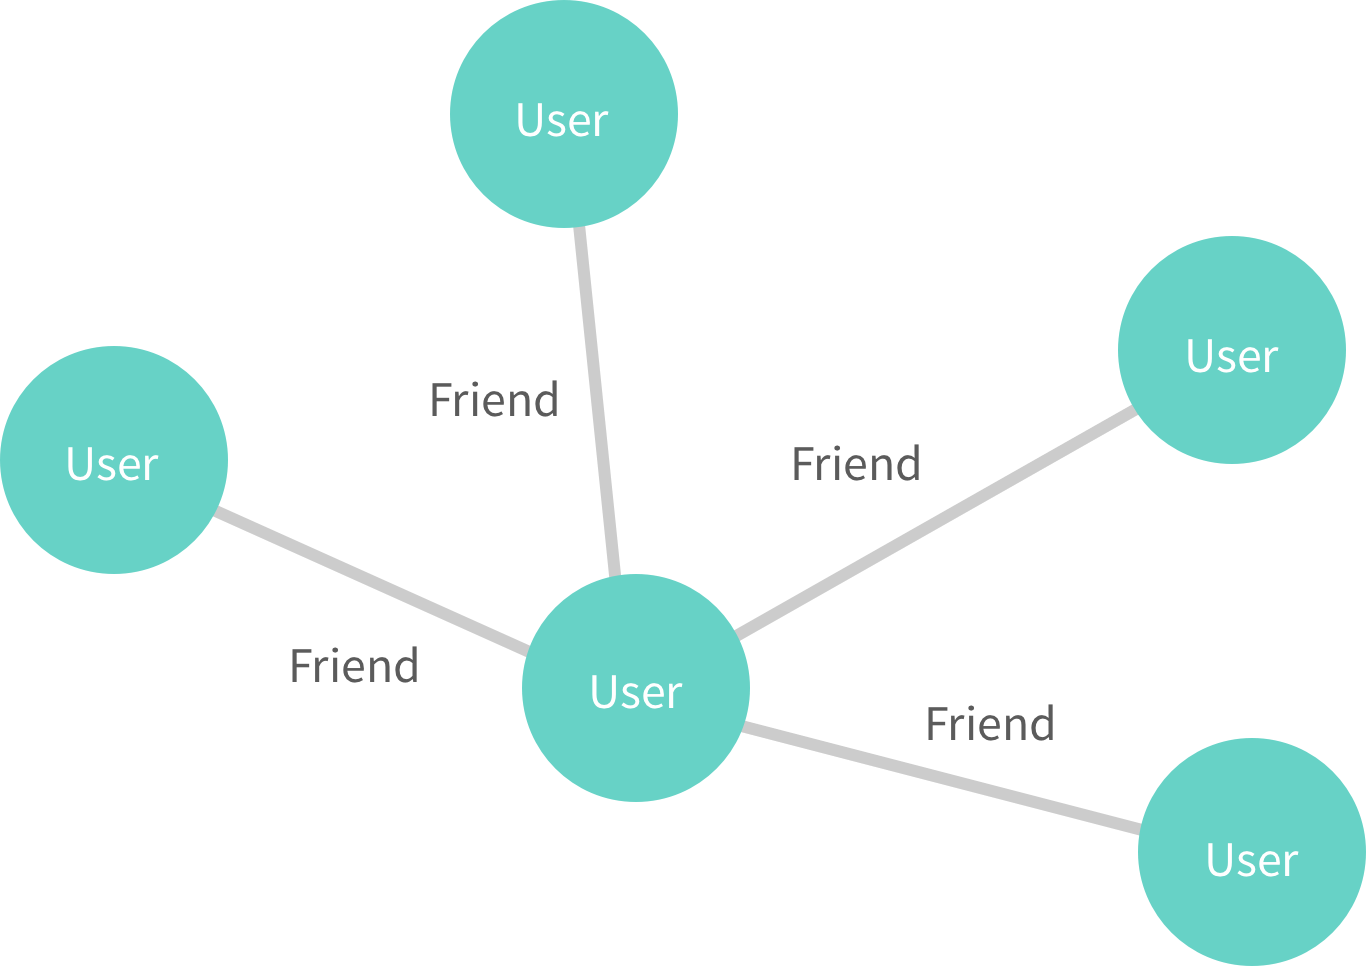
If we want to get first three friends (also users) that a user say caesar is connected to, we can run this query:
// Made up example. Will NOT work in GitHub GraphQL Explorer
{
  user(id: "caesar") {
    id
    name
    friendsConnection(first: 3) {
      edges {
        cursor
        node {
          name
        }
      }
    }
  }
}
You can try out a similar query in GitHub GraphQL Explorer. The following query will return first 5 public repositories for a alexcrichton (btw, who is an excellent developer!)
{
  user(login: "alexcrichton") {
    bio
    repositories(last: 5, privacy: PUBLIC) {
      edges {
        node {
          name
        }
      }
    }
  }
}
The first parameter that we passed to repositories connection in the last example allowed us to paginate results. There are several other pagination options available such as last, offset, after etc. You can read more here.
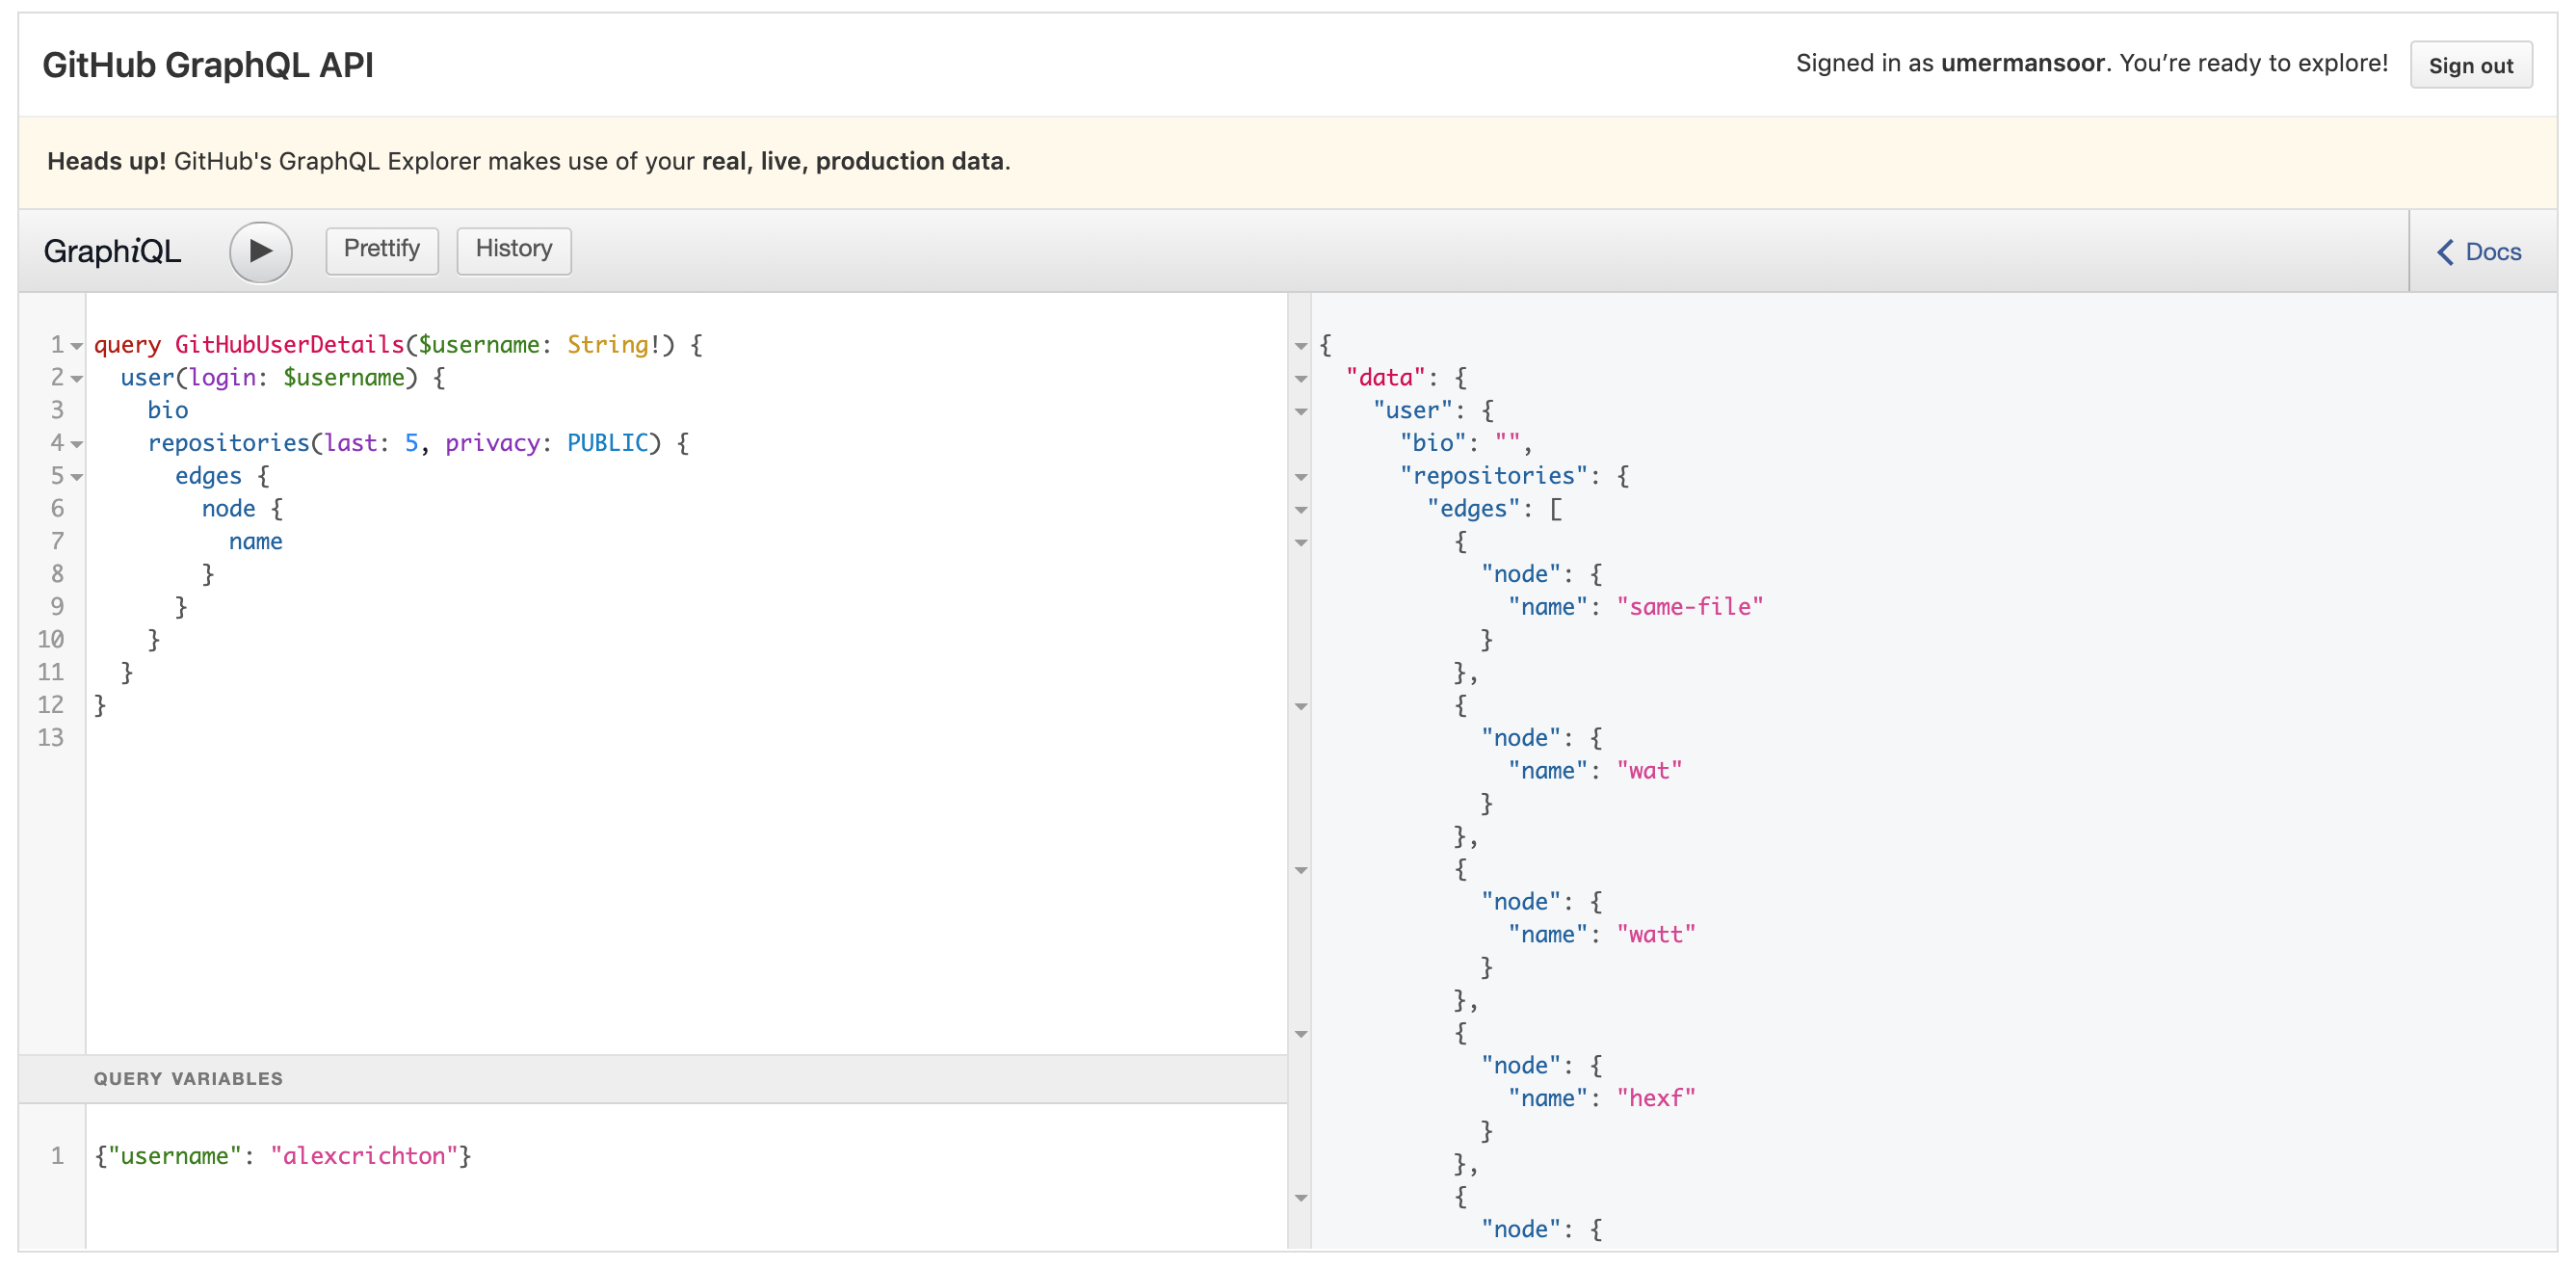
Operation Names and Variable Arguments
In our last example, we passed the argument (username) directly into the query. What if we want to make it dynamic and control it easily without editing the string in the query for each time we want to lookup a different user?
Up until now, we have been using a shorthand syntax to query GitHub GraphQL by omitting the optional query keyword. Imagine if we have a lot of queries. It will be nice to have a way to name the queries to make them easy to find. It turns out there’s a way in GraphQL to do this. We can have multiple queries and give them different names so we can choose at runtime which query we want to run.
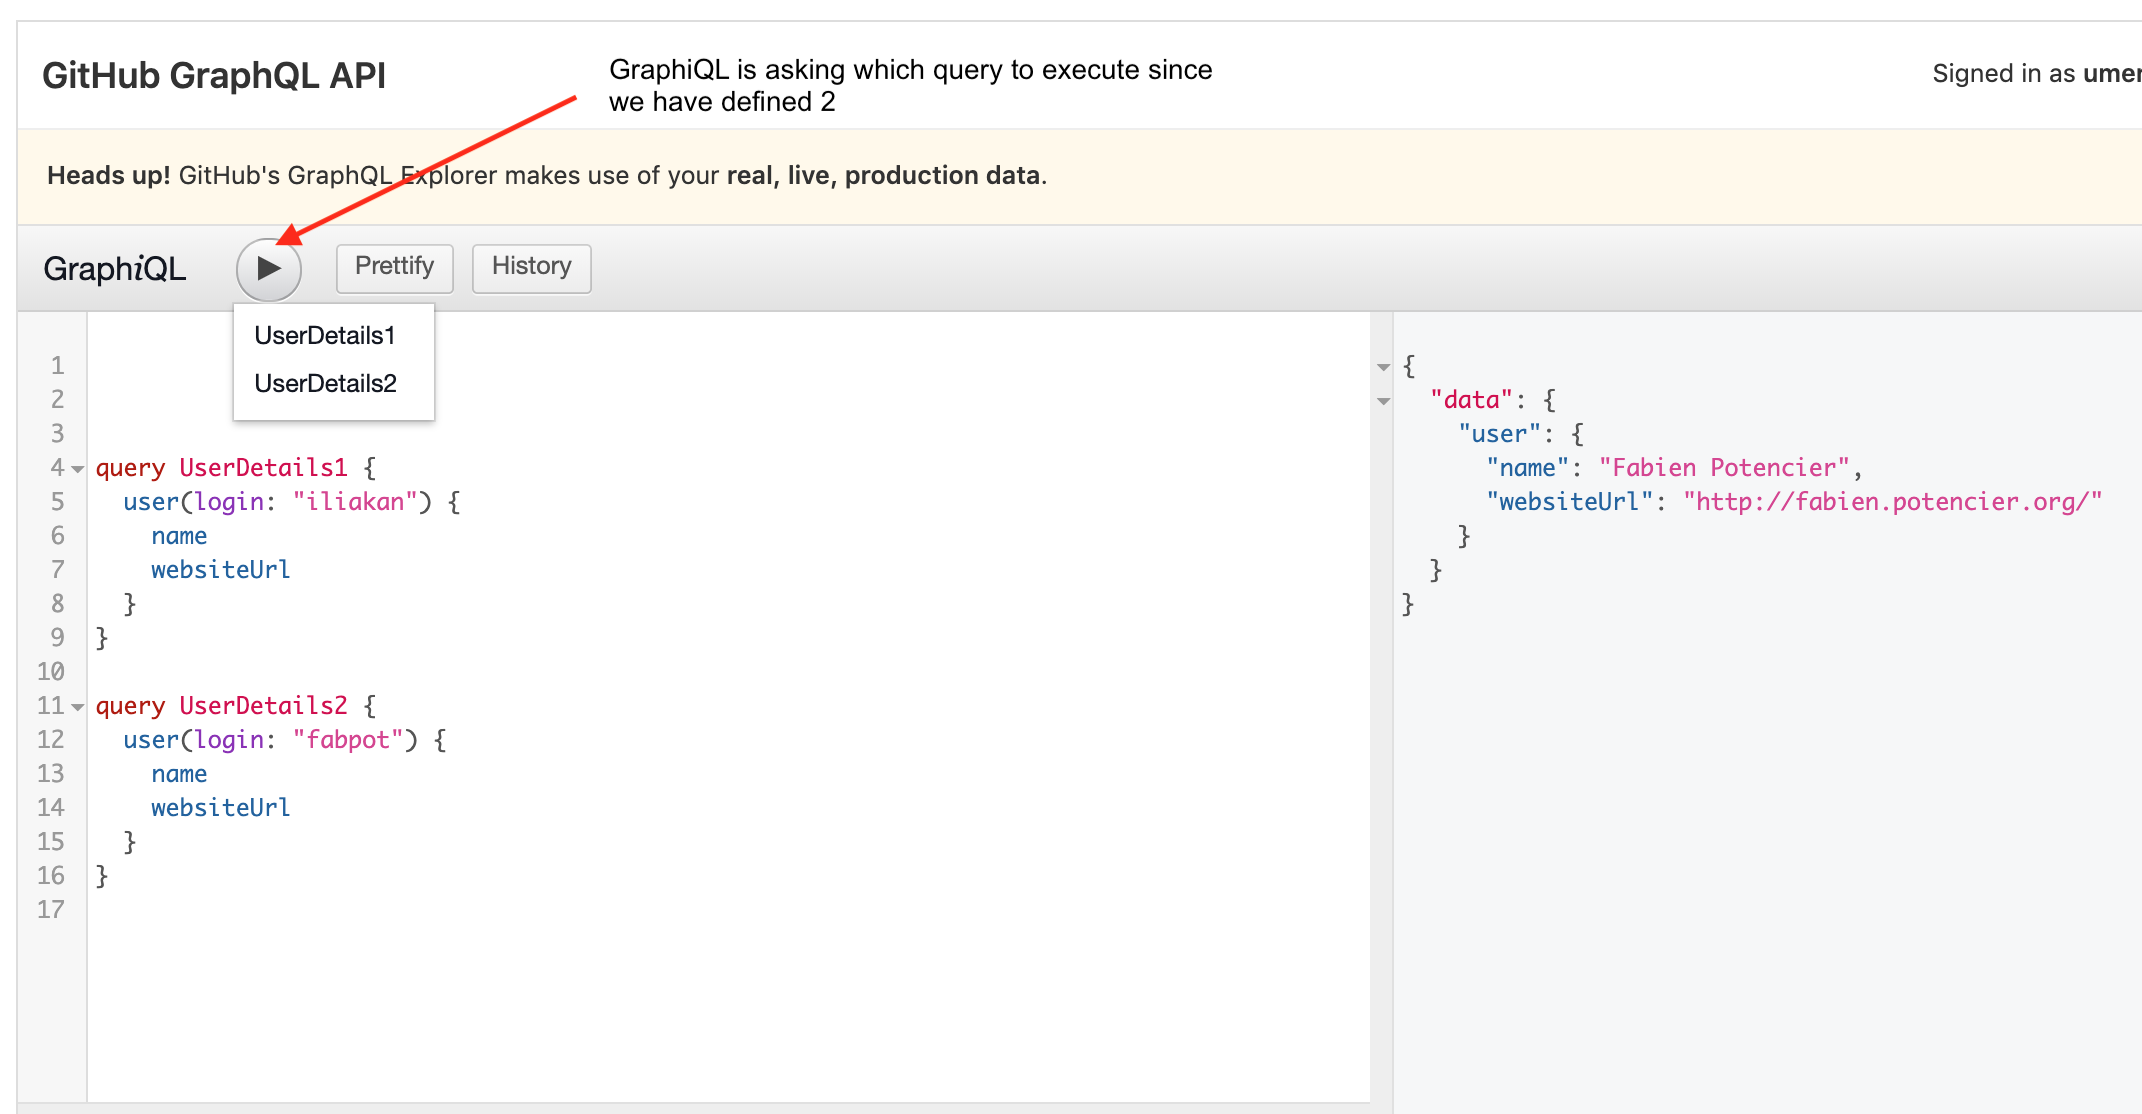
In the image above, we have defined two different queries and gave them unique names: UserDetails1 and UserDetails2 to get details for two different GitHub accounts. It works but doesn’t look right (duplication). We are running the same query twice with different hardcoded usernames. Let’s make it dynamic by passing the username as a parameter at run-time. We can this by following these steps:
- Define a named query e.g.
GitHubUserDetails - Specify a query argument and make it required by adding exclamation point e.g.
query GitHubUserDetails($username:String!) - Provide the value to the argument at run-time before running the query e.g.
{"username": "alexcrichton"}
Putting all these together, we get:
query GitHubUserDetails($username:String!) {
  user(login: $username) {
    bio
    repositories(last: 5, privacy: PUBLIC) {
      edges {
        node {
          name
        }
      }
    }
  }
}
And in query parameters section at the bottom, set the value of the username parameter:
{
  "username": "alexcrichton"
}
Mutations
So far, we’ve been just fetching data. Just like in REST APIs (e.g. PUT method in REST,) there are ways in GraphQL to update or modify data on the server. This is achieved using what’s known as mutations. You can see a list of available mutations and more details in the Document Explorer. Let’s see how to use mutations using an example. In this example, we’ll add a new star to an existing repository.
Please note that GitHub has blocked mutations to third-party repositories. So you’ll need to follow these for one of your own repositories.
Before you can run a mutation to add a star to one of your repositories, you’d need to get the unique id called for your repository. It’s simple enough to get this information using a query like the one below. Please replace owner with your GitHub username (it has to be yours!) and name with the name of one of your repositories.
query FindRepositoryId {
  repository(owner: "umermansoor", name:"hadoop-java-example") {
    id
  }
}
You should see a response like this:
{
  "data": {
    "repository": {
      "id": "MDEwOlJlcG9zaXRvcnk3NTkxMzY1"
    }
  }
}
Now that we have id, we can run our mutation to add star to the repository.
mutation AddStarMutation($input: AddStarInput!) {
  addStar(input: $input) {
    clientMutationId
  }
}
Then in the Query Parameters section at the bottom, add the following code, replacing starrableId with the id you retrieved in the query above. clientMutationId could be anything and you can leave it as is.
{
  "input": {
    "starrableId": "MDEwOlJlcG9zaXRvcnk3NTkxMzY1",
    "clientMutationId": "12345"
  }
}
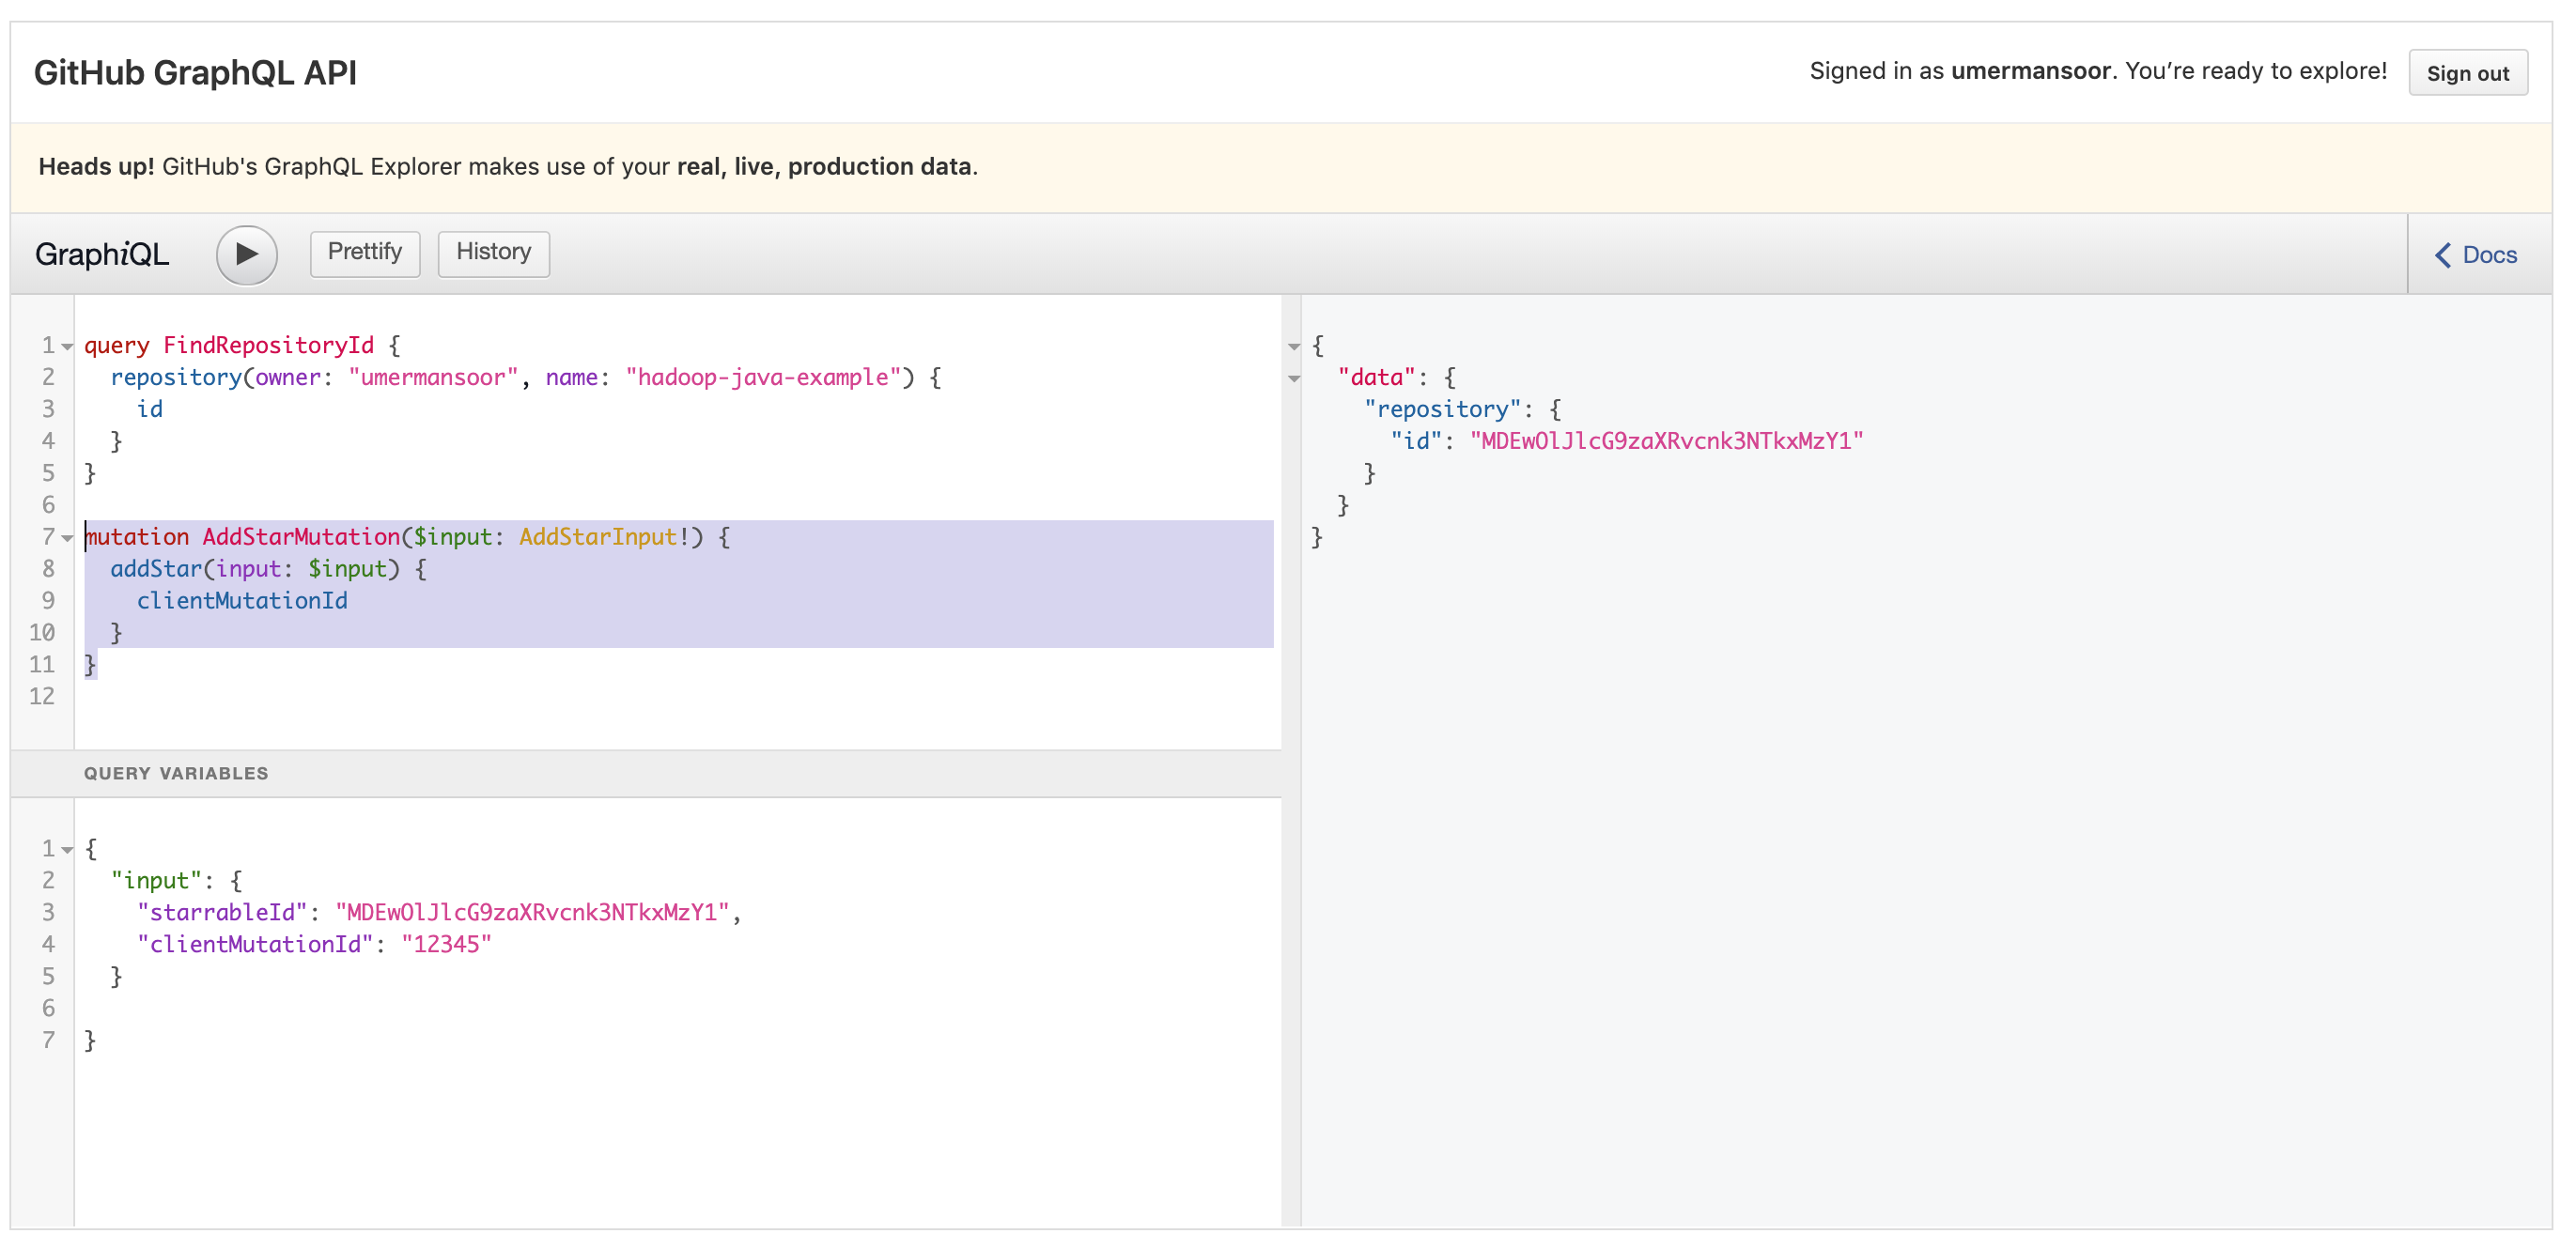
Run the mutation now. If everything was done right, you should see that you’ve starred the repository.
That’s all. I hope this gave you a quick overview of GraphQL and its capabilities.
Note: While I have compared GraphQL and REST in this article, please keep in mind that GraphQL is not a replacement of REST. There are many cases where REST makes perfect sense (e.g. for internal APIs).
If you’re interested in learning more about GraphQL, I would highly recommend the video course below. It’s free and shows how to build a GraphQL server using Node.js and allow React frontend of query it using Apollo Client. Until next time!
 == vs === in Javascript and Which Should be Used When