Version Control with Git
Version control is a way of tracking the change history of a project. Even if you have never used a version control tool, you’ve probably already done it manually: copying and renaming project folders (“paper-1.doc”, “paper-2.doc”, etc.) is a form of version control.
Git is a tool that automates and enhances a lot of the tasks that arise when dealing with larger, longer-living, and collaborative projects. It’s also become the common underpinning to many popular online code repositories, GitHub being the most popular.
We’ll go over the basics of git, but I should point out that a lot of talented people have given git tutorials, and I won’t do any better than they have. In fact, if you’re interested in learning git deeply and have some time on your hands, I suggest you stop reading this and instead read the Git Book. Scott Chacon and Ben Straub have done a tremendous job, and if you want to understand both the interfaces and the mechanisms behind git, this is the place to start.
Why should you use version control?
If you ask 10 people, you’ll get 10 different answers, but one of the commonalities is that most people don’t realize how integral it is to their development process until they’ve started using it. Still, for the sake of argument, here are some highlights:
- You can undo anything: Git provides a complete history of every change that has ever been made to your project, timestamped, commented, and attributed. If something breaks, you always have the choice of going back to a previous state.
- You won’t need to keep undo-ing things: One of the advantages of using git properly is that by keeping new changes separate from a stable base, you tend to avoid the massive rollbacks associated with constantly tinkering with a single code.
- You can identify exactly when and where changes were made: Git allows you to pinpoint when a particular piece of code was changed, so finding what other pieces of code a bug might affect or figuring out why a certain expression was added is easy.
- Git forces teams to face conflicts directly: On a team-based project, many people are often working with the same code. By having a tool which understands when and where files were changed, it’s easy to see when changes might conflict with each other. While it might seem troublesome sometimes to have to deal with conflicts, the alternative—not knowing there’s a conflict—is much more insidious.
Git Basics
The first thing to understand about git is that the contents of your project are stored in several different states and forms at any given time. If you think about what version control is, this might not be surprising: in order to remember every change that’s ever been made, you need to store a record of those changes somewhere, and to be able to handle multiple people changing the same code, you need to have different copies of the project and a way to combine them.
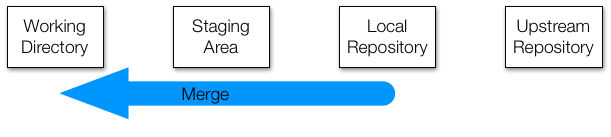
You can think about git operating on four different areas:
<img src=”/img/books/tutorials/git_layout.png” style=”width:400px; display:inline-block;” alt=”four areas of git. working directory, staging area, local repository, remote repo >
- The working directory is what you’re currently looking at. When you use an editor to modify a file, the changes are made to the working directory.
- The staging area is a place to collect a set of changes made to your project. If you have changed three files to fix a bug, you will add all three to the staging area so that you can remember the changes as one historical entity.
- The local repository is the place where git stores everything
you’ve ever done to your project. Even when you delete a file, a
copy is stored in the repo (this is necessary for always being able
to undo any change). It’s important to note that a local repository
doesn’t look much at all like your project files or directories.
Git has its own way of storing all the information, and if you’re
curious what it looks like, look in the
.gitdirectory in the working directory of your project. - When working in a team, every member will be working on their own local repository. An upstream repository allows everyone to agree on a single version of history. If two people have made changes on their local repositories, they will combine those changes in the upstream repository. This is also known as remote repository.
You can think of most git operations as moving code or metadata from one of these areas to another.
Common Git Commands Explained Visually
First, we’ll briefly look at the most common commands you’ll encounter when using git. Then we’ll show how they combine to carry out common tasks.
Git commands are passed as arguments to the git program. For example,
if you want to run the status command you’ll see later, you run it
like this:
$ git status
If you ever need help on a command, you can find the git man pages by
hyphenating git and the command name:
$ man git-status
clone

Cloning a repository does two things: it takes a repository from somewhere (usually an upstream repository) and makes a local copy (your new local repository), and it creates the most recent copy of all of the files in the project (your new working directory). This is generally how you will start working on a project for the first time.
# Example
$ git clone [email protected]:rdadolf/ac297r-git-demo.git
status

Status is your window into the current state of your project. It can tell you which files you have changed and which files you currently have in your staging area.
# Example
$ git status
add
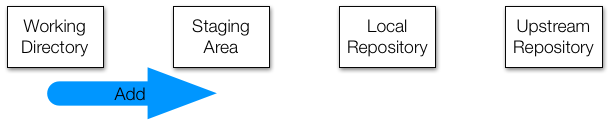
When you’ve made a change to a set of files and are ready to create a
commit, the first step is to add all of the changed files to the staging
area. Add does that. Remember that what you see in the filesystem is
your working directory, so the way to see what’s in the staging area is
with the status command. This also means that if you add something to
the staging area and then edit it again, you’ll also need to add the
file to the staging area again if you want to remember the new changes.
# Example
$ git add change1.file change2.file
commit
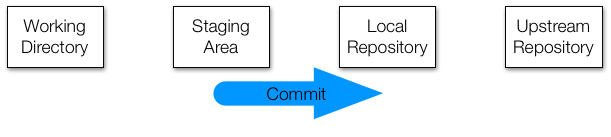
When you’re satisfied with the changes you’ve added to your staging
area, you can commit those changes to your local repository with the
commit command. Those changes will have a permanent record in the
repository from now on.
# Example
$ git commit
Every commit has two features you should be aware of. The first is a hash. This is a unique identifier for all of the information about that commit, including the code changes, the timestamp, and the author. The second is a commit message. This is text that you can (and should) add to a commit to describe what the changes were.
Good commit messages are important.
Commit messages are a way of quickly telling your future self (and your collaborators) what a commit was about. For even a moderately sized project, digging through tens or hundreds of commits to find the change you’re looking for is a nightmare without friendly summaries.
By convention, commit messages start with a single-line summary, then an empty line, then a more comprehensive description of the changes.
This is an okay commit message. The changes are small, and the summary is sufficient to describe what happened.
Add feature to update tracker on new user registration
Usually, commit messages have a subject, a description, and a name of the JIRA story/ticket. E.g.
JIRA-4500 Add authorization for Payment page access

Ask users to re-enter their password when accessing the payment page.
commit
Don’t do this.
push
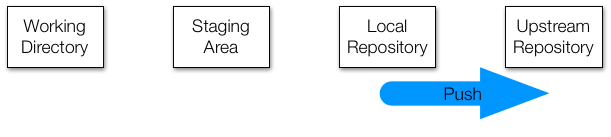
The push command takes the changes you have made to your local
repository and attempts to update a remote repository with them. If
you’re the only person working with both of these (which is how a solo
GitHub project would work), then push should always succeed.
If you’re working with other people, then it’s possible that they have
made changes to the remote repository between the time you first cloned
it and now. push will fail. That’s where the next two commands come
in.
# Example
$ git push
fetch
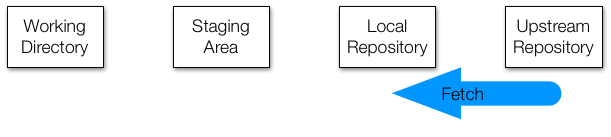
Let’s say a collaborator has pushed changes to your shared upstream
repository while you were editing. Their local repository and the
upstream repository now both contain their changes, but your local
repository does not. To update your local repository, you run fetch.
But what if you’ve committed changes in the meantime? Does your local repository contain your changes or theirs? The answer is that it contains a record of both, but they are kept separate. Remember that git repositories are not copies of your project files. They store all the contents of your files, along with a bunch of metadata, but in its own internal format. This is one of the reasons.
Let’s say that you and your collaborator both edited the same line of
the same file at the same time in different ways. On your respective
machines, you both add and commit your different changes, and your
collaborator pushes theirs to the upstream repository. When you run
fetch, git adds a record of their changes to your local repository
alongside your own. These are called branches, and they represent
different, coexisting versions of your project. The fetch command adds
your collaborator’s branch to your local repository, but keeps yours as
well.
# Example
$ git fetch
merge
Having multiple branches is fine, but at some point, you’ll want to combine the changes that you’ve made with those made by others. This is called merging.
There are two general cases when merging two branches: first, the two branches are different but the changes are in unrelated places; and second, the two branches are different and the changes are in the same locations in the same files.
The first scenario is easy. Git will simply apply both sets of changes to the appropriate places and put the resulting files into the staging area for you. Then you can commit the changes and push them back to the upstream repository. Your collaborator does the same, and everyone sees everything.
The second scenario is more complicated. Let’s say the two changes set
some variable to different values. Git can’t know which is the correct
value. One solution would be to simply use the more recent change, but
this very easily leads to self-inconsistent programs. A more
conservative solution, and the one git uses, is to simply leave the
decision to the user. When git detects a conflict that it cannot
resolve, merge fails, and git places a modified version of the
offending file in your project directory. This is important: the
file that git puts into your directory is not actually either of the
originals. It is a new file that has special markings around the
locations that conflicted.
# Commit 1
This is the number 2.
# Commit 2
This is the number 3.
# Example
$ git merge origin/master
# File produced by git merge
<<<<<<< HEAD
This is the number 3.
=======
This is the number 2.
>>>>>>> origin
The line above the ======= belongs to your branch, and the line below
belongs to the branch you’re merging with. Your job is to edit this
file to replace all of that block with just the correct output. For
instance:
# Corrected merge conflict
This is the number 5.
Once you have fixed the file, you can add, commit, and push the changes. When your collaborator merges your resolved version, git is smart enough to know that a merge resolution occurred and how to handle it without causing another conflict, despite the fact that your resolved version was different than either of the originals.
branch

Branches can also be created manually, and they are a useful way of organizing unfinished changes.
The branch command has two forms. The first:
$ git branch
simply lists all of the branches in your local repository. If you run it
without having created any branches, it will list only one, called
master. This is the default branch.
The other form creates a branch with a given name:
$ git branch my-new-branch
It’s important to note that the other branch is not active. If you
make changes, they will still apply to the master branch, not
my-new-branch. To change this, you need the next command.
checkout

Checkout switches the active branch. Since branches can have different
changes, checkout may make the working directory look very different.
For instance, if you have added new files to one branch, and then check
another branch out, those files will no longer show up in the directory.
They are still stored in the .git folder, but since they only exist in
the other branch, they cannot be accessed until you check out the
original branch.
# Example
$ git checkout my-new-branch
Common Tasks
With a basic understanding of the available commands, we can look at how they are typically strung together in normal use.
Cloning a repository
Cloning a repository depends a lot on the type of repository you’re
using. If you’re cloning out of a directory on the machine you’re
currently on, it’s just the path to the <project>.git file. For
github, you can clone over ssh with a command like this: (more on using
github later)
%%bash
cd /tmp
git clone git@github.com:rdadolf/ac297r-git-demo.git
Output
Cloning into 'ac297r-git-demo'...
%%bash
ls /tmp/ac297r-git-demo
Output
README.md
Making changes
Now let’s say that we want to add a new file to the project. The canonical sequence is “edit–add–commit–push”.
%%bash
cd /tmp/ac297r-git-demo
echo '# Hello world' > hello.md
git status
Output
On branch master
Your branch is up-to-date with 'origin/master'.

Untracked files:
  (use "git add <file>..." to include in what will be committed)

	hello.md

nothing added to commit but untracked files present (use "git add" to track)
We’ve added a file to the working directory, but it hasn’t been staged yet.
%%bash
cd /tmp/ac297r-git-demo
git add hello.md
git status
Output
On branch master
Your branch is up-to-date with 'origin/master'.

Changes to be committed:
  (use "git reset HEAD <file>..." to unstage)

	new file:   hello.md
Now our file is in the staging area, waiting to be committed.
%%bash
cd /tmp/ac297r-git-demo
git commit -m "Added a test file to demonstrate git features"
git status
Output
[master eba8cc3] Added a test file to demonstrate git features
 1 file changed, 1 insertion(+)
 create mode 100644 hello.md
On branch master
Your branch is ahead of 'origin/master' by 1 commit.
  (use "git push" to publish your local commits)

nothing to commit, working directory clean
The git commit -m... version is just a way to specify a commit message
without opening a text editor (ipython notebook can’t handle it).
Now we see that our branch, “master”, has one more commit than the
“origin/master” branch. “origin/master” represents the local
copy of the branch that came from the upstream repository (nicknamed
“origin” in this case). Let’s push the changes.
%%bash
cd /tmp/ac297r-git-demo
git push
git status
Output
On branch master
Your branch is up-to-date with 'origin/master'.

nothing to commit, working directory clean
Output
To [email protected]:rdadolf/ac297r-git-demo.git
   1c03bf4..eba8cc3  master -> master
This one looks a little funny, but it’s just an artifact of ipython
notebook. The red text starting with To [email protected]... would
actually appear on the terminal first, and it’s the output of the
git push command. It’s reporting that it pushed our local master
branch to the upstream repository.
The white text starting with On branch master... is the output of the
git status command. Git is reporting that after our push, our local
repository is up-to-date with the upstream repository.
Handling merge conflicts
As in our discussion of git merge, we can demonstrate creating two
different versions of the same file and how to reconcile their
differences.
First, let’s pretend that we’re two different developers, A and B. We’ll clone repositories for each of them.
%%bash
cd /tmp
mkdir A
cd A
git clone git@github.com:rdadolf/ac297r-git-demo.git

cd /tmp
mkdir B
cd B
git clone git@github.com:rdadolf/ac297r-git-demo.git
Output
Cloning into 'ac297r-git-demo'...
Cloning into 'ac297r-git-demo'...
Now we have two separate local repositories, in /tmp/A/ac297r-git-demo
and /tmp/B/ac297r-git-demo. Let’s create two different commits to the
same file.
%%bash
cd /tmp/A/ac297r-git-demo
echo 'Made by A.' >> hello.md
cat hello.md
git add hello.md
git commit -m 'Attributed the test file to A.'
Output
# Hello world
Made by A.
[master 735b052] Attributed the test file to A.
 1 file changed, 1 insertion(+)
%%bash
cd /tmp/B/ac297r-git-demo
echo 'Made by B.' >> hello.md
cat hello.md
git add hello.md
git commit -m 'Attributed the test file to B.'
Output
# Hello world
Made by B.
[master c059bbe] Attributed the test file to B.
 1 file changed, 1 insertion(+)
Now the local repositories for A and B have different histories. Let’s push A’s changes.
%%bash
cd /tmp/A/ac297r-git-demo
git push
Output
To [email protected]:rdadolf/ac297r-git-demo.git
   eba8cc3..735b052  master -> master
All is well and good. But when we try to do the same for B, we should get a merge conflict.
%%bash
cd /tmp/B/ac297r-git-demo
git fetch
git merge origin/master
Output
Auto-merging hello.md
CONFLICT (content): Merge conflict in hello.md
Automatic merge failed; fix conflicts and then commit the result.
And git can’t figure out how to resolve the conflict automatically. Instead, it has produced this:
%%bash
cd /tmp/B/ac297r-git-demo
cat hello.md
Output
# Hello world
<<<<<<< HEAD
Made by B.
=======
Made by A.
>>>>>>> origin/master
And now we fix the merge conflict.
%%bash
cd /tmp/B/ac297r-git-demo
echo '# Hello world' > hello.md
echo 'Made by A & B.' >> hello.md
cat hello.md
Output
# Hello world
Made by A & B.
Now we need to add and commit hello.md to fix the merge conflict.
%%bash
cd /tmp/B/ac297r-git-demo
git add hello.md
git commit -m 'Shared attribution between A and B.'
Output
[master 8e6fc29] Shared attribution between A and B.
Now we need to push the changes back to the upstream repository.
%%bash
cd /tmp/B/ac297r-git-demo
git push
Output
To [email protected]:rdadolf/ac297r-git-demo.git
   735b052..8e6fc29  master -> master
The merge conflict has been resolved, but we’re not quite done yet. A still doesn’t know what just happened. We need to fetch and merge its local repository, too.
%%bash
cd /tmp/A/ac297r-git-demo
git fetch
git merge origin/master
Output
Updating 735b052..8e6fc29
Fast-forward
 hello.md | 2 +-
 1 file changed, 1 insertion(+), 1 deletion(-)
And as expected, git knows how to resolve this conflict. The reason git
can resolve this conflict even though the files differ on the same line
is that git has the commit history, too. When A made their original
commit, they were given a commit hash (starting with 735b052). When
B resolved the merge conflict, B created a new commit hash
(8e6fc29) which unified the changes in commit 735b052 (A’s
original commit) and commit c059bbe (B’s original commit). Then,
when B pushed, all of this information was given to the upstream
repository. So git has a record stating that the merge resolution commit
8e6fc29 is a subsequent commit to A’s original changes in
735b052. When A fetched the upstream repo, it got this information,
too. So when A executed a merge, it was merging a predecessor
(735b052) with its direct successor (8e6fc29), which git handles
simply by using the successor.
The tricky conflict resolution that B did was effectively a way of taking two separate branches and tying them together.
Hosting Git Repositories on Github
We’ve talked a lot about using upstream repositories as a way of
collaborating on a project. Upstream repositories need to be stored
somewhere, and they need to have a git server to respond to clone,
push, and fetch commands.
GitHub is a popular host for upstream repositories, largely because they give away storage and hosting for free and because they provide many graphical web tools for interacting and analyzing git repositories.
GitHub Basics
Github runs git. All of the commands and tasks we showed earlier work with github repositories. That said, github also provides a number of other features which can be useful to understand.
Creating an account
To sign up for an account, just go to github and
pick a unique username, an email address, and a password. Once you’ve
done that, your github page will be at
https://github.com/your-username.
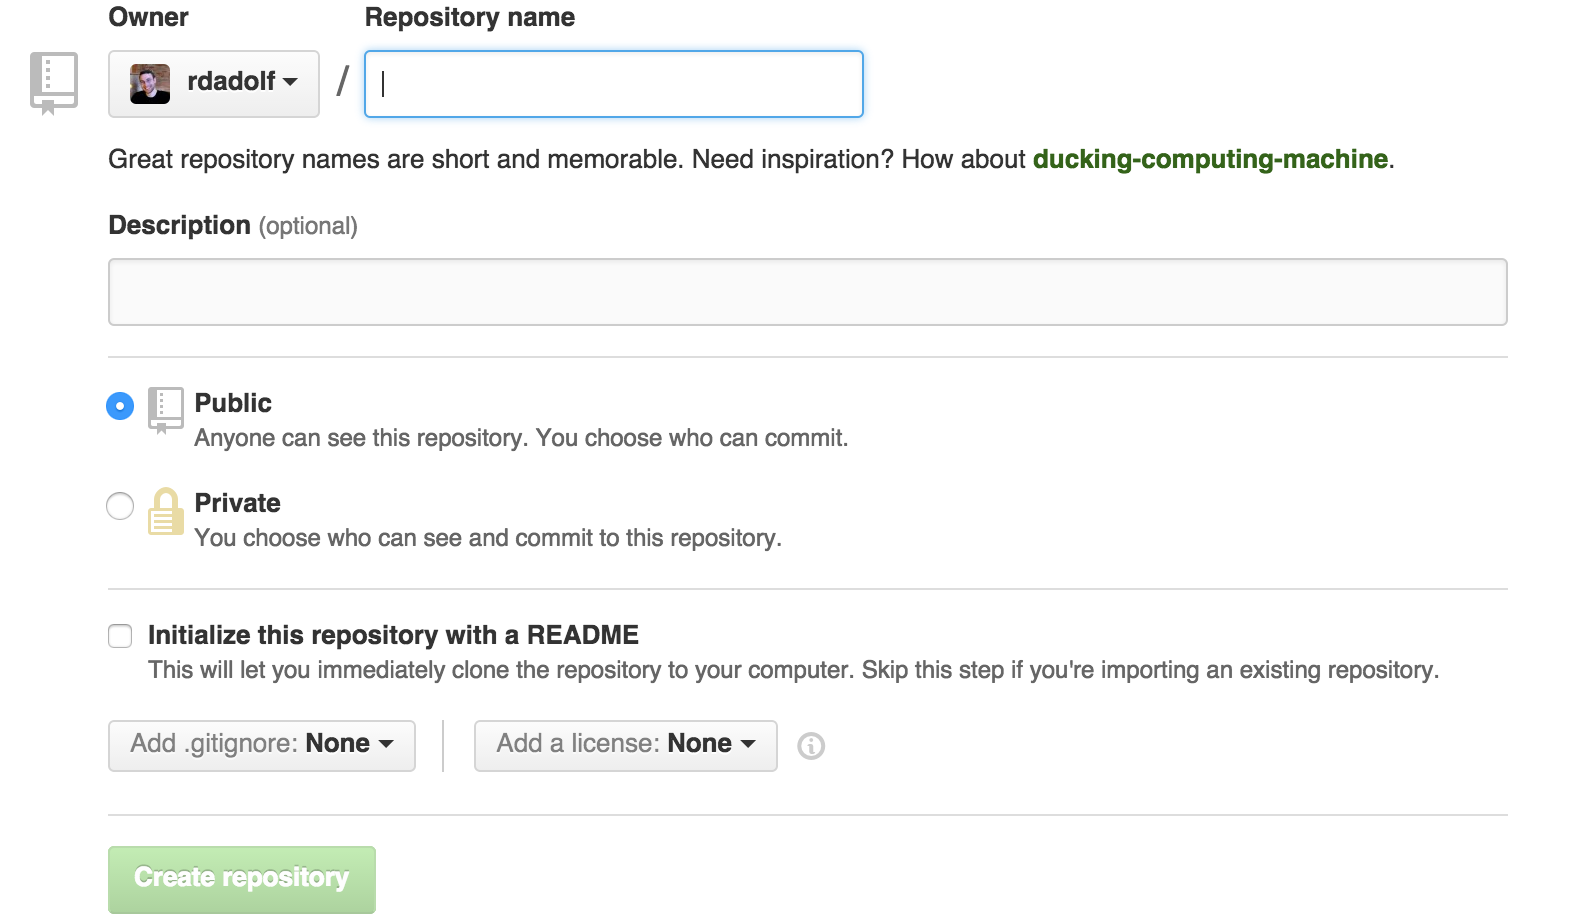
Creating a repository
Creating a repository can be done with git command line tools, or it can be done on github. On your github home, click on the ‘Repositories’ tab, then click the green ‘New’ button. You’ll be brought to a page that asks for some basic project information.
-
The repository name needs to be unique, but only amongst your github repositories. Despite what github suggests, try to pick something at least a little representative of your project.
-
The description field is just a short text field that will accompany your repository’s name on the github website.
-
If you’re creating a new repository, check the “Initialize this repository with a README” box. This is a little bit of a misnomer. If you don’t do this, you won’t be able to clone your repository at all. Instead, you’ll have to manually create a new repository on your computer and upload that to github. Suffice to say, unless you’ve got an existing git repository that was hosted somewhere besides github, always check this box.
-
You’re free to click the
.gitignoreorlicensebuttons, too, but there’s no requirement to do so. You can easily create either later.
Authentication
The next thing you’ll want to do is set up ssh authentication. Every time you contact your upstream repository (hosted on github), you need to prove you’re you. You can do this with passwords over HTTPS, but it gets old quickly. By providing an ssh public key to github, your ssh-agent will handle all of that for you.
To upload an ssh key, log in to github and click on the gear icon in the top right corner (settings). Once you’re there, click on “SSH keys” on the left. This page will contain all your ssh keys once you upload any.
Click on “add ssh key” in the top right. You should see this box:
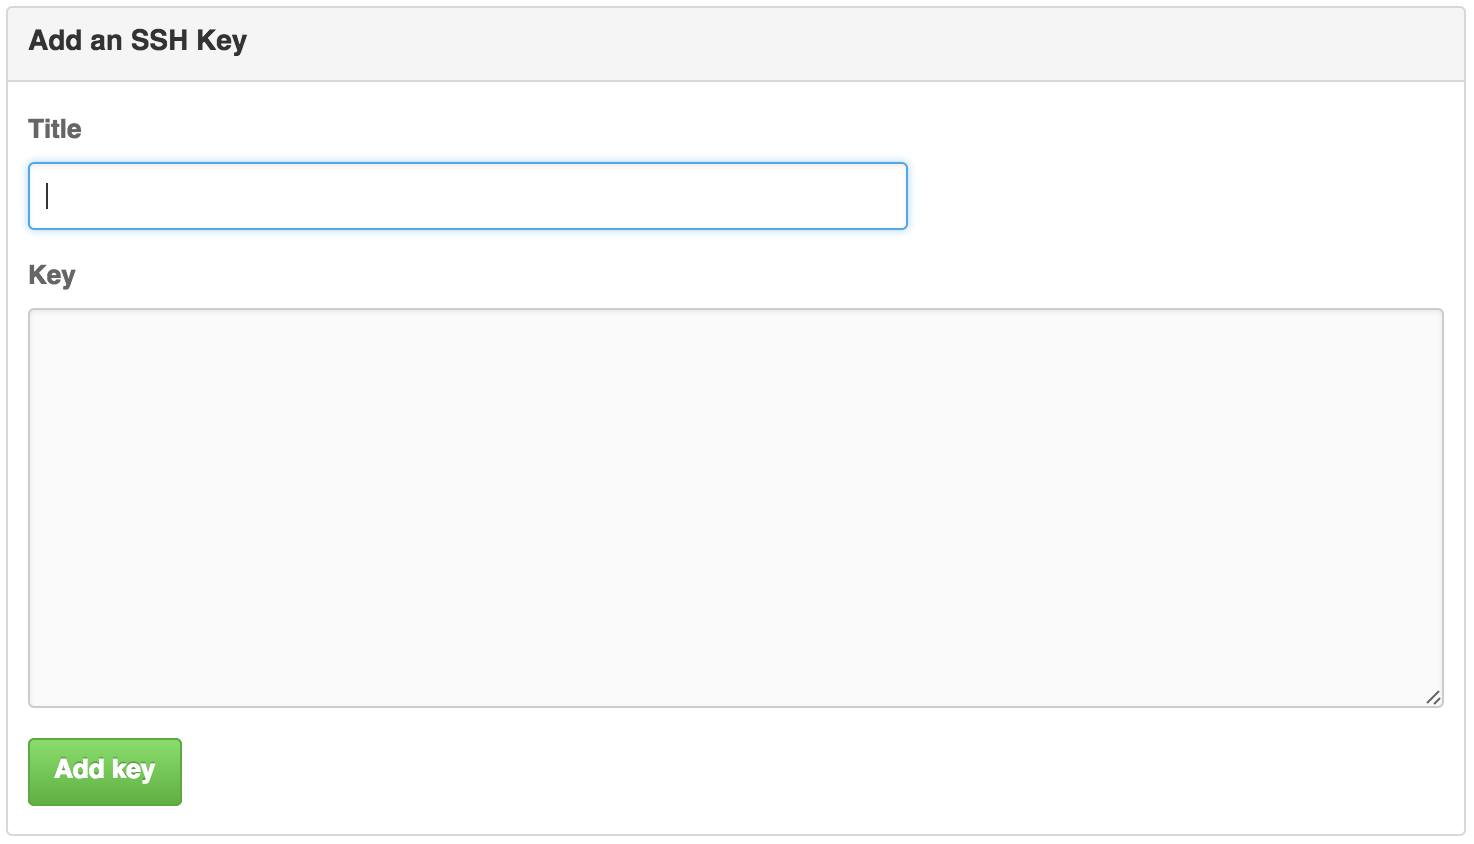
The title field should be the name of your computer or some other way to identify this particular ssh key.
In the key field, you’ll need to copy and paste your public key. Do not paste your private ssh key here.
When you hit “Add key”, you should see the key name and some hexadecimal characters show up in the list. You’re set.
Now, whenever you clone a repository using this form:
$ git clone [email protected]:rdadolf/ac297r-git-demo.git
You’ll be connecting over ssh.
Collaboration
By default, nobody but you can make changes to your repositories. But since open collaboration is the major purpose of having an upstream repository, we need to fix that. There are two major ways: adding collaborators and pull requests.
Adding collaborators
If you’re going to be working on a project consistently with another person, it’s easy to grant them permission to push changes directly to your repository. This can be done on a project-by-project basis.
To add a collaborator, go to your repository’s page and click on the “settings” button on the right, then the “collaborators” link on the left. This should bring you to this box:
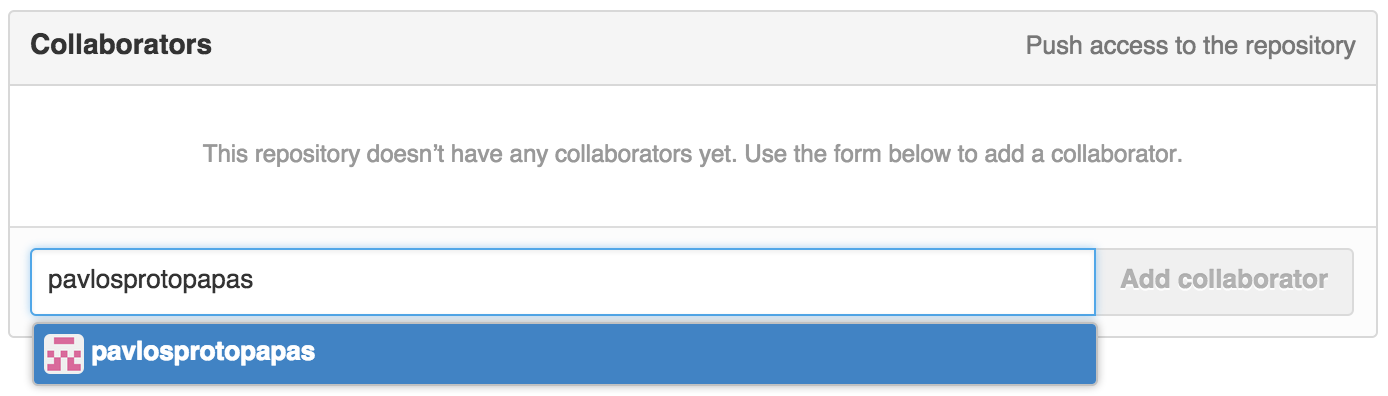
Type in the github username of the collaborator you want to add, then hit “add collaborator”.
That’s it!
Pull requests
If you have a popular piece of software hosted on github, you may have occasionally collaborators that submit bug fixes from time to time. Pull requests are a way to incorporate changes from other people without giving them full write access to your repository. They can also be a reasonable way to conduct code reviews before pushing code to a production branch.
Regardless, pull requests are a little more involved, and we don’t have time to go in to them today. If you’re interested, I urge you to check out the git book’s section.
Github Pages
In addition to hosting git repositories, github also provides web hosting for each user and project. Github provides some documentation, but it’s easier to create one than it is to figure out what to do with it next.
Automatically Generated Project Pages
The easiest (and most limited) mechanism for creating a project page is to use the automatic page generator. Github’s documentation does a fantastic job of guiding you through this, so I won’t spend time on it. It’s a 30-second process.
To edit the page, you can checkout the newly created gh-pages branch
in your project and edit the index.html file. A much easier way to edit
the page is simply to go through the automatic page generator tool
again. It might seem counterintuitive, but github saves the content that
you added the first time around, so you can make small changes without
too much trouble.
In the end, automatically generated pages are a great replacement for a
README.md file, but not much beyond that. You are limited to a single
index.html file, and the templates are fixed. If you want a larger
site or more customization options, you’re better off doing something
else.
Static Project Pages
The next natural step is to use plain old static HTML. Regardless of how
you create your site, github uses the gh-pages branch of your project
to find your website files. One way to create this branch is to click on
the “branch” button on your repository page:
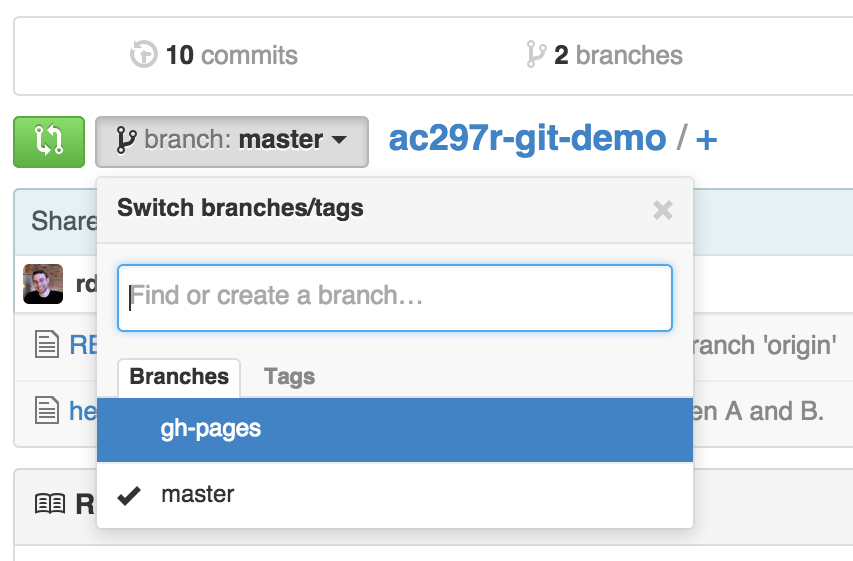
Alternately, if you’ve already clone your repository somewhere, you can do it on the command line:
$ git branch gh-pages
$ git checkout gh-pages
When you push changes to this branch, they will immediately be reflected
on the web at http://your-username.github.io/your-projectname.
You can use any static HTML, handwritten or otherwise.
Jekyll Project Pages
The last mechanism for creating project pages is using a framework called Jekyll. Jekyll is a cross between a static site generator and a blogging platform, and it’s automatically built into every github-hosted site.
Jekyll’s documentation is a little sketchy, but the basic idea is that if you put certain directories or specially-formatted files into your project website branch, Jekyll will transform them automatically before serving them.
We won’t cover all of Jekyll, but we can look at how to use Jekyll to turn a simple Markdown file into a nice-looking webpage.
Configuring Jekyll
To use Jekyll with github, you’ll want to add a _config.yaml file to
your gh-pages branch. This file can contain a number of useful pieces
of metadata, but most of them are optional. The only required
configuration option is setting the baseurl variable. A minimal config
file looks like this:
baseurl: /your-projectname
For idiosyncratic reasons specific to Jekyll, it’s important that you include the leading slash and omit a trailing one.
This config file is written in a mini-language called YAML, which has
become popular in the last couple of years. Conveniently, it’s
syntactically compatible with JSON, so if you want to write your
_config.yaml file in JSON, it will work.
Having this file isn’t strictly necessary to get Jekyll working (it’s already running be default), but it is necessary for links to be handled properly in templates.
Creating a template
To create a template, first make a _layouts directory in your
gh-pages branch (all Jekyll files and folders begin with an
underscore). This is where Jekyll will look for your templates.
Next, write a spiffy-looking HTML that you want to base your template off of. Jekyll is a substitution-based framework, so it will search for specific strings in your template and replace them with appropriate values. These variables will look something like this:
{{ site.baseurl }}
A list of the available substitutions is available here, but the most important ones you’ll probably care about are:
{{ page.title }}: The name of the page you’re templating. This is specified in a short header called “front matter” (more on this in a second) at the top of content pages.{{ site.baseurl }}: The url of your project website. This is what the_config.yamlfile fixed for you. You can create links using this by concatenating it with a path, like this:<a href="{{site.baseurl}}/my-page.html">...{{ content }}: The entire content of the page you’re templating, excluding the front matter.
Just add these string in appropriate locations (which can be anywhere, inside or outside of tags, it doesn’t matter) and your template is ready.
Creating a content page
Creating content is much easier now, and it can be done in either HTML or Markdown (which will be parsed before being templated).
The only trick is that each content page that you want to translate needs a short header at the top which tells Jekyll what to do with the file. The header is also written in YAML and is contained between dashes, like this:
---
title: My Page
layout: my-layout
---
Page content goes here...
Jekyll will assign the page.title variable to “My Page” and look
for a template file named my-layout.html in the _layouts directory
you created.
Let’s say you named this file “index.md”. If you navigate to
http://your-username.github.io/your-projectname/index.html, you should
see the content of your page substituted into the body of the template
page you created.
That’s it, you’re done. And now creating new pages is as easy as writing a couple lines of Markdown. And there’s nothing preventing you from automatically generating more static pages (HTML or Markdown) that use Jekyll’s template system.
nbviewer
A note should go to the eminently useful website http://nbviewer.ipython.org/. You’ve probably already used this, knowingly or not, to view ipython notebooks from other people.
What you may not know is that nbviewer can be used to view ipython notebooks directly from your git repository.
The easiest way to start is simply by typing in your github username into the search field. This will take you to a very familiar directory navigation page, which you can use to find the repository and notebook you want. I leave it up to you to check out the URL and understand how to craft links directly, but one useful tip is that these links are permanent. If you link to your repo using nbviewer, it will automatically display the most recent version of that branch (the branch name is embedded in the URL—and you can change this if you like).
One helpful trick is to put an nbviewer link to important notebooks right into your README.md or your project page so your visitors don’t have to download or fuss with the notebook themselves.
Git habits
Commit early, commit often.
Git is more effective when used at a fine granularity. For starters, you can’t undo what you haven’t committed, so committing lots of small changes makes it easier to find the right rollback point. Also, merging becomes a lot easier when you only have to deal with a handful of conflicts.
Commit unrelated changes separately.
Identifying the source of a bug or understanding the reason why a particular piece of code exists is much easier when commits focus on related changes. Some of this has to do with simplifying commit messages and making it easier to look through logs, but it has other related benefits: commits are smaller and simpler, and merge conflicts are confined to only the commits which actually have conflicting code.
Do not commit binaries and other temporary files.
Git is meant for tracking changes. In nearly all cases, the only meaningful difference between the contents of two binaries is that they are different. If you change source files, compile, and commit the resulting binary, git sees an entirely different file. The end result is that the git repository (which contains a complete history, remember) begins to become bloated with the history of many dissimilar binaries. Worse, there’s often little advantage to keeping those files in the history. An argument can be made for periodically snapshotting working binaries, but things like object files, compiled python files, and editor auto-saves are basically wasted space.
Ignore files which should not be committed
Git comes with a built-in mechanism for ignoring certain types of files.
Placing filenames or wildcards in a .gitignore file placed in the
top-level directory (where the .git directory is also located) will
cause git to ignore those files when checking file status. This is a
good way to ensure you don’t commit the wrong files accidentally, and
it also makes the output of git status somewhat cleaner.
Always make a branch for new changes
While it’s tempting to work on new code directly in the master
branch, it’s usually a good idea to create a new one instead,
especially for team-based projects. The major advantage to this practice
is that it keeps logically disparate change sets separate. This means
that if two people are working on improvements in two different
branches, when they merge, the actual workflow is reflected in the git
history. Plus, explicitly creating branches adds some semantic meaning
to your branch structure. Moreover, there is very little difference in
how you use git.
Write good commit messages
I cannot understate the importance of this. Seriously. Write good commit messages.
License
(C) CodeAhoy. License CC-BY-SA.
This work is a derivative of
“AC297r Tools Tutorial” by Bob Adolf used under CC-BY. It has been lightly edited to be rendered as HTML content.