Apache Airflow Tutorial
Pipelines
Automation helps us speed those manual boring tasks. The ability to automate means you can spend time working on other more thought-intensive projects.
Automation adds monitoring and logging tasks:
| ✅ Easy to automate | ❌ Difficult to automate |
|---|---|
| Regularly scheduled reports | One-off or non-scheduled tasks |
| Clear success/failure outcomes | Unclear success/failure outcomes |
| Input that can be handled via machines | Requires deeper human input |
Steps to automation
Whenever you consider automating a task ask the following questions:
- When should this task begin?
- Does this task have a time limit?
- What are the inputs for this task?
- What is success or failure within this task? (How can we clearly identify the outcomes?)
- If the task fails what should happen?
- What does the task provide or produce? In what way? To whom?
- What (if anything) should happen after the task concludes?
Top tip
If your project is too large or loosely defined, try breaking it up into smaller tasks and automate a few of those tasks. Perhaps your task involves a report which downloads two datasets, runs cleanup and analysis, and then sends the results to different groups depending on the outcome. You can break this task into subtasks, automating each step. If any of these subtasks fail, stop the chain and alert the whoever is responsible for maintaining the script so it can be investigated further.
What is a data pipeline?
Roughly this is how all pipelines look like:
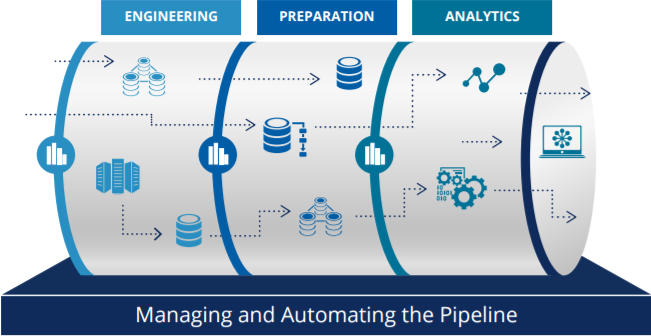
they consist mainly of three distinct parts: data engineering processes, data preparation, and analytics. The upstream steps and quality of data determine in great measure the performance and quality of the subsequent steps.
Why do pipelines matter?
- Analytics and batch processing is mission-critical as they power all data-intensive applications
- The complexity of the data sources and demands increase every day
- A lot of time is invested in writing, monitoring jobs, and troubleshooting issues.
This makes data engineering one of the most critical foundations of the whole analytics cycle.
Good data pipelines are:
- Reproducible: same code, same data, same environment -> same outcome
- Easy to productise: need minimal modifications from R&D to production
- Atomic: broken into smaller well-defined tasks
When working with data pipelines always remember these two statements:
Your Data is Dirty. Unless Proven Otherwise.
All Your Data is Important. Unless Proven Otherwise.
As your data engineering and data quality demands increase so does the complexity of the processes. So more often than not you will eventually need a workflow manager to help you with the orchestration of such processes.
Think of a workflow manager as:
GNU Make + Unix pipes + Steroids
⭐️ Creating your first ETL pipeline in Python
Setting your local database
Let’s us access your local MySQL from the command line, type the following on the command line:
MySQL -u root -p
followed by your MySQL password (this was done as part of your setup)
you should see the following message as well as a change in your prompt:
Welcome to the MySQL monitor.  Commands end with; or \g.
Your MySQL connection id is 276
Server version: 8.0.15 Homebrew

Copyright (c) 2000, 2019, Oracle and/or its affiliates. All rights reserved.

Oracle is a registered trademark of Oracle Corporation and/or its
affiliates. Other names may be trademarks of their respective
owners.

Type 'help;' or '\h' for help. Type '\c' to clear the current input statement.

mysql>
To see the existing databases you can use the following command:
SHOW DATABASES
you can also see the users and the relevant hosts using the following command
SELECT user, host FROM mysql.user;
We will need to create a new database for the following sections. So let’s start by creating a new database called airflowdb:
CREATE DATABASE airflowdb CHARACTER SET utf8 COLLATE utf8_unicode_ci;
as well as creating a corresponding user:
CREATE USER 'airflow'@'localhost' IDENTIFIED BY 'password';
make sure to substitute password with an actual password.
For this tutorial let’s assume the password is python2019.
Now we need to make sure that the airflow user has access to the databases:
GRANT ALL PRIVILEGES ON *.* TO 'airflow'@'localhost';
FLUSH PRIVILEGES;
If you want to restrict the access of this user to the airflowdb database, for example, you can do it via:
GRANT ALL PRIVILEGES ON airflowdb.* To 'airflow'@'localhost';
FLUSH PRIVILEGES;
so now the output of ` SELECT user, host FROM mysql.user;` should look like this:
 mysql> select user, host FROM mysql.user;
+------------------+-----------+
| user             | host      |
+------------------+-----------+
| airflow          | localhost |
| mysql.infoschema | localhost |
| mysql.session    | localhost |
| mysql.sys        | localhost |
| root             | localhost |
+------------------+-----------+
5 rows in set (0.00 sec)
if you need to remove a user you can use the following command:
DROP USER '<username>'@'localhost' ;
🚦Checking connection to the database from Python
The following snippet will allow you to connect to the created database from Python:
Note that you need the database name, password, and user for this.
## Script to check the connection to the database we created earlier airflowdb

## importing the connector from mysqlclient
import mysql.connector as mysql

## connecting to the database using the connect() method
## it takes 3 parameters: user, host, and password

dbconnect = mysql.connect(host="localhost",
                          user="airflow",
                          password="python2019",
                          db="airflowdb")

## print the connection object
print(dbconnect)

## do not forget to close the connection
dbconnect.close()
dbconnect is a connection object which can be used to execute queries, commit transactions and rollback transactions before closing the connection. We will use it later.
The dbconnect.close() method is used to close the connection to database. To perform further transactions, we need to create a new connection.
Streaming Twitter data into the database
We are going to create a Python script that helps us to achieve the following:
- Create a class to connect to the Twitter API
- Connect our database and reads the data into the correct columns
We will be using the Tweepy library for this (docs here https://tweepy.readthedocs.io/en/latest/) .
Let’s start with an example to collect some Tweets from your public timeline (for details on the Tweet object visit the API docs)
🚦 The first step will be to create a config file (config.cfg) with your Twitter API tokens.
[twitter]
consumer_key = xxxxxxxxxxxxxxxxxx
consumer_secret = xxxxxxxxxxxxxxxxxx
access_token = xxxxxxxxxxxxxxxxxx
access_token_secret = xxxxxxxxxxxxxxxxxx
Now to the coding bits:
## Import libraries needed
from configparser import ConfigParser
from pathlib import Path

import tweepy

## Path to the config file with the keys make sure not to commit this file
CONFIG_FILE = Path.cwd() / "config.cfg"

config = ConfigParser()
config.read(CONFIG_FILE)

## Authenticate to Twitter
auth = tweepy.OAuthHandler(
    config.get("twitter", "consumer_key"), config.get("twitter", "consumer_secret")
)
auth.set_access_token(
    config.get("twitter", "access_token"), config.get("twitter", "access_token_secret")
)

## Create Twitter API object
twitter = tweepy.API(auth)

## let's collect some of the tweets in your public timeline
public_tweets = twitter.home_timeline()

for tweet in public_tweets:
    print(tweet.text)
🚦 Create a new table
Let us create a folder called etl-basic and a stream_twitter.py script in it.
We are going to create a SQL table to save the tweets to. This table will contain the following:
- username
- tweet content
- time of creation
- retweet count
- unique tweet id
This corresponds to 5 columns and the primary key.
We already know how to connect to a database:
from mysql import connector as mysql

## Details for our MySql connection
DATABASE = {
    "host": "localhost",
    "user": "airflow",
    "password": "python2019",
    "db": "airflowdb",
}

## ----------------------------------------------
##  Database related functions
## ----------------------------------------------


def connect_db(my_database):
    """Connect to a given my_database

    Args:
        my_database(dict): dictionary with the my_database details

    Returns:
        dbconnect: MySql my_database connection object
    """
    try:
        dbconnect = mysql.connect(
            host=my_database.get("host"),
            user=my_database.get("user"),
            password=my_database.get("password"),
            db=my_database.get("db"),
        )
        print("connected")
        return dbconnect
    except mysql.Error as e:
        print(e)
Now we need to write a function to create the table
def create_table(my_database, new_table):
    """Create new table in a my_database

    Args:
        my_database (dict): details for the db
        new_table (str): name of the table to create
    """

    dbconnect = connect_db(my_database)

    # create a cursor for the queries
    cursor = dbconnect.cursor()
    cursor.execute("USE airflowdb")

    # here we delete the table, it can be kept or else
    cursor.execute(f"DROP TABLE IF EXISTS {new_table}")

    # these matches the Twitter data
    query = (
        f"CREATE TABLE `{new_table}` ("
        "  `id` INT(11) NOT NULL AUTO_INCREMENT,"
        "  `user` varchar(100) NOT NULL ,"
        "  `created_at` timestamp,"
        "  `tweet` varchar(255) NOT NULL,"
        "  `retweet_count` int(11) ,"
        "  `id_str` varchar(100),"
        "  PRIMARY KEY (`id`))"
    )

    cursor.execute(query)
    dbconnect.close()
    cursor.close()

    return print(f"Created {new_table} table")
🚦 Collect Tweets
The Twitter Streaming API has rate limits and prohibits too many connection attempts happening too quickly. It also prevents too many connections being made to it using the same authorization keys. Thankfully, tweepy takes care of these details for us, and we can focus on our program.
The main thing that we have to be aware of is the queue of tweets that we’re processing. If we take too long to process tweets, they will start to get queued, and Twitter may disconnect us. This means that processing each tweet needs to be extremely fast.
Let’s us transform the connection script we created before:
## Import libraries needed
import json
import time

from configparser import ConfigParser
from pathlib import Path

import tweepy
from dateutil import parser
from mysql import connector as mysql

## Path to the config file with the keys make sure not to commit this file
CONFIG_FILE = Path.cwd() / "config.cfg"

def connectTwitter():
    config = ConfigParser()
    config.read(CONFIG_FILE)

    #  complete the part to Authenticate to Twitter


    # Create Twitter API object
    twitter = tweepy.API(auth, wait_on_rate_limit=True, wait_on_rate_limit_notify=True)

    print(f"🦄 Connected as {twitter.me().screen_name}")

    return twitter
The next step is to create a stream listener.
The StreamListener class has a method called on_data. This method will automatically figure out what kind of data Twitter sent, and call an appropriate method to deal with the specific data type. It’s possible to deal with events like users sending direct messages, tweets being deleted, and more.
class customListener(tweepy.StreamListener):
    """We need to create an instance of the Stream Listener
    http://docs.tweepy.org/en/v3.4.0/streaming_how_to.html
    """

    def on_error(self, status_code):
        if status_code == 420:
            # returning False in on_data disconnects the stream
            return False

    def on_status(self, status):
        print(status.text)
        return True

    def on_data(self, data):
        """
        Automatic detection of the kind of data collected from Twitter
        This method reads in tweet data as JSON and extracts the data we want.
        """
        try:
            # parse as json
            raw_data = json.loads(data)

            # extract the relevant data
            if "text" in raw_data:
                user = raw_data["user"]["screen_name"]
                created_at = parser.parse(raw_data["created_at"])
                tweet = raw_data["text"]
                retweet_count = raw_data["retweet_count"]
                id_str = raw_data["id_str"]

            # insert data just collected into MySQL my_database
            populate_table(user, created_at, tweet, retweet_count, id_str)
            print(f"Tweet colleted at: {created_at}")

        except Error as e:
            print(e)
🚦 In pairs discuss how you would create the populate_table function
def populate_table(
    user, created_at, tweet, retweet_count, id_str, my_database=DATABASE
):
    """Populate a given table witht he Twitter collected data

    Args:
        user (str): username from the status
        created_at (datetime): when the tweet was created
        tweet (str): text
        retweet_count (int): number of retweets
        id_str (int): unique id for the tweet
    """

    dbconnect = connect_db(DATABASE)

    cursor = dbconnect.cursor()
    cursor.execute("USE airflowdb")

    # add content here

    try:
        # what is missing?
        commit()
        print("commited")

    except mysql.Error as e:
        print(e)
        dbconnect.rollback()

    cursor.close()
    dbconnect.close()

    return
🚦 For this to be called we need to wrap around a main function:
## complete the main function
if __name__ == "__main__":

    create_table(DATABASE, "tweets")
    # first we need to authenticate
    twitter = connectTwitter()

    # next: create stream listener
    myStreamListener = customListener()
    myStream = tweepy.Stream(auth=twitter.auth, listener=myStreamListener, timeout=30)

    # stream tweets using the filter method
    start_stream(myStream, track=["python", "pycon", "jupyter", "#pycon2019"], async=True)
Extending your data pipeline
🚀 So far we have collected some data through streaming (enough to collect some data). And created a database where this data is going to be deposited into.
The next step is to transform the data and prepare it for more downstream processes.
There are different mechanisms to share data between pipeline steps:
- files
- databases
- queues
In each case, we need a way to get data from the current step to the next step.
🚦 The next step would be to add some ‘transformation’ steps to the data set.
Modify your stream_twitter.py so that the table contains also: language, follower count and country.
Now let’s create a script called analyse_twitter.py
This script will do the following:
- Load the table into a pandas dataframe
- Clean the data: lowercase usernames, remove RT
- Create a plot from the data
- Save the plot and a csv with the clean data
import os
import os.path
import re
from datetime import datetime
from pathlib import Path

import matplotlib.pyplot as plt
import mysql.connector as mysql
import pandas as pd

## import the previously created functions
from stream_twitter import connect_db

## Details for our MySql connection
DATABASE = {
    "host": "localhost",
    "user": "airflow",
    "password": "python2019",
    "db": "airflowdb",
}

# ----------------------------------------------
#  Database related functions
# ----------------------------------------------


def sql_to_csv(my_database, my_table):

    dbconnect = connect_db(my_database)

    cursor = dbconnect.cursor()

    query = f"SELECT * FROM {table}"
    all_tweets = pd.read_sql_query(query, dbconnect)

    if os.path.exists("./data"):
        all_tweets.to_csv("./data/raw_tweets.csv", index=False)

    else:
        os.mkdir("./data")
        all_tweets.to_csv("./data/raw_tweets.csv", index=False)


def sql_to_df(my_database, my_table):
    dbconnect = connect_db(my_database)

    cursor = dbconnect.cursor()

    query = f"SELECT * FROM {my_table}"

    # store in data frame

    df = pd.read_sql_query(query, dbconnect, index_col="id")

    cursor.close()
    dbconnect.close()

    return df


# ----------------------------------------------
#  Data processing
# ----------------------------------------------


def clean_data(df):

    # Make all usernames lowercase
    clean_df = df.copy()
    clean_df["user"] = df["user"].str.lower()

    # keep only non RT
    clean_df = clean_df[~clean_df["tweet"].str.contains("RT")]

    return clean_df


def create_plots(df):
    x = df["language"].unique()
    fig, ax = plt.subplots()
    countries = df["language"].value_counts()
    plt.bar(range(len(countries)), countries)
    fig.suptitle("Language counts")
    plt.xlabel("languages")
    plt.ylabel("count")
    ax.set_xticklabels(x)

    if os.path.exists("./plots"):
        fig.savefig("./plots/barchart_lang.png")

    else:
        os.mkdir("./plots")
        fig.savefig("./plots/barchart_lang.png")


def save_df(df):
    today = datetime.today().strftime("%Y-%m-%d")

    if os.path.exists("./data"):
        df.to_csv(f"./data/{today}-clean-df.csv", index=None)

    else:
        os.mkdir("./data")
        df.to_csv(f"./data/{today}-clean-df.csv", index=None)


if __name__ == "__main__":

    df = sql_to_df(DATABASE, "tweets_long")
    print("Database loaded in df")

    clean_df = clean_data(df)

    create_plots(clean_df)

    save_df(clean_df)
Airflow basics
What is Airflow?
![]()
Airflow is a Workflow engine which means:
- Manage scheduling and running jobs and data pipelines
- Ensures jobs are ordered correctly based on dependencies
- Manage the allocation of scarce resources
- Provides mechanisms for tracking the state of jobs and recovering from failure
It is highly versatile and can be used across many many domains:

Basic Airflow concepts
- Task: a defined unit of work (these are called operators in Airflow)
- Task instance: an individual run of a single task. Task instances also have an indicative state, which could be “running”, “success”, “failed”, “skipped”, “up for retry”, etc.
- DAG: Directed acyclic graph, a set of tasks with explicit execution order, beginning, and end
- DAG run: individual execution/run of a DAG
Debunking the DAG
The vertices and edges (the arrows linking the nodes) have an order and direction associated to them
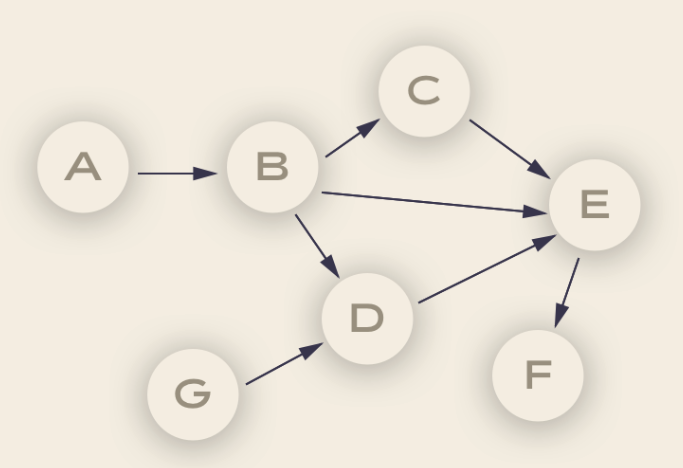
each node in a DAG corresponds to a task, which in turn represents some sort of data processing. For example:
Node A could be the code for pulling data from an API, node B could be the code for anonymizing the data. Node B could be the code for checking that there are no duplicate records, and so on.
These ‘pipelines’ are acyclic since they need a point of completion.
Dependencies
Each of the vertices has a particular direction that shows the relationship between certain nodes. For example, we can only anonymize data once this has been pulled out from the API.
Idempotency
This is one of the most important characteristics of good ETL architectures.
When we say that something is idempotent it means it will produce the same result regardless of how many times this is run (i.e. the results are reproducible).
Reproducibility is particularly important in data-intensive environments as this ensures that the same inputs will always return the same outputs.
Airflow components
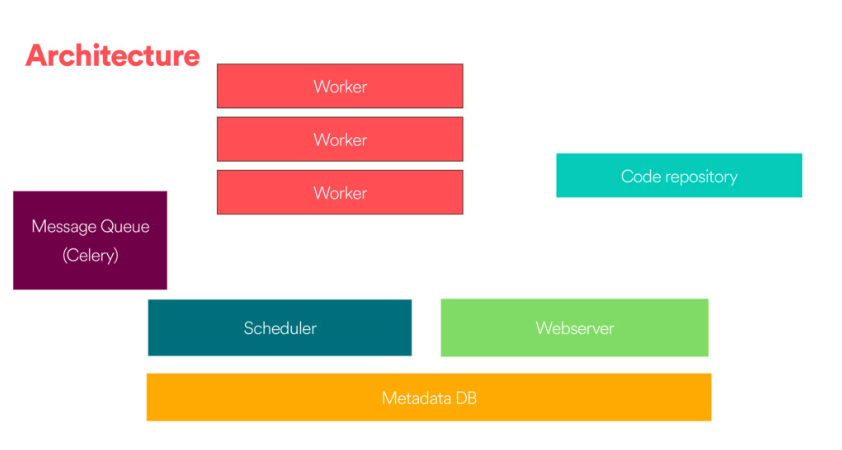
There are 4 main components to Apache Airflow:
Web server
The GUI. This is under the hood a Flask app where you can track the status of your jobs and read logs from a remote file store (e.g. Azure Blobstorage).
Scheduler
This component is responsible for scheduling jobs. This is a multithreaded Python process that uses the DAGb object to decide what tasks need to be run, when and where.
The task state is retrieved and updated from the database accordingly. The web server then uses these saved states to display job information.
Executor
The mechanism that gets the tasks done.
Metadata database
- Powers how the other components interact
- Stores the Airflow states
- All processes read and write from here
Workflow as a code
One of the main advantages of using a workflow system like Airflow is that all is code, which makes your workflows maintainable, versionable, testable, and collaborative.
Thus your workflows become more explicit and maintainable (atomic tasks).
Not only your code is dynamic but also is your infrastructure.
Defining tasks
Tasks are defined based on the abstraction of Operators (see Airflow docs here) which represent a single idempotent task.
The best practice is to have atomic operators (i.e. can stand on their own and do not need to share resources among them).
You can choose among;
BashOperatorPythonOperatorEmailOperatorSimpleHttpOperatorMySqlOperator(and other DB)
Examples:
t1 = BashOperator(task_id='print_date',
    bash_command='date,
    dag=dag)
def print_context(ds, **kwargs):
    pprint(kwargs)
    print(ds)
    return 'Whatever you return gets printed in the logs'


run_this = PythonOperator(
    task_id='print_the_context',
    provide_context=True,
    python_callable=print_context,
    dag=dag,
)
Comparing Luigi and Airflow
Luigi
- Created at Spotify (named after the plumber)
- Open sourced in late 2012
- GNU make for data
Airflow
- Airbnb data team
- Open-sourced mud 2015
- Apache incubator mid-2016
- ETL pipelines
Similarities
- Python open source projects for data pipelines
- Integrate with a number of sources (databases, filesystems)
- Tracking failure, retries, success
- Ability to identify the dependencies and execution
Differences
- Scheduler support: Airflow has built-in support using schedulers
- Scalability: Airflow has had stability issues in the past
- Web interfaces

| Airflow | Luigi |
|---|---|
Task are defined bydag_id defined by user name |
Task are defined by task name and parameters |
| Task retries based on definitions | Decide if a task is done via input/output |
| Task code to the worker | Workers started by Python file where the tasks are defined |
| Centralized scheduler (Celery spins up workers) | Centralized scheduler in charge of deduplication sending tasks (Tornado based) |
Airflow 101: working locally and familiarise with the tool
Pre-requisites
The following prerequisites are needed:
- Libraries detailed in the Setting up section (either via conda or pipenv)
- MySQL installed
- text editor
- command line
Getting your environment up and running
If you followed the instructions you should have Airflow installed as well as the rest of the packages we will be using.
So let’s get our environment up and running:
If you are using conda start your environment via:
$ source activate airflow-env
If using pipenv then:
$ pipenv shell
this will start a shell within a virtual environment, to exit the shell you need to type exit and this will exit the virtual environment.
Starting Airflow locally
Airflow home lives in ~/airflow by default, but you can change the location before installing airflow. You first need to set the AIRFLOW_HOME environment variable and then install airflow. For example, using pip:
export AIRFLOW_HOME=~/mydir/airflow

## install from PyPI using pip
pip install apache-airflow
once you have completed the installation you should see something like this in the airflow directory (wherever it lives for you)
drwxr-xr-x    - myuser 18 Apr 14:02 .
.rw-r--r--  26k myuser 18 Apr 14:02 ├── airflow.cfg
drwxr-xr-x    - myuser 18 Apr 14:02 ├── logs
drwxr-xr-x    - myuser 18 Apr 14:02 │  └── scheduler
drwxr-xr-x    - myuser 18 Apr 14:02 │     ├── 2019-04-18
lrwxr-xr-x   46 myuser 18 Apr 14:02 │     └── latest -> /Users/myuser/airflow/logs/scheduler/2019-04-18
.rw-r--r-- 2.5k myuser 18 Apr 14:02 └── unittests.cfg
We need to create a local dag folder:
mkdir ~/airflow/dags
As your project evolves, your directory will look something like this:
airflow                  # the root directory.
├── dags                 # root folder for all dags. files inside folders are not searched for dags.
│   ├── my_dag.py, # my dag (definitions of tasks/operators) including precedence.
│   └── ...
├── logs                 # logs for the various tasks that are run
│   └── my_dag           # DAG specific logs
│   │   ├── src1_s3      # folder for task-specific logs (log files are created by date of a run)
│   │   ├── src2_hdfs
│   │   ├── src3_s3
│   │   └── spark_task_etl
├── airflow.db           # SQLite database used by Airflow internally to track the status of each DAG.
├── airflow.cfg          # global configuration for Airflow (this can be overridden by config inside the file.)
└── ...
Prepare your database
As we mentioned before Airflow uses a database to keep track of the tasks and their statuses. So it is critical to have one set up.
To start the default database we can run ` airflow initdb`. This will initialize your database via alembic so that it matches the latest Airflow release.
The default database used is sqlite which means you cannot parallelize tasks using this database. Since we have MySQL and MySQL client installed we will set them up so that we can use them with airflow.
🚦Create an airflow database
From the command line:
MySQL -u root -p
mysql> CREATE DATABASE airflow CHARACTER SET utf8 COLLATE utf8_unicode_ci;
mysql> GRANT ALL PRIVILEGES ON airflow.* To 'airflow'@'localhost';
mysql> FLUSH PRIVILEGES;
and initialize the database:
airflow initdb
Notice that this will fail with the default airflow.cfg
Update your local configuration
Open your airflow configuration file ~/airflow/airflow.cf and make the following changes:
executor = CeleryExecutor
## http://docs.celeryproject.org/en/latest/userguide/configuration.html#broker-settings
## needs rabbitmq running
broker_url = amqp://guest:[email protected]/


## http://docs.celeryproject.org/en/latest/userguide/configuration.html#task-result-backend-settings
result_backend = db+mysql://airflow:airflow@localhost:3306/airflow

sql_alchemy_conn = mysql://airflow:python2019@localhost:3306/airflow
Here we are replacing the default executor (SequentialExecutor) with the CeleryExecutor so that we can run multiple DAGs in parallel.
We also replace the default sqlite database with our newly created airflow database.
Now we can initialize the database:
airflow initdb
Let’s now start the web server locally:
airflow webserver -p 8080
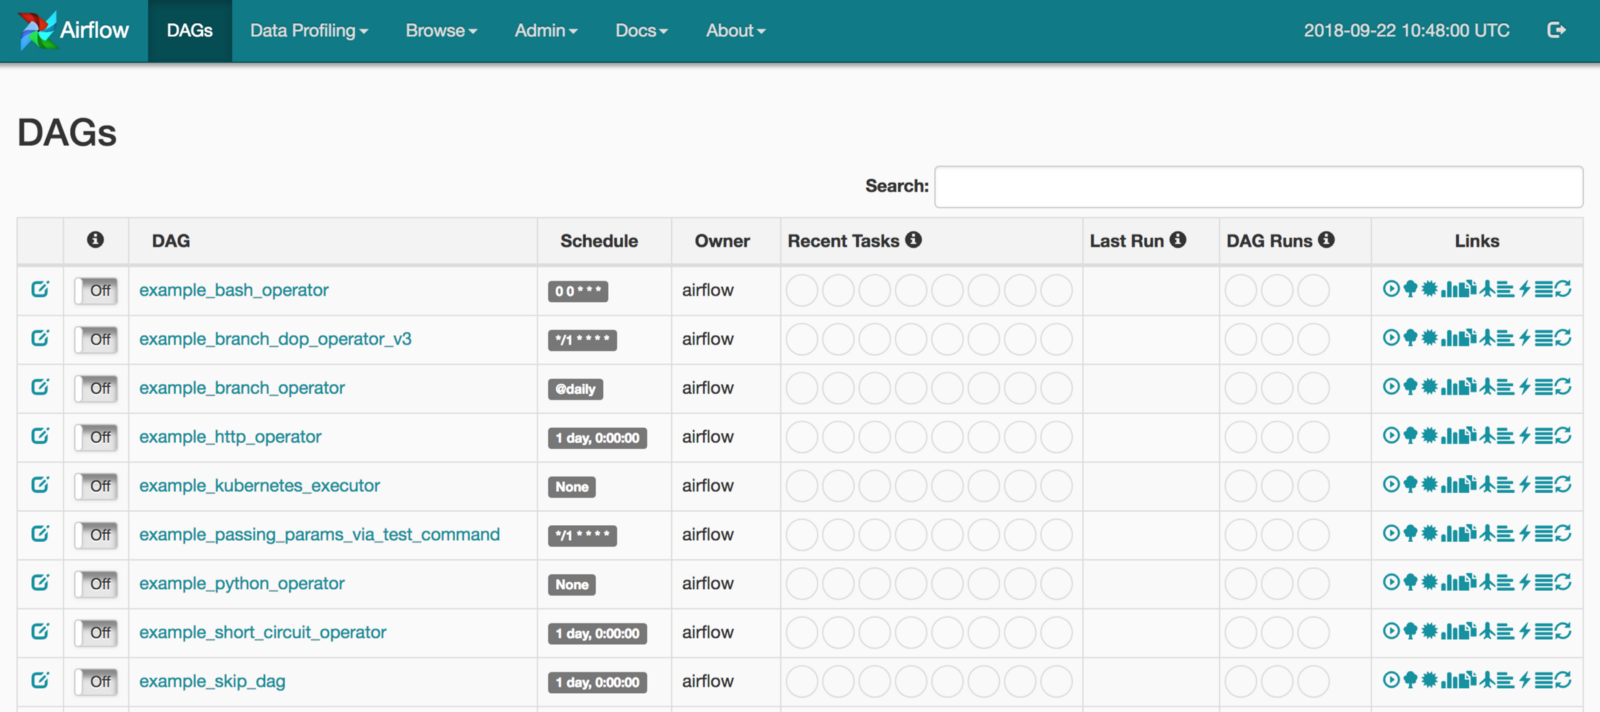
we can head over to http://localhost:8080 now and you will see that there are a number of examples DAGS already there.
🚦 Take some time to familiarise with the UI and get your local instance set up
Now let’s have a look at the connections (http://localhost:8080/admin/connection/) go to admin > connections. You should be able to see a number of connections available. For this tutorial, we will use some of the connections including mysql.
Commands
Let us go over some of the commands. Back on your command line:
airflow list_dags
we can list the DAG tasks in a tree view
airflow list_tasks tutorial --tree
we can tests the dags too, but we will need to set a date parameter so that this executes:
airflow test tutorial print_date 2019-05-01
(note that you cannot use a future date or you will get an error)
airflow test tutorial templated 2019-05-01
By using the test commands these are not saved in the database.
Now let’s start the scheduler:
airflow scheduler
Behind the scenes, it monitors and stays in sync with a folder for all DAG objects it contains. The Airflow scheduler is designed to run as a service in an Airflow production environment.
Now with the schedule up and running we can trigger an instance:
$ airflow run airflow run example_bash_operator runme_0 2015-01-01
This will be stored in the database and you can see the change of the status change straight away.
What would happen for example if we wanted to run or trigger the tutorial task? 🤔
Let’s try from the CLI and see what happens.
airflow trigger_dag tutorial
Writing your first DAG
Let’s create our first simple DAG.
Inside the dag directory (~/airflow/dags) create a simple_dag.py file.
from datetime import datetime, timedelta
from airflow import DAG
from airflow.operators.dummy_operator import DummyOperator
from airflow.operators.python_operator import PythonOperator


def print_hello():
    return "Hello world!"


default_args = {
    "owner": "airflow",
    "depends_on_past": False,
    "start_date": datetime(2019, 4, 30),
    "email": ["[email protected]"],
    "email_on_failure": False,
    "email_on_retry": False,
    "retries": 1,
    "retry_delay": timedelta(minutes=2),
}

dag = DAG(
    "hello_world",
    description="Simple tutorial DAG",
    schedule_interval="0 12 * * *",
    default_args=default_args,
    catchup=False,
)

t1 = DummyOperator(task_id="dummy_task", retries=3, dag=dag)

t2 = PythonOperator(task_id="hello_task", python_callable=print_hello, dag=dag)

# sets downstream foe t1
t1 >> t2

# equivalent
# t2.set_upstream(t1)
If it is properly setup you should be able to see this straight away on your instance.
(C) CodeAhoy. Licensed under CC BY-SA 4.0.
Original content Airflow tutorial for PyCon 2019 Used under Creative Commons Attribution License CC-BY 4.0.