Related Books


Books / The Little ASP.NET Core Book / Chapter 1
Your first ASP.NET application
Ready to build your first web app with ASP.NET Core? You’ll need to gather a few things first:
Your favorite code editor. You can use Atom, Sublime, Notepad, or whatever editor you prefer writing code in. If you don’t have a favorite, give Visual Studio Code a try. It’s a free, cross-platform code editor that has rich support for writing C#, JavaScript, HTML, and more. Just search for “download visual studio code” and follow the instructions.
If you’re on Windows, you can also use Visual Studio to build ASP.NET Core applications. You’ll need Visual Studio 2017 version 15.3 or later (the free Community Edition is fine). Visual Studio has great code completion and refactoring support for C#, although Visual Studio Code is close behind.
The .NET Core SDK. Regardless of the editor or platform you’re using, you’ll need to install the .NET Core SDK, which includes the runtime, base libraries, and command line tools you need for building ASP.NET Core applications. The SDK can be installed on Windows, Mac, or Linux.
Once you’ve decided on an editor, you’ll need to get the SDK.
Get the SDK
Search for “download .net core” and follow the instructions on Microsoft’s download page to get the .NET Core SDK. After the SDK has finished installing, open up the Terminal (or PowerShell on Windows) and use the dotnet command line tool (also called a CLI) to make sure everything is working:
dotnet --version

2.1.104
You can get more information about your platform with the --info flag:
dotnet --info

.NET Command Line Tools (2.1.104)

Product Information:
 Version:            2.1.104
 Commit SHA-1 hash:  48ec687460

Runtime Environment:
 OS Name:     Mac OS X
 OS Version:  10.13

(more details...)
If you see output like the above, you’re ready to go!
Hello World in C#
Before you dive into ASP.NET Core, try creating and running a simple C# application.
You can do this all from the command line. First, open up the Terminal (or PowerShell on Windows). Navigate to the location you want to store your projects, such as your Documents directory:
cd Documents
Use the dotnet command to create a new project:
dotnet new console -o CsharpHelloWorld
The dotnet new command creates a new .NET project in C# by default. The console parameter selects a template for a console application (a program that outputs text to the screen). The -o CsharpHelloWorld parameter tells dotnet new to create a new directory called CsharpHelloWorld for all the project files. Move into this new directory:
cd CsharpHelloWorld
dotnet new console creates a basic C# program that writes the text Hello World! to the screen. The program is comprised of two files: a project file (with a .csproj extension) and a C# code file (with a .cs extension). If you open the former in a text or code editor, you’ll see this:
CsharpHelloWorld.csproj
<Project Sdk="Microsoft.NET.Sdk">

  <PropertyGroup>
    <OutputType>Exe</OutputType>
    <TargetFramework>netcoreapp2.0</TargetFramework>
  </PropertyGroup>

</Project>
The project file is XML-based and defines some metadata about the project. Later, when you reference other packages, those will be listed here (similar to a package.json file for npm). You won’t have to edit this file by hand very often.
Program.cs
using System;

namespace CsharpHelloWorld
{
    class Program
    {
        static void Main(string[] args)
        {
            Console.WriteLine("Hello World!");
        }
    }
}
static void Main is the entry point method of a C# program, and by convention it’s placed in a class (a type of code structure or module) called Program. The using statement at the top imports the built-in System classes from .NET and makes them available to the code in your class.
From inside the project directory, use dotnet run to run the program. You’ll see the output written to the console after the code compiles:
dotnet run

Hello World!
That’s all it takes to scaffold and run a .NET program! Next, you’ll do the same thing for an ASP.NET Core application.
Create an ASP.NET Core project
If you’re still in the directory you created for the Hello World sample, move back up to your Documents or home directory:
cd ..
Next, create a new directory to store your entire project, and move into it:
mkdir AspNetCoreTodo
cd AspNetCoreTodo
Next, create a new project with dotnet new, this time with some extra options:
dotnet new mvc --auth Individual -o AspNetCoreTodo
cd AspNetCoreTodo
This creates a new project from the mvc template, and adds some additional authentication and security bits to the project. (I’ll cover security in the Security and identity chapter.)
You might be wondering why you have a directory called
AspNetCoreTodoinside another directory calledAspNetCoreTodo. The top-level or “root” directory can contain one or more project directories. The root directory is sometimes called a solution directory. Later, you’ll add more project directories side-by-side with theAspNetCoreTodoproject directory, all within a single root solution directory.
You’ll see quite a few files show up in the new project directory. Once you cd into the new directory, all you have to do is run the project:
dotnet run

Now listening on: http://localhost:5000
Application started. Press Ctrl+C to shut down.
Instead of printing to the console and exiting, this program starts a web server and waits for requests on port 5000.
Open your web browser and navigate to http://localhost:5000. You’ll see the default ASP.NET Core splash page, which means your project is working! When you’re done, press Ctrl-C in the terminal window to stop the server.
The parts of an ASP.NET Core project
The dotnet new mvc template generates a number of files and directories for you. Here are the most important things you get out of the box:
-
The Program.cs and Startup.cs files set up the web server and ASP.NET Core pipeline. The
Startupclass is where you can add middleware that handles and modifies incoming requests, and serves things like static content or error pages. It’s also where you add your own services to the dependency injection container (more on this later). -
The Models, Views, and Controllers directories contain the components of the Model-View-Controller (MVC) architecture. You’ll explore all three in the next chapter.
-
The wwwroot directory contains static assets like CSS, JavaScript, and image files. Files in
wwwrootwill be served as static content, and can be bundled and minified automatically. -
The appsettings.json file contains configuration settings ASP.NET Core will load on startup. You can use this to store database connection strings or other things that you don’t want to hard-code.
Tips for Visual Studio Code
If you’re using Visual Studio Code for the first time, here are a couple of helpful tips to get you started:
-
Open the project root folder: In Visual Studio Code, choose File - Open or File - Open Folder. Open the
AspNetCoreTodofolder (the root directory), not the inner project directory. If Visual Studio Code prompts you to install missing files, click Yes to add them. -
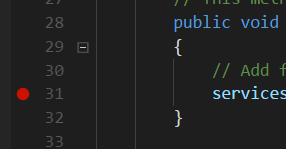
F5 to run (and debug breakpoints): With your project open, press F5 to run the project in debug mode. This is the same as
dotnet runon the command line, but you have the benefit of setting breakpoints in your code by clicking on the left margin:
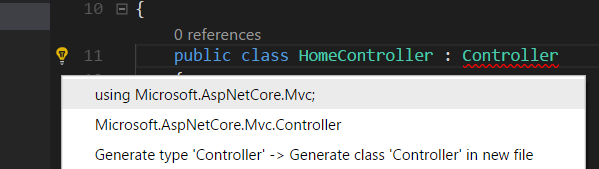
- Lightbulb to fix problems: If your code contains red squiggles (compiler errors), put your cursor on the code that’s red and look for the lightbulb icon on the left margin. The lightbulb menu will suggest common fixes, like adding a missing
usingstatement to your code:
- Compile quickly: Use the shortcut
Command-Shift-BorControl-Shift-Bto run the Build task, which does the same thing asdotnet build.
These tips apply to Visual Studio (not Code) on Windows too. If you’re using Visual Studio, you’ll need to open the
.csprojproject file directly. Visual Studio will later prompt you to save the Solution file, which you should save in the root directory (the firstAspNetCoreTodofolder). You can also create an ASP.NET Core project directly within Visual Studio using the templates in File - New Project.
A note about Git
If you use Git or GitHub to manage your source code, now is a good time to do git init and initialize a Git repository in the project root directory:
cd ..
git init
Make sure you add a .gitignore file that ignores the bin and obj directories. The Visual Studio template on GitHub’s gitignore template repo (https://github.com/github/gitignore) works great.
There’s plenty more to explore, so let’s dive in and start building an application!