Related Books


Books / The Little ASP.NET Core Book / Chapter 12
Add more features
Now that you’ve connected to a database using Entity Framework Core, you’re ready to add some more features to the application. First, you’ll make it possible to add new to-do items using a form.
Add new to-do items
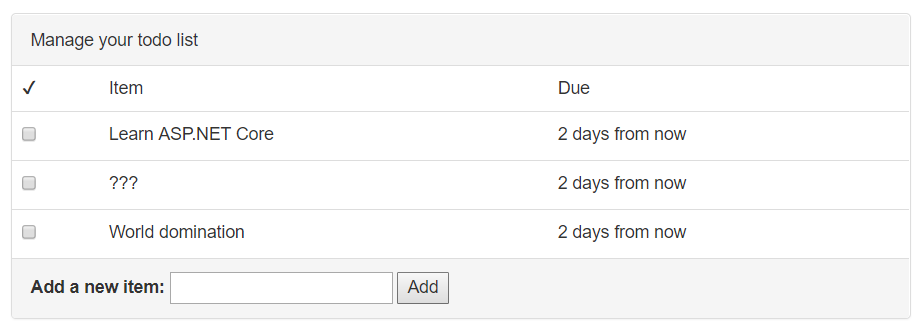
The user will add new to-do items with a simple form below the list:
Adding this feature requires a few steps:
- Adding a form to the view
- Creating a new action on the controller to handle the form
- Adding code to the service layer to update the database
Add a form
The Views/Todo/Index.cshtml view has a placeholder for the Add Item form:
<div class="panel-footer add-item-form">
  <!-- TODO: Add item form -->
</div>
To keep things separate and organized, you’ll create the form as a partial view. A partial view is a small piece of a larger view that lives in a separate file.
Create an AddItemPartial.cshtml view:
Views/Todo/AddItemPartial.cshtml
@model TodoItem

<form asp-action="AddItem" method="POST">
    <label asp-for="Title">Add a new item:</label>
    <input asp-for="Title">
    <button type="submit">Add</button>
</form>
The asp-action tag helper can generate a URL for the form, just like when you use it on an <a> element. In this case, the asp-action helper gets replaced with the real path to the AddItem route you’ll create:
<form action="/Todo/AddItem" method="POST">
Adding an asp- tag helper to the <form> element also adds a hidden field to the form containing a verification token. This verification token can be used to prevent cross-site request forgery (CSRF) attacks. You’ll verify the token when you write the action.
That takes care of creating the partial view. Now, reference it from the main Todo view:
Views/Todo/Index.cshtml
<div class="panel-footer add-item-form">
  @await Html.PartialAsync("AddItemPartial", new TodoItem())
</div>
Add an action
When a user clicks Add on the form you just created, their browser will construct a POST request to /Todo/AddItem on your application. That won’t work right now, because there isn’t any action that can handle the /Todo/AddItem route. If you try it now, ASP.NET Core will return a 404 Not Found error.
You’ll need to create a new action called AddItem on the TodoController:
[ValidateAntiForgeryToken]
public async Task<IActionResult> AddItem(TodoItem newItem)
{
    if (!ModelState.IsValid)
    {
        return RedirectToAction("Index");
    }

    var successful = await _todoItemService.AddItemAsync(newItem);
    if (!successful)
    {
        return BadRequest("Could not add item.");
    }

    return RedirectToAction("Index");
}
Notice how the new AddItem action accepts a TodoItem parameter? This is the same TodoItem model you created in the MVC basics chapter to store information about a to-do item. When it’s used here as an action parameter, ASP.NET Core will automatically perform a process called model binding.
Model binding looks at the data in a request and tries to intelligently match the incoming fields with properties on the model. In other words, when the user submits this form and their browser POSTs to this action, ASP.NET Core will grab the information from the form and place it in the newItem variable.
The [ValidateAntiForgeryToken] attribute before the action tells ASP.NET Core that it should look for (and verify) the hidden verification token that was added to the form by the asp-action tag helper. This is an important security measure to prevent cross-site request forgery (CSRF) attacks, where your users could be tricked into submitting data from a malicious site. The verification token ensures that your application is actually the one that rendered and submitted the form.
Take a look at the AddItemPartial.cshtml view once more. The @model TodoItem line at the top of the file tells ASP.NET Core that the view should expect to be paired with the TodoItem model. This makes it possible to use asp-for="Title" on the <input> tag to let ASP.NET Core know that this input element is for the Title property.
Because of the @model line, the partial view will expect to be passed a TodoItem object when it’s rendered. Passing it a new TodoItem via Html.PartialAsync initializes the form with an empty item. (Try appending { Title = "hello" } and see what happens!)
During model binding, any model properties that can’t be matched up with fields in the request are ignored. Since the form only includes a Title input element, you can expect that the other properties on TodoItem (the IsDone flag, the DueAt date) will be empty or contain default values.
Instead of reusing the
TodoItemmodel, another approach would be to create a separate model (likeNewTodoItem) that’s only used for this action and only has the specific properties (Title) you need for adding a new to-do item. Model binding is still used, but this way you’ve separated the model that’s used for storing a to-do item in the database from the model that’s used for binding incoming request data. This is sometimes called a binding model or a data transfer object (DTO). This pattern is common in larger, more complex projects.
After binding the request data to the model, ASP.NET Core also performs model validation. Validation checks whether the data bound to the model from the incoming request makes sense or is valid. You can add attributes to the model to tell ASP.NET Core how it should be validated.
The [Required] attribute on the Title property tells ASP.NET Core’s model validator to consider the title invalid if it is missing or blank. Take a look at the code of the AddItem action: the first block checks whether the ModelState (the model validation result) is valid. It’s customary to do this validation check right at the beginning of the action:
if (!ModelState.IsValid)
{
    return RedirectToAction("Index");
}
If the ModelState is invalid for any reason, the browser will be redirected to the /Todo/Index route, which refreshes the page.
Next, the controller calls into the service layer to do the actual database operation of saving the new to-do item:
var successful = await _todoItemService.AddItemAsync(newItem);
if (!successful)
{
    return BadRequest(new { error = "Could not add item." });
}
The AddItemAsync method will return true or false depending on whether the item was successfully added to the database. If it fails for some reason, the action will return an HTTP 400 Bad Request error along with an object that contains an error message.
Finally, if everything completed without errors, the action redirects the browser to the /Todo/Index route, which refreshes the page and displays the new, updated list of to-do items to the user.
Add a service method
If you’re using a code editor that understands C#, you’ll see red squiggely lines under AddItemAsync because the method doesn’t exist yet.
As a last step, you need to add a method to the service layer. First, add it to the interface definition in ITodoItemService:
public interface ITodoItemService
{
    Task<TodoItem[]> GetIncompleteItemsAsync();

    Task<bool> AddItemAsync(TodoItem newItem);
}
Then, the actual implementation in TodoItemService:
public async Task<bool> AddItemAsync(TodoItem newItem)
{
    newItem.Id = Guid.NewGuid();
    newItem.IsDone = false;
    newItem.DueAt = DateTimeOffset.Now.AddDays(3);

    _context.Items.Add(newItem);

    var saveResult = await _context.SaveChangesAsync();
    return saveResult == 1;
}
The newItem.Title property has already been set by ASP.NET Core’s model binder, so this method only needs to assign an ID and set the default values for the other properties. Then, the new item is added to the database context. It isn’t actually saved until you call SaveChangesAsync(). If the save operation was successful, SaveChangesAsync() will return 1.
Try it out
Run the application and add some items to your to-do list with the form. Since the items are being stored in the database, they’ll still be there even after you stop and start the application again.
As an extra challenge, try adding a date picker using HTML and JavaScript, and let the user choose an (optional) date for the
DueAtproperty. Then, use that date instead of always making new tasks that are due in 3 days.
Complete items with a checkbox
Adding items to your to-do list is great, but eventually you’ll need to get things done, too. In the Views/Todo/Index.cshtml view, a checkbox is rendered for each to-do item:
<input type="checkbox" class="done-checkbox">
Clicking the checkbox doesn’t do anything (yet). Just like the last chapter, you’ll add this behavior using forms and actions. In this case, you’ll also need a tiny bit of JavaScript code.
Add form elements to the view
First, update the view and wrap each checkbox with a <form> element. Then, add a hidden element containing the item’s ID:
Views/Todo/Index.cshtml
<td>
    <form asp-action="MarkDone" method="POST">
        <input type="checkbox" class="done-checkbox">
        <input type="hidden" name="id" value="@item.Id">
    </form>
</td>
When the foreach loop runs in the view and prints a row for each to-do item, a copy of this form will exist in each row. The hidden input containing the to-do item’s ID makes it possible for your controller code to tell which box was checked. (Without it, you’d be able to tell that some box was checked, but not which one.)
If you run your application right now, the checkboxes still won’t do anything, because there’s no submit button to tell the browser to create a POST request with the form’s data. You could add a submit button under each checkbox, but that would be a silly user experience. Ideally, clicking the checkbox should automatically submit the form. You can achieve that by adding some JavaScript.
Add JavaScript code
Find the site.js file in the wwwroot/js directory and add this code:
wwwroot/js/site.js
$(document).ready(function() {

    // Wire up all of the checkboxes to run markCompleted()
    $('.done-checkbox').on('click', function(e) {
        markCompleted(e.target);
    });
});

function markCompleted(checkbox) {
    checkbox.disabled = true;

    var row = checkbox.closest('tr');
    $(row).addClass('done');

    var form = checkbox.closest('form');
    form.submit();
}
This code first uses jQuery (a JavaScript helper library) to attach some code to the click even of all the checkboxes on the page with the CSS class done-checkbox. When a checkbox is clicked, the markCompleted() function is run.
The markCompleted() function does a few things:
- Adds the
disabledattribute to the checkbox so it can’t be clicked again - Adds the
doneCSS class to the parent row that contains the checkbox, which changes the way the row looks based on the CSS rules instyle.css - Submits the form
That takes care of the view and frontend code. Now it’s time to add a new action!
Add an action to the controller
As you’ve probably guessed, you need to add an action called MarkDone in the TodoController:
[ValidateAntiForgeryToken]
public async Task<IActionResult> MarkDone(Guid id)
{
    if (id == Guid.Empty)
    {
        return RedirectToAction("Index");
    }

    var successful = await _todoItemService.MarkDoneAsync(id);
    if (!successful)
    {
        return BadRequest("Could not mark item as done.");
    }

    return RedirectToAction("Index");
}
Let’s step through each line of this action method. First, the method accepts a Guid parameter called id in the method signature. Unlike the AddItem action, which used a model and model binding/validation, the id parameter is very simple. If the incoming request data includes a field called id, ASP.NET Core will try to parse it as a guid. This works because the hidden element you added to the checkbox form is named id.
Since you aren’t using model binding, there’s no ModelState to check for validity. Instead, you can check the guid value directly to make sure it’s valid. If for some reason the id parameter in the request was missing or couldn’t be parsed as a guid, id will have a value of Guid.Empty. If that’s the case, the action tells the browser to redirect to /Todo/Index and refresh the page.
Next, the controller needs to call the service layer to update the database. This will be handled by a new method called MarkDoneAsync on the ITodoItemService interface, which will return true or false depending on whether the update succeeded:
var successful = await _todoItemService.MarkDoneAsync(id);
if (!successful)
{
    return BadRequest("Could not mark item as done.");
}
Finally, if everything looks good, the browser is redirected to the /Todo/Index action and the page is refreshed.
With the view and controller updated, all that’s left is adding the missing service method.
Add a service method
First, add MarkDoneAsync to the interface definition:
Services/ITodoItemService.cs
Task<bool> MarkDoneAsync(Guid id);
Then, add the concrete implementation to the TodoItemService:
Services/TodoItemService.cs
public async Task<bool> MarkDoneAsync(Guid id)
{
    var item = await _context.Items
        .Where(x => x.Id == id)
        .SingleOrDefaultAsync();

    if (item == null) return false;

    item.IsDone = true;

    var saveResult = await _context.SaveChangesAsync();
    return saveResult == 1; // One entity should have been updated
}
This method uses Entity Framework Core and Where() to find an item by ID in the database. The SingleOrDefaultAsync() method will either return the item or null if it couldn’t be found.
Once you’re sure that item isn’t null, it’s a simple matter of setting the IsDone property:
item.IsDone = true;
Changing the property only affects the local copy of the item until SaveChangesAsync() is called to persist the change back to the database. SaveChangesAsync() returns a number that indicates how many entities were updated during the save operation. In this case, it’ll either be 1 (the item was updated) or 0 (something went wrong).
Try it out
Run the application and try checking some items off the list. Refresh the page and they’ll disappear completely, because of the Where() filter in the GetIncompleteItemsAsync() method.
Right now, the application contains a single, shared to-do list. It’d be even more useful if it kept track of individual to-do lists for each user. In the next chapter, you’ll add login and security features to the project.