Related Books


Books / Raspberry Pi Programming Workshop / Chapter 2
Introduction to Programming
I would love to teach everyone to program in a day. That is not possible. I can show you some cool things you can do with programming. I can tell you how to learn more. You will have to do more on your own, practice, find a project that you can work on during your spare time, search for solutions, read code and tutorials, communicate with other programmers, ask questions, and have fun making new things.
Why should you use the Raspberry Pi for programming? I see lots of web developers use these shiny, expensive laptops. They design engaging interactive websites. They put them out on the Internet and then the result does not work for the majority of computers. They write it off and say, “Oh, well. It works for me.” That attitude does not change the situation they face. Many people cannot use their website. Had they developed on a low spec Raspberry Pi, the result should work on any computer or phone.
I will be using Python for these examples. Python is an easy-to-read, beginner programming language that can do almost anything with extra libraries. Libraries expand the functionality of a language by adding more functions, APIs (application program interfaces), and features.
NOTE: While learning, try to debug and follow all errors. The error should give line numbers. Check that line, if it leads to another function, check that function. Google the error if that does not help. Replace the file with the original if all else fails.
I will be using many terminal commands. It is dangerous to take the word of a stranger on the Internet when dealing with terminal commands. GNU/Linux has some built in documentation. You will need the Internet to find most information and tutorials, but the built-in documentation helps as a quick reference. You can use the ‘‘man’’ command to look up information about a command. To find information on using the ‘‘ls’’ command, try this in a terminal:
man ls
You can also read the manual for the manual with this command:
man man
Python has even more built in documentation than its man page. Open the interactive Python prompt with this command:
python
Now we can access the interactive help menu with this command:
help()
Quit the interactive help menu with this command:
quit
Quit interactive Python with this function:
quit()
Hello, world!
Hello, world! is traditionally the first program that anyone writes when tackling a new programming language. It is a simple program that says, “Hello,” to the world.
Relevant XKCD:
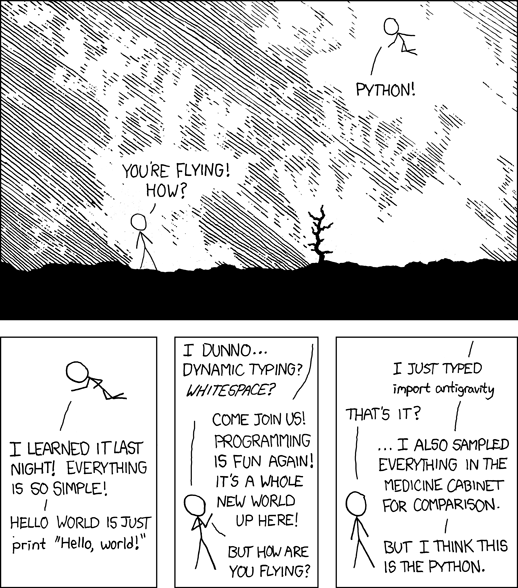
NOTICE: This comic is dated and uses the old way to use print. Older versions of Python 2 used this format. Later versions of Python 2 use the new way as well as the old way. It is good to be aware of this, as many old examples still exist on the Internet.
In a terminal, type this command:
python
The cursor will now follow three greater than symbols »>. Type this command and we will be on our way:
print("Hello, world!")
If you read ‘‘Hello, world!’’ back from the computer, you succeeded. Pat yourself on the back and feel good about writing your first line of Python code. Quit interactive Python with this function:
quit()
We will do this same exercise in a different way. Open up a text editor from the terminal using the following command line. Leafpad and nano come installed with Raspbian. Nano is a terminal application so we will use that. We will also create a new file and give it a filename as we open it.
nano hello.py
Write out the print function again.
print("Hello, world!")
Exit by holding CTRL and pressing X. It asks if you want to save changes. Press Y and enter. You have now saved your program as a text file.
We will call this new text file into Python with this quick command:
python hello.py
You wrote your first program! Now, we will get to the good stuff.
Infinite Loops
I believe that infinite loops are one of the most exciting concepts in computer science. A ‘‘normal’’ programming book will hold out on this information until much later. I like to give away some spoilers.
We can copy our hello.py file from earlier to a new file with this command:
cp hello.py helloloop.py
We can open the new file with nano using this command:
nano helloloop.py
Now, add a new line to the beginning of the file that reads:
while True:
Put a tab in front of our earlier work so that the file looks like this:
while True:
	print("Hello, world!")
Exit by holding CTRL and pressing X. It asks if you want to save changes. Press Y and enter. You have now saved your program as a text file.
When we run this file, it will not stop printing ‘‘Hello, world!’’ until we force the program to close. To close the program, hold CTRL and press C. You could also close the terminal window, but we will need it again in a second. Run the new program with this command:
python helloloop.py
Remember to close it by holding CTRL and pressing C once you have had enough! That was your first loop! Loops are great for when you want to repeat something without having to start it each time. Our loop is much easier to write than the alternative:
print("Hello, world!")
print("Hello, world!")
print("Hello, world!")
print("Hello, world!")
print("Hello, world!")
print("Hello, world!")
print("Hello, world!")
print("Hello, world!")
Programming may seem like a lot of typing at first, but it allows you to type less in the long run.
GPIO: General Purpose Input/Output
If you have ever used an Arduino, you are already familiar with input/output pins. These can be programmed and linked to other components to build custom circuits. The Pi A & B have 26 pins. The Pi A+, B+, 2 B, Zero, 3 B, 3 B+, and 4 B have 40 pins. The Pi Compute Module has 200 pins.
| Models A & B | Models A+, B+, 2 B, Zero, 3 B, 3 B+, and 4 B |
|---|---|
 |
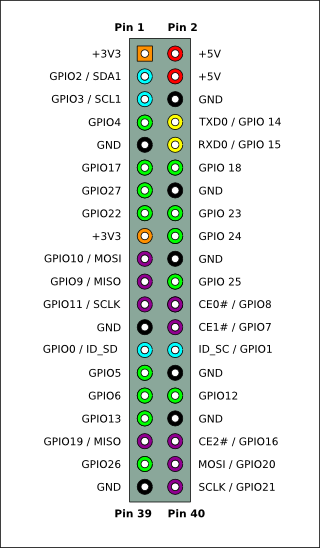 |
These are programmable with Python. I will do a simple demonstration of this and continue onward. If circuitry and robotics is a passion of yours, dig in.
I will use two wires and an LED light with two pins, one short and one long. The Pi’s third pin from the corner is a GROUND. One wire will connect the LED’s short pin to the Pi’s GROUND. The other wire will connect the long pin to the pin labeled GPIO7 in the diagram above (the thirteenth pin down on the right).
We will light up the bulb using two methods: once with Python and once with bash. Bash is a command line shell. Getting to know bash is a great way for students to start digging into the most basic elements of programming, so I wanted to introduce it a little bit here.
Setup the modules you will need by running the following on the command line. Modules for Python expand the functionality of the programming language. Some modules are associated with Python by default and many others are available to download. All of your modules can be listed with the Python function ‘‘help(‘modules’)’’ from within interactive Python. In this example, we will use the RPIO module, which connects Python with the pins of the Pi, and the time module, which allows Python to track the passage of time.
sudo apt-get update

sudo apt-get install -y python-dev python-rpi.gpio
We will write a Python script using nano again. We will call the file LED7.
nano LED7.py
Once RPIO is installed, this module can be pulled into any Python script with
import as shown here.
import RPi.GPIO as GPIO
import time

# Choose which GPIO pin to use
led = 7

# set up GPIO as output
GPIO.setmode(GPIO.BCM)
GPIO.setup(led, GPIO.OUT)

# set pin GPIO7 to be "on," turning on the light
GPIO.output(led, 1)

# delays for 1 second, keeping the light on briefly
time.sleep(1)

# set pin GPIO7 to be "off," turning off the light
GPIO.output(led, 0)

# delays for 1 second, keeping the light off briefly
time.sleep(1)
Exit by holding CTRL and pressing X. It asks if you want to save changes. Press Y and enter. You have now saved your program as a text file.
Since Python is controlling hardware with this script, it will need root privileges. Use this command to run the script:
sudo python3 LED7.py
The light should turn on and off.
Another way to approach this is to use bash. Bash is the default shell for the command line. This is possible because everything in the system is treated like a file, including hardware (like the pins) or other devices. This usage of bash is more complex than the RPIO method in pythod, but it is also very precise. We will not focus on the code here, just be aware that it can be done if students want to manipulate any of the hardware from the command line.
sudo echo "7" > /sys/class/gpio/export

sudo echo "out" > /sys/class/gpio/gpio7/direction

sudo echo "1" > /sys/class/gpio/gpio7/value

sudo echo "0" > /sys/class/gpio/gpio7/value
Echo is a self-explanatory command. It repeats back what you give it. The greater than symbol ‘’>’’ sends the output of the previous command to overwrite a file. In this case, the file is actually hardware instead of a document. This is a unique aspect to Unix and GNU/Linux.
If you replace the LED with a motor, the same code can control a robot!
For more information about projects using the Raspberry Pi’s GPIO, check out these links:
- https://www.raspberrypi.org/learning/python-quick-reaction-game/worksheet/
- https://pythonhosted.org/RPIO/
- https://pypi.python.org/pypi/RPi.GPIO
- http://elinux.org/RPi_Tutorial_Easy_GPIO_Hardware_%26_Software
- http://log.liminastudio.com/writing/tutorials/tutorial-how-to-use-your-raspberry-pi-like-an-arduino
Python and pygame
Raspbian comes bundled with some games written in Python. I like to use these games as a starting point when teaching kids about programming in Python. The programs are small enough that you can read them in one sitting, and they are very well commented. Comments are lines that start with ‘’#’’ and are ignored by the computer.
We will pick a game, demonstrate how it works, read code, make a change, and test. This is a great exercise to do with students. However, changing variables is a backwards way to learn a language.
Pygame is a module that can be used to write games and modify them. Python, the pygame module, and games written with pygame can be installed on GNU/Linux, Mac, and Windows. You do not need a Raspberry Pi for this section.
I would suggest downloading Python version 2.7 to maximize compatibility with pygame.
- GNU/Linux Installation Instructions
Python is probably already installed on your GNU/Linux system. You can check that Python 2.7 is installed by running this command:
python -V
Pygame is installed by default on Raspbian. If you are on a debian based system, you can install pygame with this command:
sudo apt-get update && sudo apt-get install -y python-pygame
Since pygame depends on Python, the correct version of Python would also be installed with this command.
- Mac Installation Instructions
Download Python and pygame. Install Python and then install pygame. Note: I am purposefully linking to an older release of Python 2.7.
- Windows Installation Instructions
The easiest way to install Python (and many other common programs) for Windows is through ninite. Ninite is a website that allows you to install many programs at once. The ninite download program can be left on your system and used as an updater in the future.
We also need the pygame module. Install Python and then install pygame.
You can download the code we will start with from:
http://inventwithpython.com/makinggames_src.zip
These games written with pygame originated from the Invent with Python website. You can get a free book that accompanies the games.
There are hundreds of free games that you can modify from the pygame webpage.
Check out the pygame tutorials for more information.
Beginner: Download Al’s games from http://inventwithpython.com/makinggames_src.zip Unzip them and play a bit. Then, open a file that ends in .py in a text editor or IDLE, change variables, save it, and test it out by playing the game again.
Intermediate: Change a game from inventwithpython, http://www.pygame.org/, or https://pyweek.org/ into something that looks completely different from the original with different game mechanics. Since you’re making bigger changes, save your work with a new file name.
A simple example of this is TheGameThatMarioBeat2.py based on code from wormy.py The Game That Mario Beat 2
Mastery: Build your own game starting with a blank document using python and pygame using the internal documentation for python and pygame and the python and pygame websites.
- Fat Math Three is a well made, choose-your-own-adventure with a math game mechanic made for PyWeek.
- Endgame: Singularity is a simulation game in written with python, pygame, and numpy that explores the perspective of an AI. Source code is on github.
- Video tutorial series from TheNewBoston
Photo Editing
To add your own images to games, you need to use a photo editor. GIMP (the GNU Image Manipulation Program) is free and open source and works on the Raspberry Pi 3, GNU/Linux, Mac, and Windows.
The default layout has three windows (tools, image, and layers) and can be confusing to young kids. On the menu bar, choose Window and “Single-Window Mode” to make it easier to navigate.
Beginner: To familiarize yourself with it, take an image from PyGame or Ren’Py and make some changes to it. Export it into the same format and test the python script to make sure it works.
Intermediate: Use a picture from the Internet. If you are planning on using the image for a public project, make sure you have the right to reuse the image. Bring the image into GIMP. In the layers panel, right click on the image layer and choose “Add Alpha Channel” which adds the ability to have a transparent background. Crop the character, sprite, or object so that everything else is a checkerboard pattern. Save it as a png file. Try using this png with python in a pygame activity. You could also take a photo of yourself with a camera, open the photo with GIMP, crop your body or face so that the background is transparent, save the image, and test with python.
Minecraft: Pi Edition
Minecraft is the best selling game of all time. Mojang (the original developer of Minecraft) wrote a version specifically for the Raspberry Pi. Mojang gave it alway for free in hopes of teaching youth programming. Python and java modules accompany the game. Minecraft: Pi Edition and the python and java modules are already installed on Raspbian.
NOTE: Minecraft: Pi Edition only works for the Raspberry Pi’s CPU architecture ARM. Since the game itself is not open source, it cannot be recompiled for other computers. To work with Minecraft: Pi Edition on a 32 or 64 bit CPU architecture, you have to emulate a Raspberry Pi with something like QEMU (more on that in the projects section).
Start up Minecraft: Pi Edition.
NOTE: Do not make the game full-screen. Children tend to do this first thing. The mouse will not work optimally, and it is not meant to be full-screen. It is meant to take up some of the screen while you code next to it.
Create a world and start to play. Notice the three cartesian coordinates in the top left corner of the screen. These coordinates give numbers to the x, y, and z axis of the game world.
Open up leafpad to code in a text file, or type ‘‘python’’ into the terminal to code in an interactive Python shell, and we will write a program for Minecraft.
# import the modules
from mcpi import block
from mcpi import minecraft

# First make a connection between Python and the game
mc = minecraft.Minecraft.create()

# mc is a object we can call to control the world.  Let's say, ''Hello!''
mc.postToChat("Hello, Minecraft World!")

# Now add a block.  You could read the coordinates in the top left, and choose
# numbers near those.
mc.setBlock(-7, 10,0 , block.STONE)

# Try to spell a word in the sky.  It is very easy with copy and paste.
mc.setBlock(-7, 9, 0, block.STONE)
mc.setBlock(-7, 8, 0, block.STONE)
mc.setBlock(-7, 7, 0, block.STONE)
mc.setBlock(-7, 6, 0, block.STONE)
mc.setBlock(-7, 9, 1, block.STONE)
mc.setBlock(-7, 10, 2, block.STONE)
mc.setBlock(-7, 9, 3, block.STONE)
mc.setBlock(-7, 10, 4 , block.STONE)
mc.setBlock(-7, 9, 4, block.STONE)
mc.setBlock(-7, 8, 4, block.STONE)
mc.setBlock(-7, 7, 4, block.STONE)
mc.setBlock(-7, 6, 4, block.STONE)
# I spelled the letter M.  Try to write your name and impress your friends.
If you typed this into a file, save it as minecrafthack.py and run it with ‘‘python minecrafthack.py’’
Something is not right. We will have to fix it. See if you can fix my capital M.
See if you can write your entire name.
There are other projects that can be found elsewhere like the interactive photo booth, giant clock, and more.
This is only the beginning of what can be done. Check out these links for more Minecraft projects with the pi.
- Raspberry Pi page about Minecraft: Pi Edition
- Minecraft Pi api reference
- An overview about Minecraft Pi programming with links
- How to connect Python to regular Minecraft using bukkit server
- How to connect Python to regular Minecraft using canary server
- Getting started with Minecraft: Pi
- Working clock project for Minecraft Pi
- Other projects from that programmer/author Martin
- Minecraft: Pi Edition home page - the api has been updated since then
- Book - Adventures in Minecraft
- Book - Learn to Program with Minecraft: Transform Your World with the Power of Python
Looping GPIO with Minecraft
Programming Python, loops, GPIO, and Minecraft is all cool, but can we combine them? Yes. Here are two example scripts:
Processing
Processing is a great introductory programming language that can make generative art, interactive art, and drawing. https://processing.org/
Processing is a programming language about making visual art. Processing is geared towards making interactive drawings with code. It works on Android, iOS, GNU/Linux, Mac, and Windows. Drawings can be generated from mouse movements, music frequencies, GPIO inputs, or web apis. Processing is one of the easiest languages to learn. Processing uses java syntax by default. You can also use javascript live on webpages through p5.js. Python syntax can also be used if enabled.
To install processing on the Raspberry Pi, run these two commands:
wget https://processing.org/download/install-arm.sh

sudo sh install-arm.sh
If you want to use P3D, this command will fix a bug in the latest versions of Raspbian (at the time of this writing):
sudo aptitude remove libgles1-mesa libgles2-mesa
These are scripts I have made or modified using Processing:

Generative art using randomly moving triangles of random sizes. These triangles have a calming and mesmerizing effect on the viewer. As this script continues, the result becomes more unique and beautiful. Run for an hour to multiple days. Hold ‘s’ to save images.

JitterRotate is an experiment with semantic errors. Generative art using randomly moving triangles of random sizes, colors, rotation, and transparency. This sketch only takes about 30 seconds to peak. Hold ‘s’ to save images.

Draw with squares, ellipses, and triangles. Shapes have random fill color, stroke color, stroke width, and size. WARNING: Contains flashing lights. Hold ‘s’ to save images.
The code for my processing examples can be found at my Processing github.
To learn more, check out the Resources section and my page of examples.
Note: Java is licensed under the Oracle Binary Code License which differs from many of the other licenses discussed around the Raspberry Pi.
Computer Vision: opencv-python and simplecv
I will not demonstrate Computer Vision, but I have to mention it. ‘‘opencv’’ allows you to program the sense of sight. Analyze photos, video, or live feeds and make decisions based on what you “see.” It is a very powerful module for Python. ‘‘simplecv’’ makes it much easier to write programs. OpenCV is a framework that works on top of C++, Java or Python.
To learn more, check out the Resources section.