Related Books


Books / Ruby for Beginners / Chapter 21
Gems
Until now all of our experiments were pretty straightforward. However, with two-dimensional arrays you may have been noticed the lack of visual cues. For example, array for “Sea battle” game doesn’t look super-intuitive in console:
$ irb
> Array.new(10) { Array.new(10) }
 => [[nil, nil, nil, nil, nil, nil, nil, nil, nil, nil], [nil, nil, nil, nil, nil, nil, nil, nil, nil, nil], [nil, nil, nil, nil, nil, nil, nil, nil, nil, nil], [nil, nil, nil, nil, nil, nil, nil, nil, nil, nil], [nil, nil, nil, nil, nil, nil, nil, nil, nil, nil], [nil, nil, nil, nil, nil, nil, nil, nil, nil, nil], [nil, nil, nil, nil, nil, nil, nil, nil, nil, nil], [nil, nil, nil, nil, nil, nil, nil, nil, nil, nil], [nil, nil, nil, nil, nil, nil, nil, nil, nil, nil], [nil, nil, nil, nil, nil, nil, nil, nil, nil, nil]]
We still can understand what it is, but can you quickly find out where is fifth row and second column? You need to look close enough.
Ruby language designers knew that it’s impossible to create something that everyone likes. Instead of having fixed set of tools, it was decided to introduce extensions, so everyone’s able to add something new to the language.
Software developers from around the world took advantage of this opportunity and built amazing ecosystem of extensions - gems. You may have already heard about gems, especially if you know how to write code in other languages (they also called libraries or packets). And tools are similar. For example, there is “gem” shell command in Ruby, and “npm” (Node Packet Manager) shell command in Node.JS.
Word “gem” sounds more Ruby-ish than just a “packet”, but the meaning is the same: something that you can install and reuse if you know its name. There are few ways of installing gems, we’ll use “gem” shell command for now, which is a part of default Ruby language toolset, along with other commands like “irb” or “ruby”.
Let’s install our first gem:
$ gem install cowsay
“Cowsay” gem just prints a cow with a text bubble. Find gem documentation by searching Internet with “cowsay gem documentation”. Gem adds “cowsay” command to your shell, and you should be able to run it:
$ cowsay 'Hey, Joe!'
 ___________
| Hey, Joe! |
 -----------
      \   ^__^
       \  (oo)\_______
          (__)\       )\/\
              ||----w |
              ||     ||
There are lots of gems for every occasion. Actually, that’s what Ruby language is famous for: whatever you do, there is a high chance that there is a gem for that.
Gem doesn’t necessarily adds a shell command. Often gems are reusable pieces of code you can attach to your program by using “require” keyword with gem name as parameter, like: require "something".
For our next chapters we need to install one useful gem you will love. This gem is quite popular, and kinda unofficial standard in Ruby ecosystem. It happens quite often: independent developers make gems and the crowd loves it so much, and it becomes an industry standard. And sometimes functionality from popular gems go into Ruby language itself!
Our gem name is “pry”. There is a page on GitHub https://github.com/pry/pry - remember to always look at official docs before you install something: independent developers from all parts of the world work on gems, and lifecycle of some gems can be unpredictable. It can be obsolete, deprecated, or just abandoned. You should always know what you install and what are you going to use in your project.
Here is what official docs say about “pry”: “An IRB alternative and runtime developer console”. We’ll switch from the tool we already familiar with (“irb”) to the new one. Let’s do it now and see why it’s better:
$ gem install pry
...
$ pry
>
Well, command prompt looks similar. But let’s type array definition in “pry” and see what happens:
$ pry
> arr = [[0, 0, 1], [nil, 0, nil], [1, nil, 1]]
Do you see code highlighting? By default numbers are highlighted in blue, and nils with cyan. Is that it? Almost, and actually, this detail is quite important.
You’re going to work with large amounts of data, and do it on a daily basis. So, multiply this tiny improvement by amount of data human can handle in a day, and then multiple it by the number of days you’re going to use Ruby (hopefully you’ll be happy with the language for the next 5-10 years).
The second detail is configuration. And here is where things go little bit unexpected. Gem is actually extension for Ruby language. But gems may have their own extensions too! And we’re going to install extension for better output formatting. In other words, information you see on your screen is going to be even more awesome. Let’s install “awesome print”:
gem install awesome_print
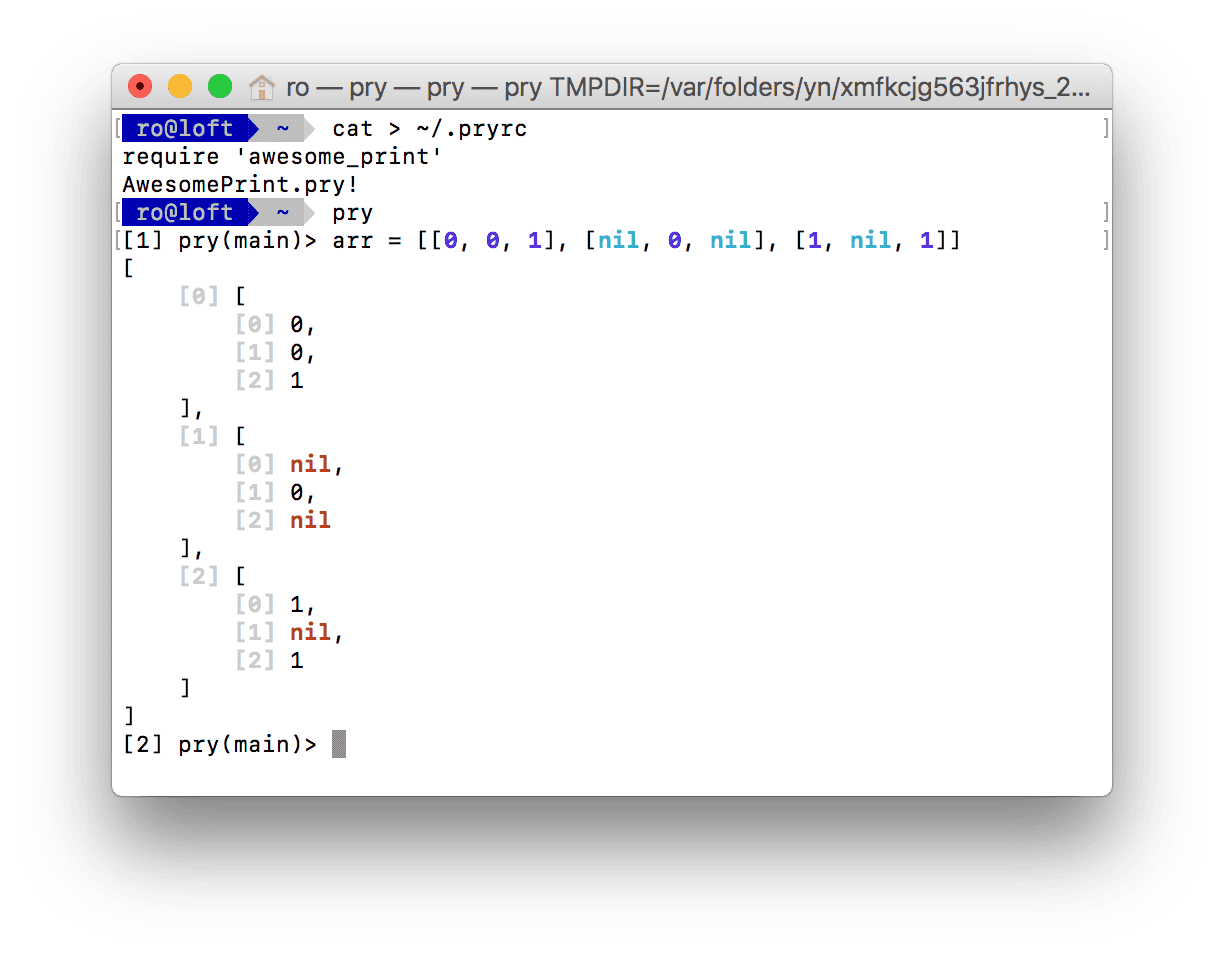
This gem doesn’t configure itself or adds any commands while being installed, so we need to take care of it and connect it to “pry”. There are details on how you can do that in official documentation, but the bottom line is to update “.pryrc” file located in your home directory. You can do it with any code editor or by running the following sequence in your shell:
$ cat > ~/.pryrc
require 'awesome_print'
AwesomePrint.pry!
^D
On the first line we just type “cat > ~/.pryrc”. You can copy next two lines from this book (if you’re reading electronic version of the book, copy lines one by one, so you paste without line numbers). And on line 4 you’ll need to press combination of Ctrl+D: it’s special terminal sequence to let your shell know about the end of your input. This is how you can update any file in your filesystem. Basically, we added only two lines to ~/.pryrc (line 2 and 3 in the listing above).
But where did these two lines come from and do I need to remember those? These two lines are not magic, and you can find them in official docs, just search Internet for “pry gem docs”, and scroll down to “Pry integration” section. There is something going on behind the scenes while these two lines are being executed, but don’t worry about it now.
You need to connect “awesome print” to “pry” only once on your computer.
Finally, let’s run “pry” and type array definition we used for tic-tac-toe game:
$ pry
> arr = [[0, 0, 1], [nil, 0, nil], [1, nil, 1]]
[
    [0] [
        [0] 0,
        [1] 0,
        [2] 1
    ],
    [1] [
        [0] nil,
        [1] 0,
        [2] nil
    ],
    [2] [
        [0] 1,
        [1] nil,
        [2] 1
    ]
]
Wow, it’s not just improved formatting, but both code and result are highlighted in colors!
 Depending on your settings, your color scheme can look different. With “pry” and “awesome print” it’s so much easier to understand your programs and REPL snippets. From the picture above you can see indexes of rows and columns. For example, if we need to reach the center of this two-dimensional array (
0 value of second row and second column), we need to type “arr[1][1]”.
Compare this output to default IRB we had before:
$ irb
> arr = [[0, 0, 1], [nil, 0, nil], [1, nil, 1]]
 => [[0, 0, 1], [nil, 0, nil], [1, nil, 1]]
And one more thing: one of the most powerful usages of “pry” is using it with a Ruby debugger. We’ll cover this topic later in this book.
Exercise Define “Sea battle” (10 by 10) array in “pry” and see how it looks. Set the following cells to value of 1, 2, and 3 respectively: 1) third row, third column 2) fifth row, fourth column 3) fourth row, fifth column. Look at the resulting array in “pry”.