Related Books


Books / Ruby for Beginners / Chapter 41
Docker, crash course
In our last chapter, we touched on the subject of virtualization. It’s worth taking a closer look into basic concepts. To date, there are three main approaches to virtualization that any programmer should be familiar with.
First one is about “classic” virtualization when you have two operating systems - host and guest. For example, your host operating system is Windows, and you want to run Linux inside Windows. In this case you can take advantage of solutions like VirtualBox (free of charge) or VMWare Workstation (has more features, but there is no free version). Here is how it looks like:
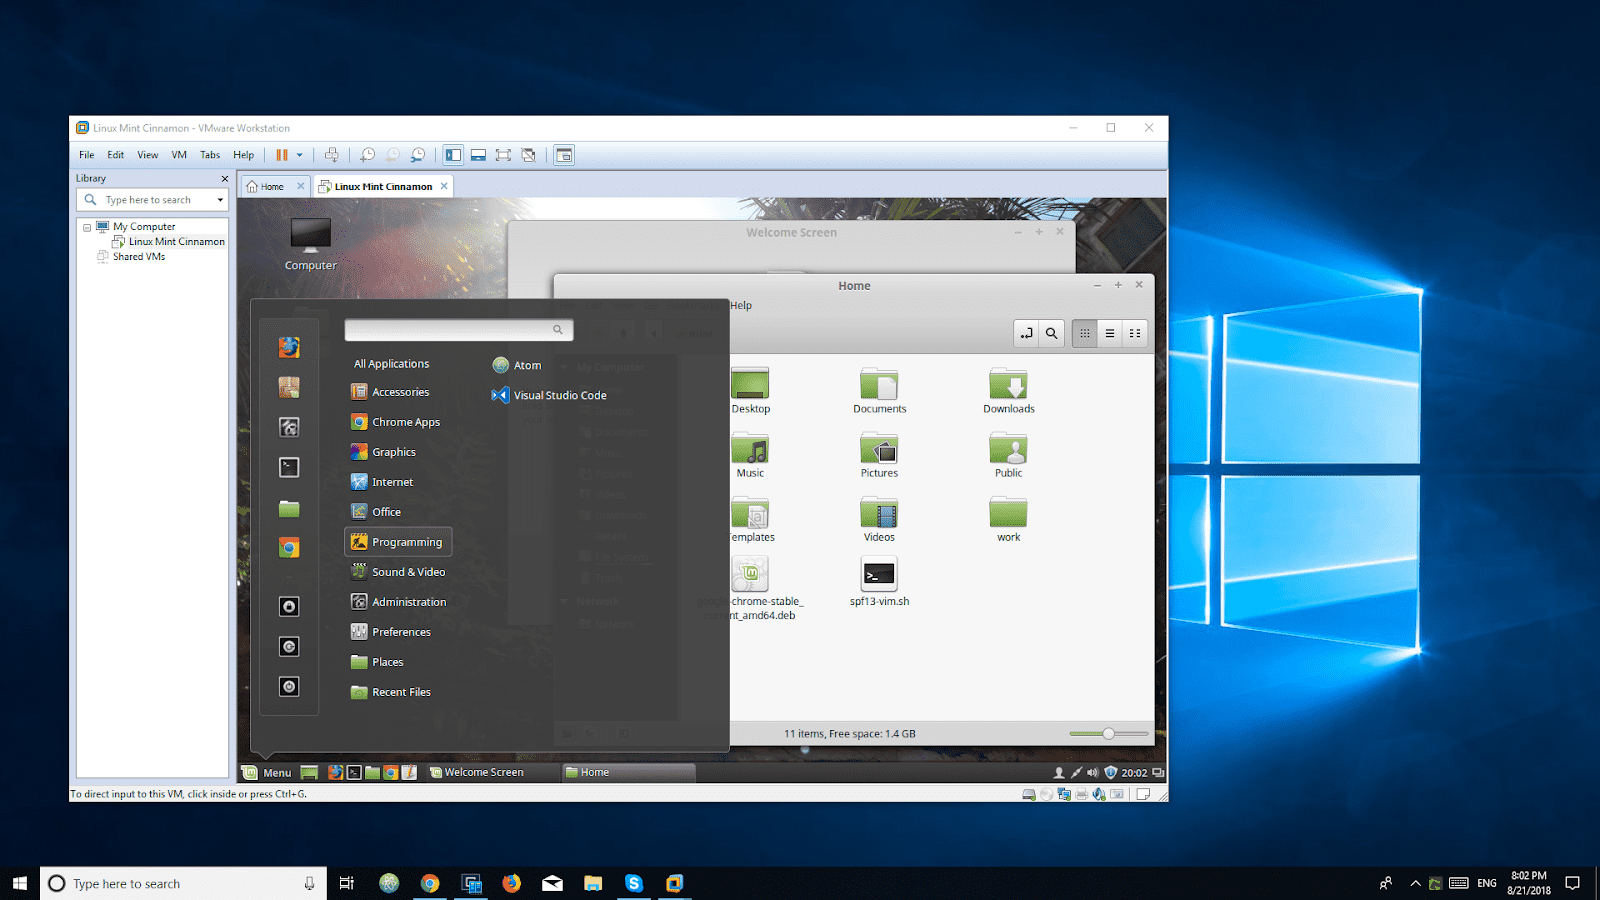
Pros of this approach is that operating systems “think” that they’re running on a stand-alone computer and work in very much the same way. Virtualization software allows you to see the actual UI of guest operating system, connect devices (USB, for example), play sound simultaneously on guest and host operating systems, and so on.
There are few downsides of such a way of virtualization. The first downside is the size of an image. Even Linux with UI shell requires few gigabytes on a hard drive and at least 1 GB of RAM. The second downside is that because that it is hard to run multiple containers at the same time, system performance degrades and everything becomes very unresponsive and slow. And another downside is that often there is no command line utilities: when everything is controlled through UI, automation is hard.
Second approach to virtualization is to use tools like Vagrant. It allows you to run and provision containers with a file called “Vargrantfile”. There is a base image, and a list of steps that Vagrant need to go through to build the desired image. You can also specify shared folders and hide guest OS UI if you need.
It is little bit more flexible because of the scripting syntax available (which is, by the way, Ruby program!). Programmers can share their Vagrant files, most of the time these files are quite small, so sharing containers is easy, because base images are kept in central repository, and everyone can provision a system with certain flavor and certain set of pre-installed tools.
Vagrant works at the top of VirtualBox (or VMWare) and allows you to run any operating systems inside (including Windows). When it comes to Linux inside Vagrant, developers prefer to run without any UI shell: it saves memory and allows to keep multiple running containers at the same time.
Sometimes Vagrant is used as development environment operating system. You can configure shared folder which is available on both host and guest OS, so program execution is happening inside the container, and file changes are happening outside. For example, you can edit your programs in Windows, but run these programs in Linux.
Imagine it is your first day as a programmer, you’re getting new computer and instructions and it says:
Dear friend! Welcome to the team. We’re working on Project X, it is Ruby On Rails web application. You need to install and configure the following tools before you can start working on the project:
- MySQL, time burden is ~1 hour
- Ruby, Node.js, rvm, nvm, time burden is ~3 hours
- Redis (20 minutes)
- Git and related tools like git-lfs, ~1 hour
- Clone the latest code
- Run commands to seed the database
Every item in the list has its own instructions for a human. Where to go, where to download, which parameters you need to specify and so on. More professional team would provide you the better instructions, like:
Dear friend! Welcome to the team. We’re working on Project X, it is Ruby On Rails web application. So you can start you need to install Vagrant, download this Vagrantfile and run “vargant up”. It will take some time to provision guest OS, but it is going to happen automatically while you can read some manuals and enjoy your coffee. Once everything is done, you’ll see the app. If something goes wrong, we won’t put a blame on you, because we want to unify our development environment provisioning, it’s our standard for everyone on the team. We keep this Vagrant file in a good shape, so everyone has exactly the same experience!
Third approach (and the most commonly used) is virtualization through Docker. We’re already familiar with this approach a little bit. Docker allows to run lightweight containers which were made for virtualization purposes. For example, Linux Alpine is only 5 MB docker image. So on one machine you can run tens or even hundreds such lightweight containers.
While working with Docker it’s crucial to distinguish between “container” and “image”. Image is just a pattern, like a technical drawing, like a class in computer programming. Image itself is not a living organism, it just exists on the hard drive, or available remotely (through Docker Hub, for example). But container is instance that were made based on the image. So you can do the following operations with these two entities:
- with a container: you can
startandrun,stop, remove (rm), see the list of running containers withps(process status) - with an image: remove (
rmi- remove image), see the list of available images (“images” subcommand).
With having this picture in mind it is much easier to understand how Docker actually works. We do not intend to provide you a comprehensive Docker guide, but some essential commands are always useful. If you don’t know what Docker is, there is a very high change you’ll hear about it in the future:
- “
docker version” - show docker version - “
docker ps” - show the list of running containers (similar topsshell command) - “
docker ps -a” - show all containers (not only running containers) - “
docker images” - show the list of images - “
docker rm container_name” - remove container by name - “
docker rm f767ff6ecebf” - remove container by ID
Example of a command to start a container (we already did it in the previous chapter):
$ docker run -it --name xxx -p 4567:4567 ro31337/rubybook-save-the-world
Use “docker run --help” to get the help for “run” or any other command.
Also, here are some useful combinations of commands/parameters (used below):
- “
docker ps -a -q” - show all container identifiers in a quiet mode (list only). - “
docker images -q” - show all images identifier in a quiet mode (list only).
The most useful script to fix things up if you messed up something and want to start from scratch. These three commands will stop and remove all containers and images:
docker stop $(docker ps -a -q)
docker rm $(docker ps -a -q)
docker rmi $(docker images -q)