Related Books


Books / Ruby for Beginners / Chapter 4
Writing Your First Ruby Program
In this chapter
Text Editors
There are plenty of text editors out there for all operating systems: MacOS, Linux, Windows, but we’ll be discussing only code editors. What’s the difference between text editors and code editors? Well, often text editors do not save the file in plain format. For example, Microsoft Word saves the file along with meta information like formatting, font settings, images, and so on. But our code should be “plain”.
In other words, what we type on keyboard should be saved to file. You are already familiar with minimalistic code editor:
$ cat > app.rb
puts "Hello"
Type anything from your keyboard and press Ctrl+D (sometimes you need to press Ctrl+D twice). Everything you typed will be saved to app.rb. Note that contents of app.rb will be replaced in this case, and if you need to add data to the end of file, you need to use >> instead of just >.
Now you can see what was written to this file the following way:
$ cat app.rb
puts "Hello"
You can also look at hexadecimal output, followed by raw data:
$ cat app.rb | hexdump -C
00000000  70 75 74 73 20 22 48 65  6c 6c 6f 22 0a  |puts "Hello".|
0000000d
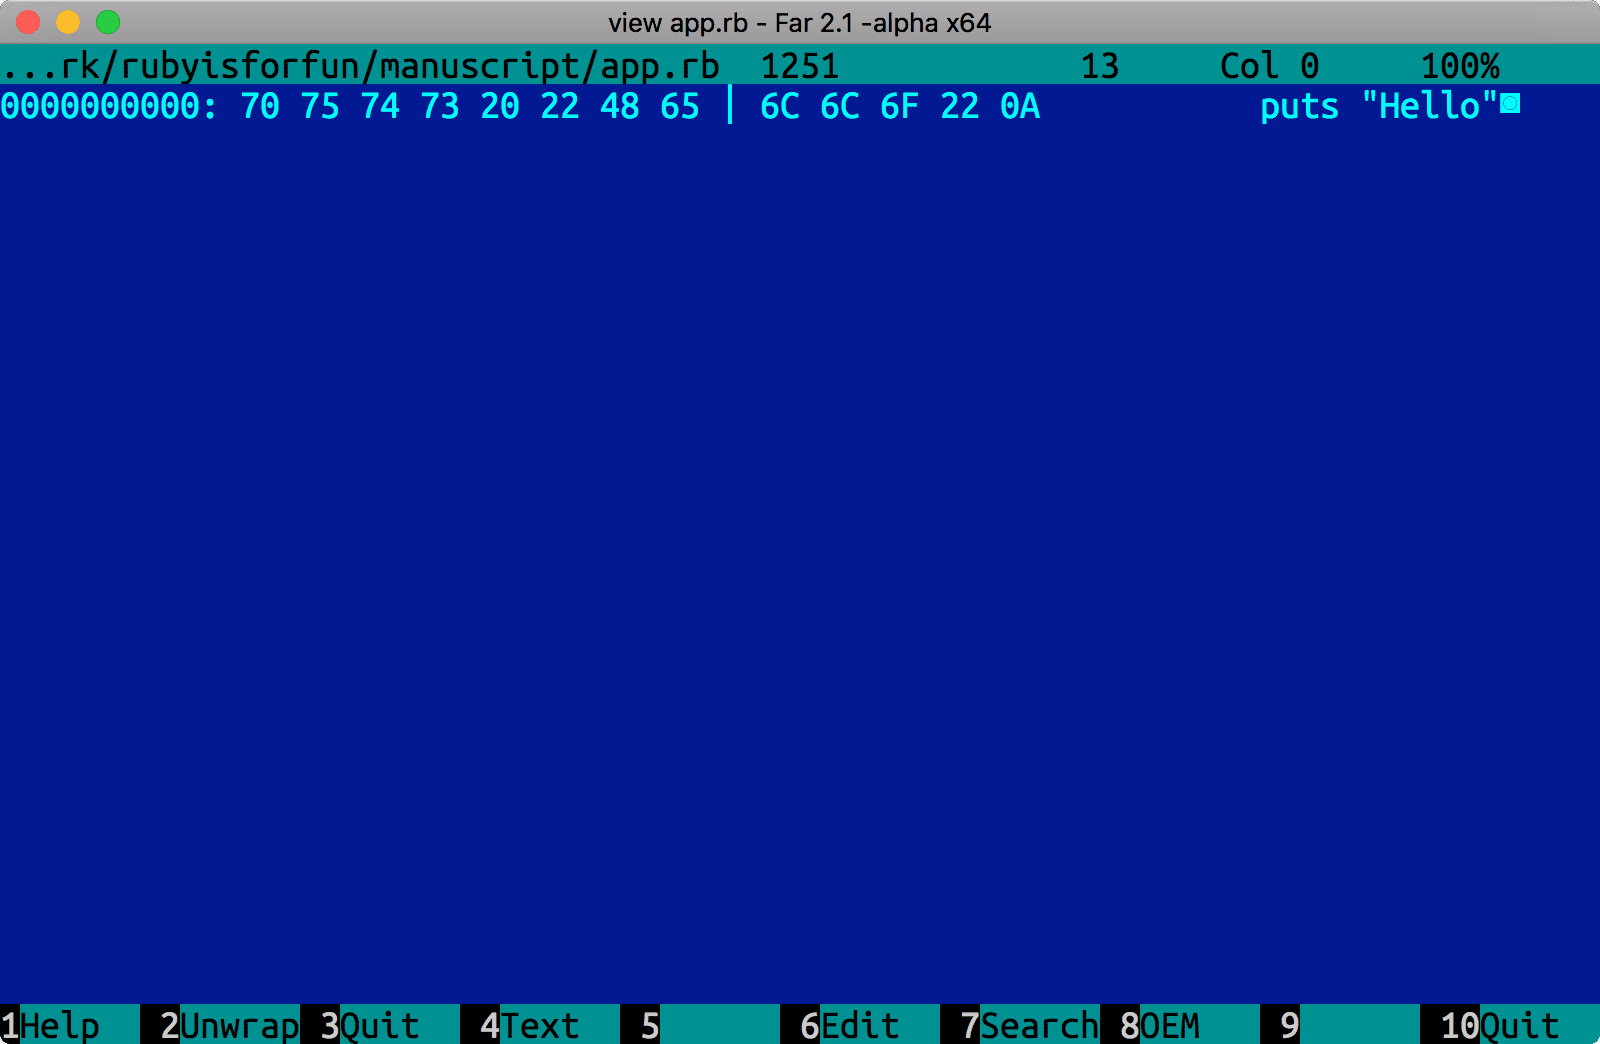
Similar output can be achieved via Far Manager: select the file, press F3, and then toggle hex view with F4:
But dealing with raw cat command is hard. Once you pressed Enter, there is no way to go back and make changes. You can’t use left and right arrow keys to navigate your program. And nobody is using cat command for writing programs (except maybe for the purpose of showing your excellence on interview).
There are many convenient code editors that were designed to edit code and help a programmer. If editor is simple, it can be used for both editing text and code. Nano is one of the easiest code/text editors and installed on almost any operating system (except Windows):
$ nano app.rb
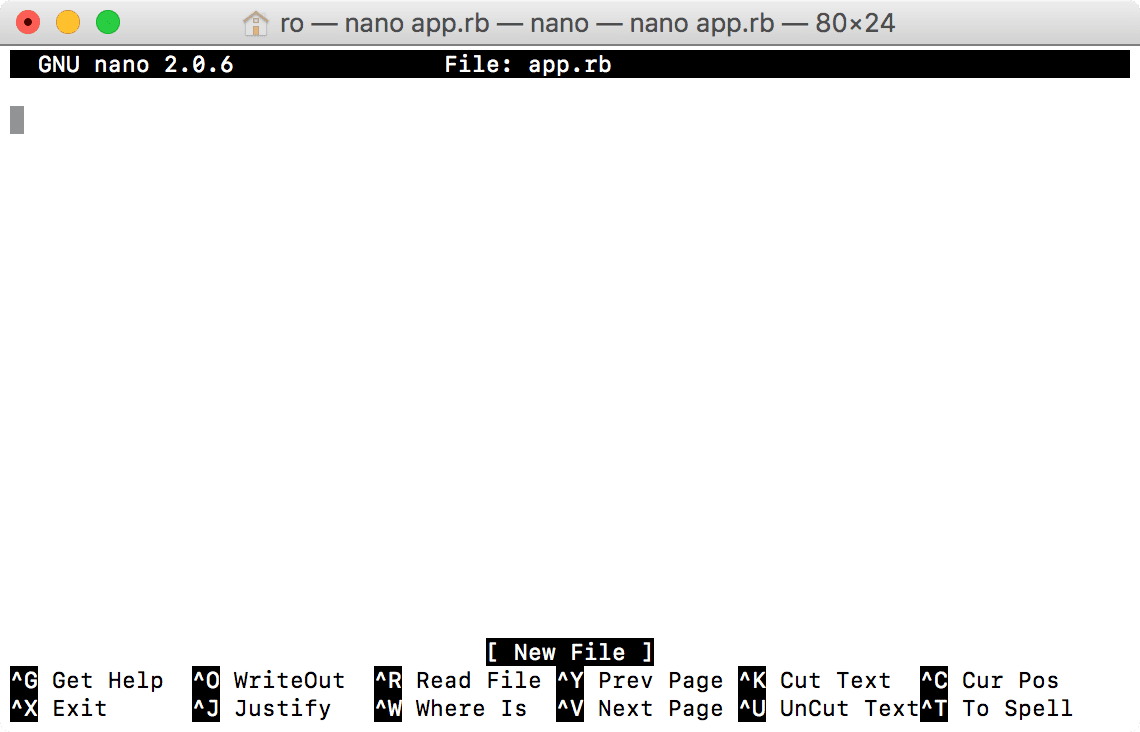
Footer has hints for available commands. For example, you can quit Nano by pressing Ctrl+X. There are much more advanced code editors like Vim and Emacs. Unfortunately, more advanced editors require more time to capture their functionality. You can find many “holy wars” on Internet about picking the right code editor. However, picking the right editor itself won’t help you acquiring computer language knowledge and programming skills. So it’s not very important which code editor you’ll be using.
Code editors like cat, nano, vim, emacs are all console editors. It means you run the command from your terminal and you don’t need to quit the terminal. It’s just a text on your screen. They’re quite useful when you work with remote machines. For example, you’ve logged in to the server and want to edit or view some files. You can do that without quitting the terminal.
But on your own machine you’re free to run any programs. And there are some code editors with graphic elements (like icons, different font styles, colors, and so on). Often these editors offer much more useful features (like live error checking, debugging, bookmarks) and make the life of a programmer much easier:
- VsCode, Visual Studio Code (don’t get confused with “Visual Studio”)
- RubyMine (requires subscription)
- Atom
- Sublime Text (fixed price)
RubyMine is not just a code editor, but Interactive Development Environment (IDE). Comprehensive tool for writing code with many features. Beginners can pick any of these editors. RubyMine offers great support on first steps, offering hints and tips. Other editors can be configured to offer this kind of support as well. However, we won’t be covering this topic in our book.
At the very beginning it’s worth using built-in code/text editor in your file manager. For example, you can create new file in Far Manager with Shift+F4 combination. At later steps feel free to use any code editor you like.
Also, you should be able to run your code editors from console:
$ code . # Will open VsCode for current directory
$ code ~/tmp # Will open VsCode for tmp directory
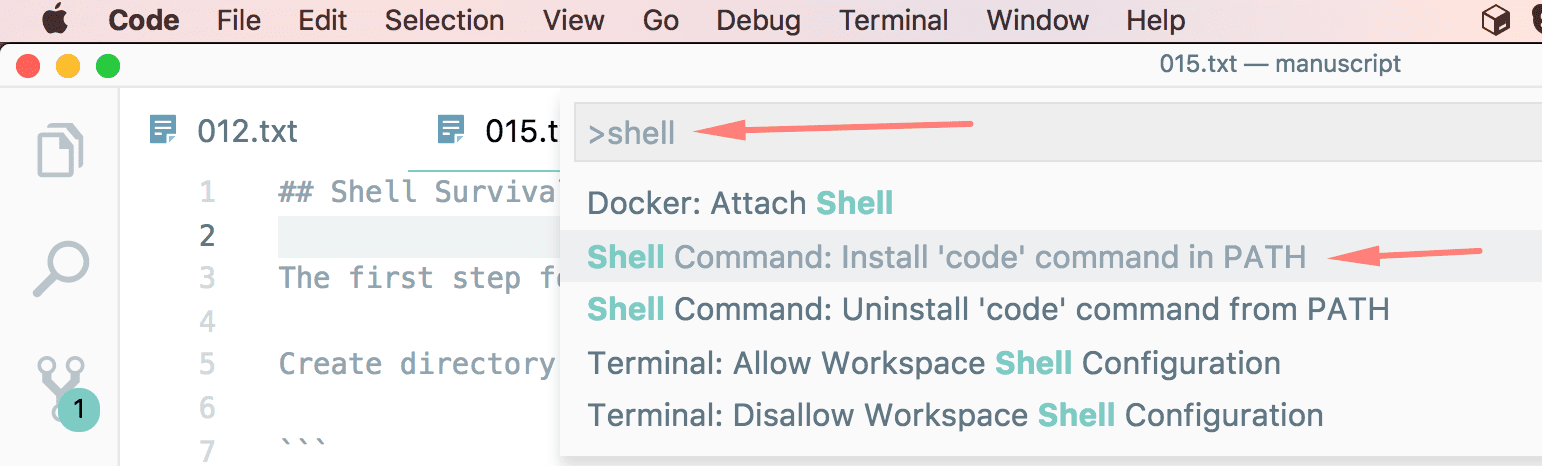
But sometimes you need to integrate editor with your shell. In VsCode it’s achievable with:
- Cmd+P combination (or Ctrl+P on Linux/Windows). It will open up navigation bar.
- Type
>in navigation bar to switch from file navigation to settings navigation. - Type
shelland select “Install code in path” menu item.
Atom editor can be configured the similar way, and can be executed from shell with atom command:
$ atom .
Exercise Install text editor (VsCode if you don’t have any preference). Try to create few files, like
1.txt,2.txt,3.txtand so on. In every file put the name of a person you know. Check your results with file manager. Delete files by using text editor UI.
Your First Ruby Program
In fact, your first program was 1+1. But this time let’s create a file with the name app.rb in your code editor with the following content:
puts "I would hug you, but I’m just a text"
Save the file and run Ruby interpreter with parameter app.rb:
$ ruby app.rb
I would hug you, but I’m just a text
You can also type ruby app.rb in your file manager, but when you press Enter, result will disappear! The subtlety is that program runs, “works off”, and quits. Control gets returned back to terminal or file manager. That’s why we do not see result on the screen when you run a program from file manager. But we can toggle the output screen (hide panels) by clicking Ctrl+O.
Congratulations! You’ve written something meaningful and saved your program to disk. Let’s improve it a little bit:
puts "I would hug you, but I’m just a text"
gets
In the program above we put a string on the screen and awaiting for the user input. Not just for any input, but for the whole string. Instruction gets stands for “get string”, and string is not a character, it’s a sequence of characters. That’s why we can type any letters and must press Enter. Or we can press Enter without typing any letters, in this case gets will return empty string (we’ll discuss return values later).
Run the program above and see what happens. If you run the program from file manager, result won’t “disappear”, because Ruby will be waiting for your input.
Now, let’s write a super simple program to learn a foreign language. Let’s take three random Spanish words: la pelota (ball), la puerta (door), la paz (peace). Imagine that you need to learn these words. How would you do that using a computer? One of the ways is to emulate a teacher. The computer will be the teacher and ask questions, and we will respond by spelling out the translation:
puts "How to translate la pelota?"
gets
puts "How to translate la puerta?"
gets
puts "How to translate la paz?"
gets
Try to run this program and… it works! Not very convenient, but it is something. There are no any answers, but we have questions. And result is great, only by using puts and gets we’ve just built something useful! If you’re playing guitar, the following program is demonstration of how you can use your Ruby knowledge to teach yourself notes on a first string on fretboard:
puts "Say a note on a 0 fret?" # The right answer is E
gets
puts "Say a note on a 1st fret?" # The right answer is F
gets
puts "Say a note on a 2nd fret?" # The right answer is F#
gets
puts "Say a note on a 3rd fret?" # G
gets
# ...
And so on up to 12th fret (E F F# G G# A A# B C C# D D# E).
Few notes about the listing above. As you may have already noticed, there are comments on some lines. Comments start with pound sign # (or “hash”). You can leave as many comments as you want, including comments on the new line. Comments will not affect behavior of your program.
Exercise 1 Finish the program above if you understand music theory. If you don’t, create a program to learn 10 foreign words. Try to add some comments to your program so you can understand it better.
Another note is about encoding. Since our program has only characters from A to Z, there is no need to specify any encoding. However, if you want to use Chinese, Russian, etc. characters, you have two options:
- If you’re on Windows, first line of your program should be
# encoding: cp866(“cp866” is the name of encoding). Also, the file should be saved using this encoding. - You don’t need to do anything if you’re on MacOS or Linux
In other words, you may face encoding problems on Windows. There will be other minor issues over the course of this book if you’re using Windows. There is a slim to zero chance to be a solid and productive Ruby programmer with this operating system (if you’re not using workarounds like virtual machines).
It doesn’t mean that Windows operating system sucks, not at all. The only reason is that some gem authors (gem is a small Ruby module, to be covered later in this book) do not test their code on Windows. Don’t blame them, because historically Ruby community and infrastructure evolved around free and open source tools, and Linux was the number one platform for Ruby. MacOS was the second, because it supports POSIX (Portable Operating System Interface), and all existing tools were somewhat compatible. Nobody was thinking about Windows, and to be honest Microsoft didn’t pay too much attention to open source when it all started.
So we highly recommend switching to a free operating system like Linux Mint Cinnamon or MacOS.
Exercise 2 If you’re running Windows, make an attempt to download and install VirtualBox (free) or VMWare Workstation (requires a license). With this software you’ll be able to run Linux inside of your Windows box. You will need to install Linux Mint Cinnamon 64-bit. Try to open up the terminal, install Midnight Commander, and write your first program in Linux. Do not expect immediate success, it might take a couple of tries the first time. If it doesn’t work, feel free to come back to this topic later. Important step here is to identify if your computer hardware supports virtualization. If not, you’ll probably need to install Linux instead of Windows (recommended) or upgrade your computer.